Documentation Library
Qubic System — product manuals and technical documentation.
76 manuals
·
6 categories
Software
Software applications and simulation guides
Hardware
Motion platform hardware manuals
Tutorials
Step-by-step guides and tutorials
Product Cards
Product specification sheets and datasheets
Miscellaneous
Wallpapers and additional resources
3D Prints
3D printable models for motion platforms
How to Check Your Machine's Revision Number?
Please locate the label on your equipment. The revision number is indicated by the red arrow.

Coming soon
Manuals in this category are being prepared and will be available shortly.
Software
Software applications and simulation guides


Hardware
Motion platform hardware manuals

QS-210 R2
Use this user manual if you have revision R2 with Push-Pull Connectors.
QS-210 R1
Use this user manual if you have revision R1.

QS-220 R4
Use this user manual if you have revision R4.
QS-220 R3
Use this user manual if you have revision R3.

QS-220 R2 and older
Use this user manual if you have second revision (R2) of the system or older model

QS-BT1
User manual for QS-BT1.

QS-CH1
User manual for QS-CH1.

QS-CH2
User manual for QS-CH2.

QS-DD-20
User manual for QS-DD-20.

QS-H13
User manual for QS-H13.

QS-Pivot
User manual for QS-Pivot.

QS-S25
User manual for QS-S25.

QS-S35
User manual for QS-S35.

QS-V20
User manual for QS-V20.
Tutorials
Step-by-step guides and tutorials
Section 1
Help and Tutorials
Landing page for the Help and Tutorials section with navigation tips and search guide.
Naming convention
Reference guide for naming conventions — ship motion names, force names, sustained vs. intermittent terminology.
Section 2
Action Center
Lists issues requiring attention: game integration installs, software/firmware updates, and error prompts.
Dashboards
Customizable vehicle dashboard system streaming telemetry-driven displays to USB screens, monitors, or smartphones.
Dashboard Editor
Create, clone, and edit custom QML-based vehicle dashboards using the built-in Dashboard Editor.
DIY Wind Simulator with RPM gauge
Build a DIY wind simulator with RPM gauge using Arduino or STM32 microcontroller boards.
Motion Post-Processing
Apply gain, linearity curves, and curvature offsets to fine-tune platform movement output.
OBD-II Simulator Configuration
Configure the built-in OBD-II simulator streaming virtual vehicle diagnostics to smartphones or tablets.
DIY Tactile Feedback System
Tactile Audio Based Feedback System driving bass shakers via a dedicated sound card.
Section 3
VR HeadWay
VR HeadWay motion compensation — subtracts platform movement from VR headset tracking.
How to check whether VR Headset works in 6DoF
Verify that your VR headset supports 6DoF tracking required for VR HeadWay.
ScreenWay
ScreenWay motion compensation for stationary monitors — adjusts in-game camera to counteract platform movement.
How to configure ScreenWay for EA Sports WRC
Set up ScreenWay motion compensation in EA Sports WRC using a vJoy virtual joystick.
How to configure ScreenWay for WRC Generations
Set up ScreenWay motion compensation in WRC Generations using a vJoy virtual joystick.
Section 4
How to configure UDP proxy/forwarder for Dirt Rally 2.0 and FanaLEDs
UDP proxy/forwarder setup for sharing Dirt Rally 2.0 telemetry between platform manager and FanaLEDs.
How to configure UDP proxy/forwarder for F1 2019 and FanaLab
UDP proxy/forwarder setup for sharing F1 2019 telemetry between platform manager and FanaLab.
How to configure UDP proxy/forwarder for F1 22 and SimHub
UDP proxy/forwarder setup for sharing F1 22-25 telemetry between platform manager and SimHub.
How to configure UDP proxy/forwarder for Forza Motorsport 7 and Dash Panel
UDP proxy/forwarder setup for sharing Forza Motorsport 7 telemetry between platform manager and Dash Panel.
How to configure UDP proxy/forwarder for WRC Generations and SimHub
UDP proxy/forwarder setup for sharing WRC Generations telemetry between platform manager and SimHub.
How to configure UDP proxy/forwarder for Wreckfest 2 and SimHub
UDP proxy/forwarder setup for sharing Wreckfest 2 telemetry between platform manager and SimHub.
How to configure UDP proxy/forwarder for Project Motor Racing and SimHub
UDP proxy/forwarder setup for sharing Project Motor Racing telemetry between platform manager and SimHub.
Section 5
How to configure ForceFeedback in 22 Racing Series
Recommended in-game force feedback settings for the QS-DD-20 steering wheel in 22 Racing Series.
How to use joystick to control the motion platform
Use a joystick or gamepad as a direct input device to control the motion platform.
How to configure X-Plane 11/12 on Linux
Run X-Plane 11/12 on Linux with motion platform support via network telemetry.
How to configure VR-Engage (MAK Technologies)
Integrate MAK Technologies VR-Engage military simulation with the motion platform.
How to configure Gran Turismo 7
Connect Gran Turismo 7 on PlayStation to a PC-controlled motion platform over local network.
How to configure MechWarrior 5 Mercenaries
Configure MechWarrior 5 Mercenaries motion platform support using SpaceMonkeyTP telemetry tool.
How to configure Dakar Desert Rally
Configure Dakar Desert Rally motion platform support using SpaceMonkeyTP telemetry tool.
How to configure iRacing LFE
Capture iRacing Low Frequency Effects audio via VB-CABLE for enhanced motion and bass shaker effects.
Section 6
How to backup all your profiles and quick tunes
Back up and restore all user profiles, quick tunes settings, custom motion scripts, and dashboards.
How to change profile image
Change the tile image of a custom profile by editing the profiles.ini file.
How to create desktop shortcut that launches the game or a profile
Create desktop shortcuts for launching games or activating specific motion profiles.
How to control platform manager from 3rd party software
Control the platform manager from third-party apps using the mosy:// URL protocol.
How to control platform manager from Stream Deck
Use Elgato Stream Deck to control platform manager with dedicated buttons for park, pause, and profiles.
How to monitor motion platform status from 3rd party software
Web API (JSON over HTTP) for third-party monitoring of device status, temperature, and uptime.
How to tune motion platform for (any) flight simulator
Tune roll, pitch, and G-force settings for flight simulators — sustained vs. intermittent modes.
How to tune Vehicle parameters
Tune vehicle-specific parameters: rev limiter, wheel slip, wheelbase, and center of gravity.
How to use Button Box to tune active profile during racing
Assign button box knobs and rotary encoders to adjust quick tunes and switch profiles.
How to use Visual Studio Code to edit motion profiles
Edit motion scripts in Visual Studio Code with IntelliSense and syntax highlighting.
Section 7
ACE Editor and Advanced Tuning
Advanced tuning of motion-cueing parameters, signal filtering, and washout algorithm settings.
Network Dashboard
Monitor multiple motion platforms across a local network from a single supervisor PC.
SDK - ForceSeatMI
ForceSeatMI SDK — add motion platform support to any application by sending telemetry data.
Product Cards
Product specification sheets and datasheets
QS-210
Professional-grade motion simulation for home setups. Compact, lightweight design with ultra-low 8ms latency.
QS-220
Flagship motion system with 0.8G acceleration and 800mm/s velocity. Class-leading performance for sim racing and flight simulation.
QS-BT1
Dual channel direct drive seat belt tensioner. 200N of force per channel for maximum braking and cornering immersion.
QS-CH2
Precise traction loss simulation by moving the entire cockpit. Sub-8ms feedback for Rally, Drift and racing.
QS-H13
High-performance 2DOF seat mover. Ultra-fast lateral and longitudinal G-force feedback directly through the seat.
QS-Pivot
2.5 DOF configuration add-on. Combined with QS-210 or QS-220, delivers up to 80% of 3DOF immersion.
QS-S25
Six degrees of freedom in a modular frame. 1.0G peak acceleration, 54 dB quiet, doorway-friendly kit.
QS-S35
300mm actuator stroke — three times the heave range of competing 6DOF platforms. Built for dedicated sim rooms.
QS-V20
Extended 4DOF motion cockpit with built-in traction loss. 0.89G acceleration for pro racing simulation.
Miscellaneous
Wallpapers and additional resources


3D Prints
3D printable models for motion platforms
Pedal Mount Bracket
Universal mounting bracket for Fanatec and Heusinkveld pedal sets.
QS-220
by QubicSystem
STL
Button Box Enclosure
Compact enclosure for a 12-button box with USB connector cutout.
Universal
by SimRacer42
STL
Cable Guide Clip
Snap-on cable management clip for actuator wiring harness.
QS-210
by QubicSystem
STL
QS-Pivot
User manual for QS-Pivot.
1 QS-Pivot
QS-Pivot bar enables you to run a 2DoF setup - two linear actuator on the back or on the front of the platform. It can be bolted to the bottom of the aluminum frame using included hardware. The adjustment range is presented in section 1.4.Info
QS-Pivot bar is an accessory purchased separately.
1.1 Dimensions

Image: pivot_bar_dimensions1.png
1.2 QS-Pivot components
Included in the QS-Pivot box: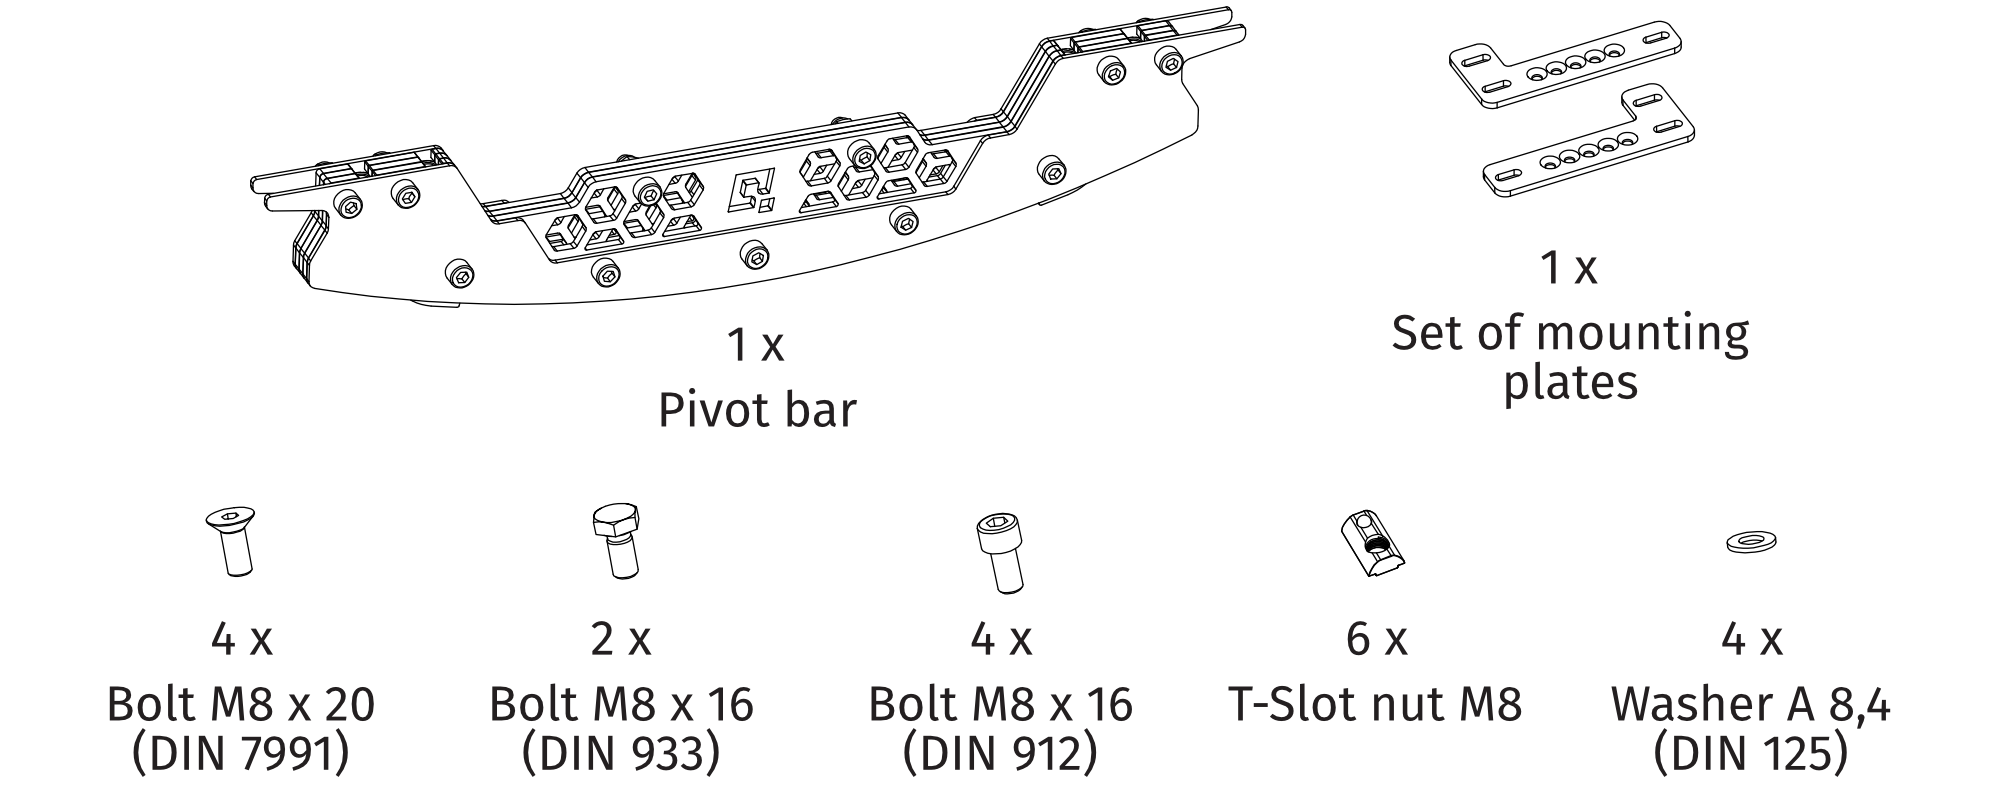
Image: pivot_bar_components.png
Warning
Be aware that the motion platform will crawl a little in every direction during normal operation. These movements could damage the surface in the long term. The manufacturer, its subsidiaries and their partners are not responsible for any floor damages.
1.3 Mounting to an aluminum profile cockpit
Use all of the included hardware to mount the QS-Pivot bar according to the pictures. QS-Pivot bar is to be installed to the underside of the aluminum profile. It can be installed either on the front or back of the cockpit - depending on your setup. QS-Pivot bar can be moved closer to center of the rig to increase pitch movement but it MUST be installed to a crossbeam to increase stiffness. If there is no crossbeam in the preferred installation spot - it MUST be added.- Mount the installation plates to the QS-Pivot bar at a width that matches the cockpit. Mounting plates are not interchangeable because of countersunk holes - DIN 7991 bolts must sit flush inside them, when screwed in from the top.
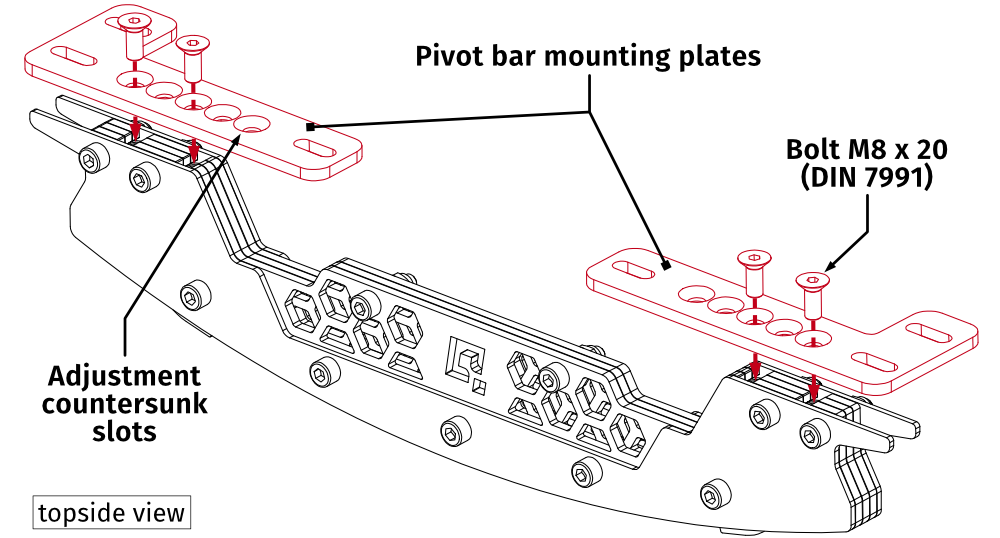 Image: pivot_bar_mounting1.png
 - Screw the QS-Pivot bar in under the cockpit using included bolts.
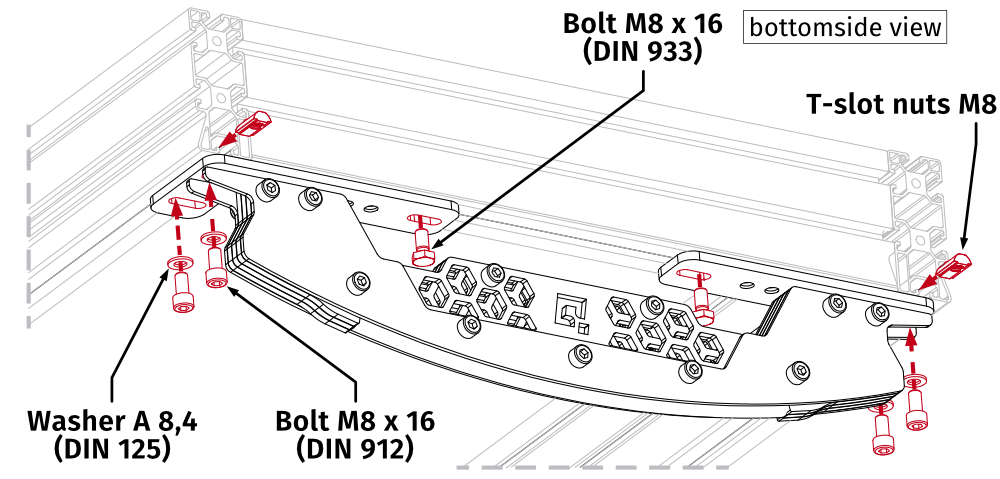 Image: pivot_bar_mounting2.pngInfoUse small amount of medium strength thread locker on all bolts.
1.4 Adjustment dimensions
For adjustment dimensions refer to the illustration below: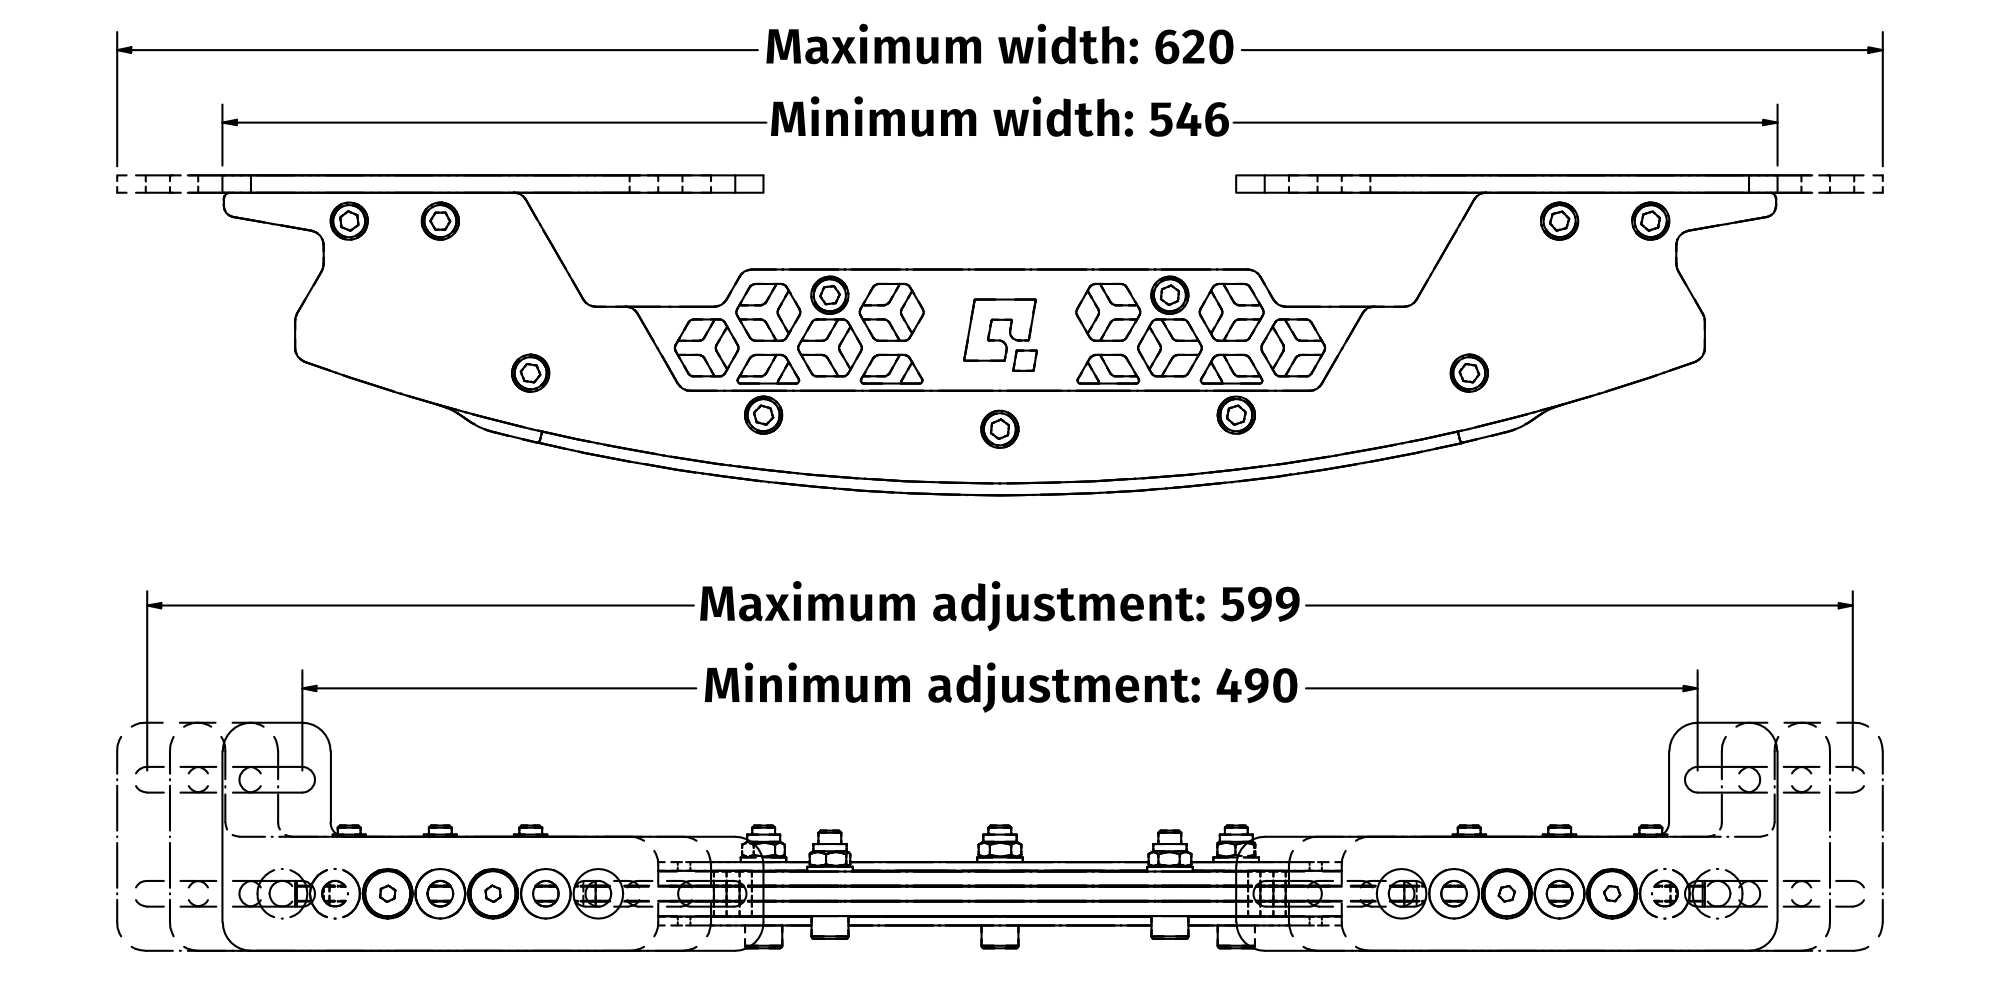
Image: pivot_bar_dimensions2.png
1.5 Correct installation guidelines
It is possible that incorrect installation of 2 front actuators + QS-Pivot at the back may cause undesired cockpit behavior — during dynamic weaving of a high-downforce/high-grip vehicle, the actuators may lose contact with the actuator feet (bounce off the ground). Preventing actuator bouncing is crucial for user safety and for maintaining the durability of the motion platform's mechanical components. What hardware-related conditions increase the possibility of actuators bouncing off the cups/feet?- Actuators mounted too close together — excessive roll motion range resulting in a worsened side to side stability
- Racing seat mounted directly over the QS-Pivot and actuators mounted too far from the user — insufficient weight over the actuators
- Front actuators + rear QS-Pivot setup - for better stability, front QS-Pivot + back actuators setup is preferred
- Highly dynamic weaving in vehicles with significant downforce or grip capabilities (e.g., open-wheelers, single seater hyper- or sports-cars, GT racing cars)
- Ideal tire and track conditions resulting in maximum grip
- Direct-drive steering base set to maximum force feedback, reduced damping, and increased inertia — this may cause steering wheel oscillations at high speed
- High-speed crash with the Violent Movement Suppressor effect disabled in QubicManager software
What steps must be taken to minimize the risk of actuator bouncing off the cups?
- DO NOT mount the actuators too close to each other — mount them on the side beams of the cockpit, not at the front
- Consider using included flat face profile mounting adapters to space out the actuators. Go to QS-210/QS-220 user manual.
- In high downforce/grip vehicle scenarios — reduce the Overall Gain slider value or decrease the Lateral G-force and Side Slip effects gains
- NEVER disable the Violent Movement Suppressor effect in the SFX tab by decreasing its sliders
- DO NOT mount the seat directly over or behind the QS-Pivot — this will not only reduce the risk of actuator bouncing but also improve the overall motion sensation for the user
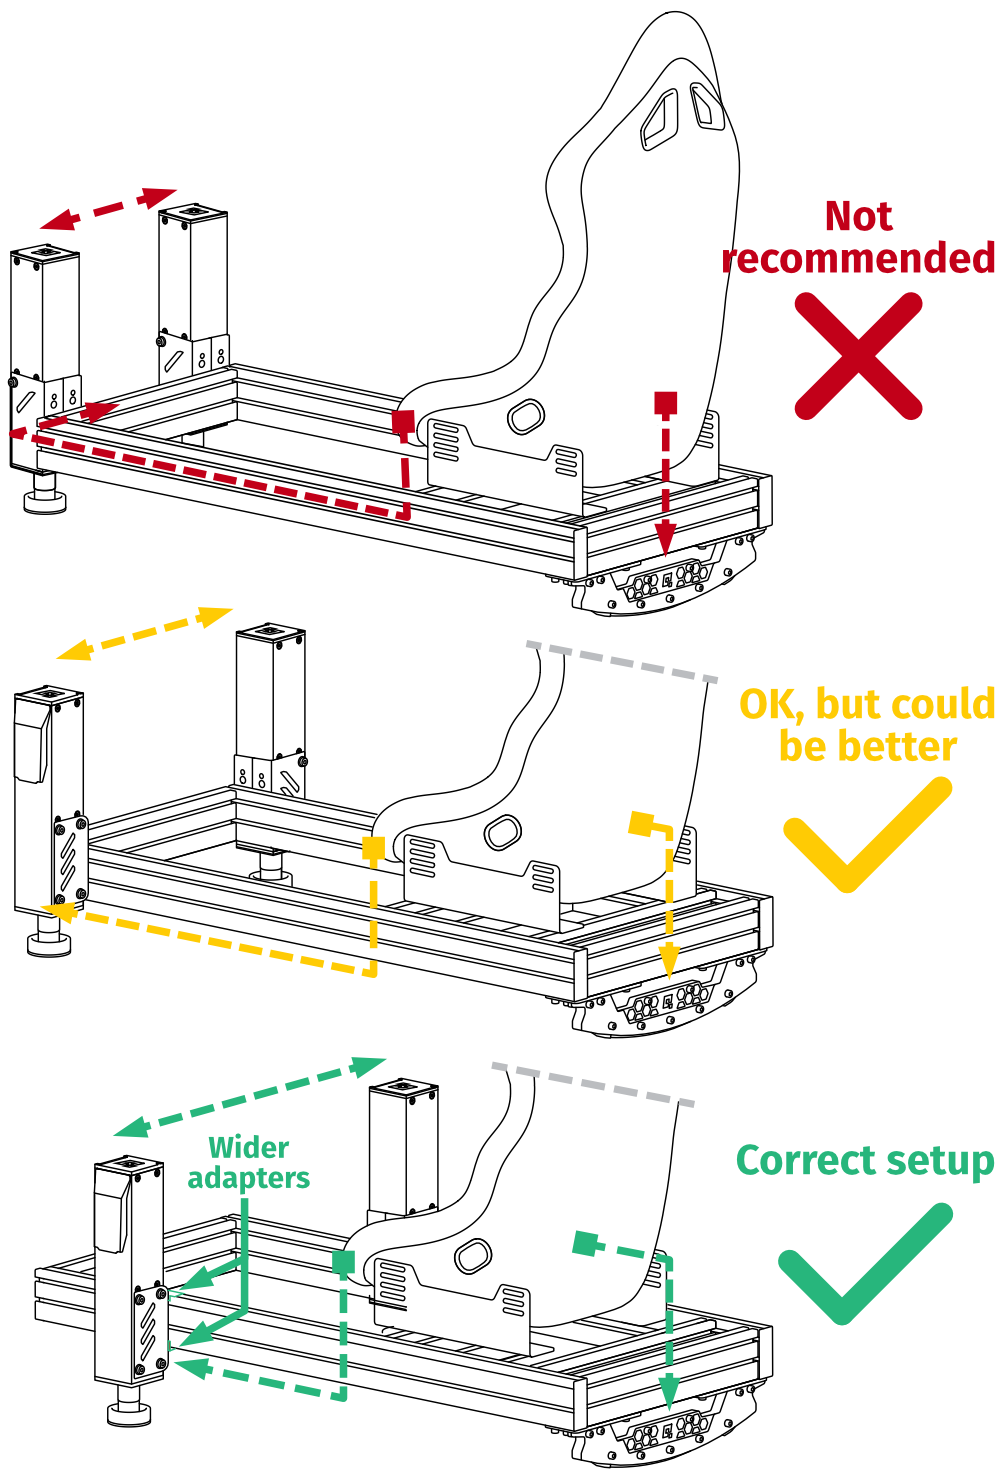
Image: correct_pivot_2dof_installation.png
- Seat directly over the QS-Pivot - unwanted inertia Actuators in front - underloaded Too close to each other - too much roll for safe operation
- Seat moved forward - corrected weight balance Widened actuators mounting - more stable Too far away from user - underloaded
- Seat moved away from QS-Pivot - improved weight balance Actuators closer to user - more heavily loaded Added wider adapters for stabilization - info in QS-210/QS-220 user manual.
Warning
Keep in mind that motion platform implementations using QS-210/220 actuators and QS-Pivot rely on the user's ingenuity and common sense. The QS-210/220 is capable of highly dynamic movements based on telemetry input from the simulator, and the motion rig must therefore be built to a safe specification with that in mind. Please exercise caution when installing and using this motion set.