SIM - an application or a game that generates telemetry data (e.g. using physics engine or reading a CSF file) and sends it to QubicManager via provided set of APIs.
top table - an alternative term for the top frame (the moving assembly) of the motion platform. In fully motion-integrated aluminum profile cockpits, this term refers to the entire cockpit structure.
Platform manager software - either ForceSeatPM or QubicManager (details in section 3.1)
ForceSeatPM, QubicManager - platform manager applications that run ACE and control motion platforms.
ForceSeatMI - API that allows the SIM to send telemetry data to the ForceSeatPM.
ACE - an Acceleration Control Engine that implements modified classical washout algorithm and telemetry filters, back-end of all built-in default game profiles.
classical washout algorithm - it is the most widely used motion-cueing algorithm. It creates the illusion of G-forces and acceleration by generating motion over a limited range of actuators. Subsequently, the machine slowly and imperceptibly return to its neutral position, making room for the next acceleration event.
motion cues - name for accelerations, which exert forces on the user's body. They should convince the passengers that they are driving in a real car. The algorithms which are responsible for generating these cues are named motion cueing algorithms.
telemetry - input data that comes from the game/simulation
IK - inverse kinematics.
FK - forward kinematics.
quick tunes - mechanism in QubicManager that allow, using tuning sliders, to quickly and safely adjust motion platform operation to their preferences without the need for understanding how the system works in the background.
tuning sliders - graphic adjustment widgets found in main profile window, used to tune the motion effects
game profile - attached to a specific game or simulator, represents a predefined configuration for filtering and processing incoming game data to calculate the motion of the platform's top frame for a specific device.
Default (Built-in) Game Profile - a refined, ready-to-use profile created by in-house R&D department, preloaded into the software for immediate use.
PS-series - big, industrial type line of heavy-duty motion platforms signed with the Motion Systems logo (details: https://motionsystems.eu/products/)
QS-series - motion platforms and accessories for home users and sim racing centers, for entertainment or educational purposes, signed with the QubicSystem logo (details: https://qubicsystem.com/products/)
1 How do Motion Systems/QubicSystem devices work?
In order to encourage users to take advantage of the software more competently and to enable effective profile tuning for PS- and QS-series motion platforms and accessories, it is essential to understand how the platforms translate the data incoming from the game or simulator into physical movement.
Motion Processing Profiles for QS-Series Devices
Telemetry data — comprising vehicle physics (acceleration and rotational forces), and additional relevant parameters generated by the game or simulator are received by ForceSeatMI, which interprets the data and forwards it to the Acceleration Control Engine (ACE).
ACE operates in the background as the "back-end" for Platform managers (ForceSeatPM for PS-series and QubicManager for QS-series devices) and is responsible not only for filtering (smoothing) all incoming simulator data, but also for performing the necessary calculations to control the actuators, thereby producing the motion of the platform's top frame and creating precise motion cues.
ACE also performs signal interpolation, filling in gaps in the incoming data to ensure smooth and continuous platform motion. That means that the game's frame-based output (e.g.60 FPS) is converted into a stable signal (e.g. 250 Hz), ensuring smooth platform movement without abrupt interruptions or discontinuities.
In essence, telemetry data from the simulation is processed by ACE and delivered to motion platforms and accessory devices as motor position calculations.
Image: motion_processing_chart.png
Motion diagnostics
The role of Platform managers (ForceSeatPM and QubicManager are very similar - more details in section 3.1) is to provide the user with a graphical interface and tuning controls, allowing adjustment of motion intensity and strength. While ACE calculates and filters incoming data, QubicManager can also selectively disable or modify feedback generated by specific effects.
Additionally, the software collects and presents diagnostic information via graphical charts for input, output and top frame data, enabling detailed system and motion cueing process analysis.
Full adjustability or seamless operation out of the box
Although the underlying processes are complex, the key point is that the user retains full control over profile parameters and platform behavior when desired. And by creating and refining the built-in default game profiles in-house for users who prefer a simplified experience, the platform manager software ensures smooth motion and reliable feedback without any manual adjustments.
Baseline (built-in) default profiles are a good starting points for further adjustment. For details and tips on tuning sliders adjustment, go to section 4.2. If you want advanced motion tuning and intend to create entirely new profiles from scratch, proceed to the Vehicle Physics Simulation Application manual.
Platform manager software operation in examples
PS- and QS-devices respond to vehicle physics - the braking force is represented as negative forward acceleration that comes from the vehicle telemetry, not a brake pedal input. This is the reason why the platform can perform pitch motion even without braking, but when starting to slow down by downshifting (engine braking).
There is no separate "collision force" effect. During in-game crash, the motion feedback corresponds to the actual accelerations acting on the vehicle or aircraft — longitudinal, vertical, lateral and rotational - during that event.
Different games transmit varying telemetry data, which can be either sparse or rich in details. ACE cannot calculate a motion cue from input data that is not present. Unintuitive top frame movement requires adjustment, whereas a lack of movement indicates that an effect is either disabled or absent.
Example of a wheel slip (side or forward) - it can be felt through heave and pitch motion from the vehicle's suspension response, however this effect is usually too subtle. PS- and QS-series devices can generate haptic feedback (vibrations) listed in the SFX tab. Unlike full-travel motion, these vibrations are artificially derived from telemetry data to enhance feedback for events that would otherwise be insignificant.
For users with 2- or 3DoF platform, it is not possible to create direct feedback for sideslip (yaw motion) or forward traction loss (surge motion). ACE can implement these raw effects into existing degrees of freedom (yaw → roll, surge → pitch) to provide the user with feedback in axes where it would not normally be present.
Info
The impact of the profile on platform behavior is significant. The same platform running the same simulation can feel completely different depending on the profile. All default built-in profiles are designed to support all QubicSystem platforms and devices, offering a balanced combination of performance, motion feedback, and haptic intensity. If the platform does not deliver the desired experience, it is rarely a hardware issue - start by cloning the profile and adjusting the effects individually.
Tip
It is not necessary to create separate profiles for different vehicles and tracks. SIM telemetry is usually diverse enough to differentiate the experience within a single profile. However, users are welcome to create separate profiles and assign them to specific vehicles or aircraft, which will switch automatically. More details in section 4.3.8.
2 Quick start
Info
This is a quick start guide on how to start playing using Qubic System device. For detailed instructions, begin from the next chapter or use reference links below.
Connect and set your device using electrical diagrams from the main user manual.
Warning
Some devices will perform a calibration run once they are powered up. Other will wait for a cold-start procedure. For details refer to user manuals.
Download, install and launch latest version of ForceSeatPM or QubicManager (section 3.4).
Device status should say Running or Parked/Centered (section 6.6). If not, start the troubleshooting procedure (device user manual).
Go to Action Center, resolve all issues/game integrations (section 3.5).
Perform firmware updates, if needed (from the Action center window).
Activate a default profile for a specific game and launch the game.
Device will start motion/feedback as soon as the game session is started.
No further configuration is needed.
Info
All QubicSystem user manuals contain troubleshooting section, which covers common connection or initial start-up issues. Refer to main user manual of your device for hardware-related issue. Go to section 7.2 for QubicManager -related issues.
Motion/feedback adjustment - copy the default profile and use quick tune sliders (section 4.2).
Input diagnostic from profile menu shows input data from the SIM
Script Debug Diagnostic from Tools and Diagnostic menu shows output data, calculated by ACE
Platform diagnostics (or Seat Belt Tensioner Diagnostic for QS-BT1) from Tools and Diagnostic menu show top frame position and allows for motion platform manual manipulation
3 Introduction
3.1 ForceSeatPM
ForceSeatPM (Platform Manager) is a professional, dedicated control software for the platform. It offers click-and-play compatibility with all major racing and flight titles on PC and is continuously updated to support new releases. Despite being a powerful engine, the Platform Manager remains easy to use — motion, bumps, roll and pitch levels can be adjusted with a single click. The software also includes VR HeadWay, which uses advanced mathematical algorithms to calculate the required compensation and applies it to the VR headset in real time, providing the most authentic and immersive simulation experience.
Image: qm_overview1.png
Image: qm_overview2.png
Image: qm_overview3.png
Image: qm_overview4.png
3.2 QubicManager
Image: qubic_logo.png
ForceSeatPM is designed for use with Professional Series Motion Systems platforms. For users of Qubic System devices, the recommended software is QubicManager. Both applications share the same profile structure, interface layout, visual design, the majority of available features and are updated simultaneously. QubicManager ensures full compatibility and complete functionality with all QS-series devices, including all diagnostic features.
Software compatibility:
Device
Qubic Manager
ForceSeatPM
Next Level Racing® Platform Manager
QS-BT1
✓
✓
✓
QS-H13
✓
✓
x
QS-210
✓
✓
x
QS-220
✓
✓
x
QS-CH2
✓
✓
x
QS-S25
✓
✓
x
QS-S35
✓
✓
x
QS-V20
✓
✓
x
QS-CH1 (discontinued)
✓
✓
x
QS-DD-20 (discontinued)
✓
✓
x
PS-6TM-XXX
✓
✓
x
PS-6TL-XXX
✓
✓
x
PS-3TM-XXX
✓
✓
x
PS-2RM-XXX
✓
✓
x
Next Level Racing® Motion V3
✓
✓
✓
Next Level Racing® Motion Plus
✓
✓
✓
Next Level Racing® Traction Plus
✓
✓
✓
No motion platform
✓
✓
✓
3rd party motion platform*
✓
✓
✓
*Platform manager software runs parallel to your software (e.g., SimHub, Sim Racing Studio, SimTools) and does not interfere with its operation.
Yellow checkmark - it will work but it is recommended to use dedicated software (ForceSeatPM for PS-devices, QubicManager for QS-devices, Next Level Racing® Platform Manager for NLR-devices).
3.3 System requirements
Below are the system requirements for running QubicManager . Please note that your system must also meet the individual requirements of each supported game.
Supported operating system:
Microsoft Windows 10 x64 Home/Pro
Microsoft Windows 11 x64 Home/Pro
Additionally:
CPU must support AVX instruction set
At least 1 GB of free RAM
At leas 500 MB free space on system partition
USB port 2.0 (or faster) or Ethernet port (PS-series device only)
Warning
Linux-based PCs, Playstation 3/4/5 and X-Box 360/One/Series X are not supported by the platform manager.
Only exception is Gran Turismo 7, with a PC and platform manager software installed acting as a data transmitter. For details go to QubicManager → Help and Tutorials → type in 'gran turismo 7' to find the tutorial page → follow the instructions.
3.4 Software Installation
Info
Note down the QubicManager serial number before installation as it is needed to access software download page.
The SERIAL NUMBER required to access software download can be found printed on the rating label in the XXXXXX-XXXXXX-XXXXXX-XXXXXX format and encoded into a QR code. For rating label location for a specific device - refer to that device's user manual.
Once the device is mounted and checked for clearance:
Connect the device according to the interconnection diagram without connecting the power supply unit to the wall socket.
Download QubicManager - serial number located on the identification label will be needed.
In case of Windows 10 or Windows 11 - double-click the .msi file to begin the installation. On the welcome screen, click Next. Read the license agreement, accept it if you agree to the terms, and click Next again. Proceed with the installation steps and launch the application.
Info
During the installation, a UAC (User Account Control) prompt may appear. Please approve any permission elevation requests.
Make sure the Motion Lock jumper is plugged in/Motion Lock button is implemented correctly.
Connect device's power cord to the wall socket.
Vertical actuators driven devices will request a cold start procedure (for details refer to device's user manual, section Cold start procedure).
The device will perform a start-up calibration (with the exception of QS-BT1).
Warning
User may seat in the cockpit during the calibration run - be aware of its movement.
DO NOT change the payload during the start-up calibration.
If QubicManager has recognized the device correctly, the status visible in the lower left corner will change to Parked/Centered (1).
Info
If you need to obtain the serial number:
it can be found in the QubicManager. After connecting the QubicManager go to Tools and Diagnostics → Devices. Serial number is visible under the device name:
Download a small application that will read the code directly from your device (if it is connected via USB): QubicSystem.com/GetSerialNumber
Image: get_serial_number.png
Warning
The software is provided "as is", without warranty of any kind, express or implied, including but not limited to the warranties of merchantability, fitness for a particular purpose, and non-infringement. In no event will the authors or copyright holders be liable for any claim, damage, or other liability, whether in an action of contract, tort or otherwise, arising from, out of, or in connection with the software or the use or other dealings in the software.
The software sends anonymous usage data to the Motion Systems company. The data is used to improve the software and game profiles. The data is not used for advertising purposes.
3.4.1 Application Startup
At each start-up, QubicManager performs a quick system scan to detect installed games. As a result, two types of actions may occur:
If a built-in profile exists for a detected game, the game's executable is automatically assigned to that profile. This allows you to activate the profile and launch the game directly from QubicManager with a single click using the Run the game button.
If a game requires an additional plug-in (also called a connector), a corresponding entry is added to the Action Center. Connectors are not installed automatically because they integrate directly with the game, so you must initiate the installation manually. In most cases, administrator rights are required, so expect a UAC prompt.
If any actions require your attention after the scan, the Action Center will open automatically. You can also trigger the scan manually at any time by opening the Action Center and clicking Check configuration.
Info
QubicManager opens several UDP and TCP ports on the localhost to receive telemetry data from games. This may trigger a Windows Firewall (or third-party firewall) notification. If these connections are blocked, some games may not function correctly.
3.5 Action Center
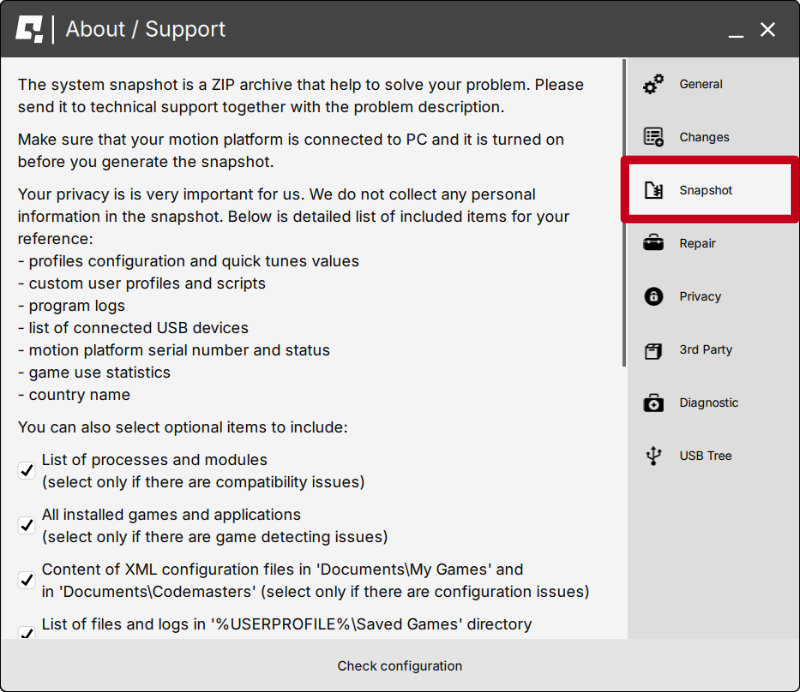
Action Center contains a list of issues that require your attention. The list may be extensive on first startup and depends on the number of installed games. In most cases, resolving an issue is as simple as clicking the button next to it.
Check Action Center (1) on the right side panel for a list of actions that requires attention:
It is possible to solve them one by one or by pressing the Resolve All button. Firmware update may require additional confirmation in the dialogue box.
Image: QM_action_center_resolve_all.jpg
Info
QubicManager does not install connectors automatically during startup. This approach has been deliberately chosen for two primary reasons:
Installing a connector constitutes integration with third-party game software. Automatic installation may potentially cause conflicts with other plug-ins or disrupt the game environment. To avoid unintended consequences, user confirmation is required before installation.
Most games are installed in the Program Files directory. Copying files to this location requires elevated permissions. Automatically prompting for administrator rights multiple times during startup could be confusing to the user.
These considerations justify the explicit connector installation mechanism. The user initiates installation by clicking Install, which triggers a UAC prompt as a direct result of their action.
3.6 Games integration
Games Integration (1) is used when a game icon (game configuration) and profile is missing from the main application window. This window also displays the configuration status. If a game has not been integrated automatically, you need to click the Locate button and find it manually. If a game is not on that list, it is not supported.
Enter the game title in the search field (2) → click Locate (3) → navigate to the exact installation folder of the game → once inside the game folder, click 'OK'. If the game is successfully added, the status will change from black to green (4).
If a Configure button is active, it automatically creates a game configuration.
4 Main window and game profiles
The main application window contains tiles for the games with default built-in game profiles. These profiles are integrated into the software and do not require any additional downloads. Additional profiles can be found in the "Community Profiles" tab. On the right side of the window, there are buttons for the most essential program functions. Below, a detailed explanation of all program features is provided.
4.1 Main window overview
The main program window presents a list of available profiles. This is the central interface where you can manage and launch your motion platform experiences. A quick access toolbar is also provided on the right side for convenient navigation.
(1) Default built-in profile game tiles
(2) Profile search bar – enter the title of the game or simulation you are looking for
(3) Profile filtering drop-down – select a filter type to display fewer profile tiles in the main window (Favorites, Only installed, Only user's, For the same game [as already selected])
(4) Profile type drop-down – switch between Game, Professional profiles, and Dashboards
(5) From left to right: minimize, maximize, minimize to system tray
(6) Tools and diagnostics – opens a menu providing access to all program functions
(7) Games integration – functionality for adding games not included in the default game list
(8) Help and tutorials – section containing contextual help, tutorials, and guidance on software operation
(9) Action Center – software and hardware diagnostics menu
(10) Community profiles – repository of user-created profiles
(11) Exit program – closes the program completely
(12) Connection type
(13) Status – displays device status; click to view the list of connected devices
(1) Enabling/disabling VR HeadWay
(2) Enabling/disabling ScreenWay
(3) VR coordinates mapping
(4) Enabling/disabling Tactile Audio Based Feedback
(5) Enabling/disabling Accessories & DIY
(6) Global Pause - all devices stop (and freeze) the motion/feedback
(7) Belt Tensioner Pause - QS-BT1 stops the feedback
(8) Global Park - all devices come to a parking position
(9) Global center - all devices come to a center position
(10) Run command - opens a QubicManager command window
4.1.1 Game profile window
Info
Default (Built-in) profiles are integrated with the software and do not require additional installation. List of supported games is available at: QubicSystem.com/Supported-games.
To manage a profile, select the desired game from the main window and click on its corresponding tile (1) to view profile details.
Adjust the motion effects intensity up to your preferences in the game profile window. Scroll down to see all of the settings (2).
Activate a profile by clicking the Activate button (3).
Launch the game by clicking the Run the game button (4) - then select a configuration to launch (for non-VR select Default).
Tip
You can also adjust the settings during the game simulation by pressing ALT+TAB and switching between the applications - once the profile is active changes will apply instantly.
4.2 Profile parameters tuning
When the integration with the SIM works correctly and the motion platform operation (top table motions) is close to expected with only minor tweaking required, then the easiest solution is to use quick tunes system in the QubicManager rather than adjusting the ACE operation.
Info
If for some reason serious changes in the motion platform operation are required, then it is recommend to make full copy (NOT shallow copy) of the built-in profile and use ACE Editor to retune motion-cueing algorithm. ACE Editor is explained in detail in a separate document: http://qubicsystem.com/uqsace.
4.2.1 Difference between Gain, Sharpness and Deadzone adjusters
Gain, Sharpness and Deadzone sliders are basic tuning parameters available in every game profile. Use them to personalize your effect settings — not just by increasing the effects you want, but also by changing how they are experienced.
Gain controls the overall intensity of all the effects together. It can be approached like a volume knob for motion feedback effects.
Sharpness increases details of the output, but it can also make the feedback feel rough or "noisy." After increasing, there is more small fluctuations in the output telemetry. Decrease it to make the effect smoother. Keep in mind that the sensation can vary depending on your setup and the type of motion device you're using.
Deadzone sets a threshold that filters out low-strength output signals and starts generating feedback only from a bigger signal. It removes mild inputs and only begins generating feedback once the signal exceeds the defined cutoff level.
For example, if the vehicle is being driven into a corner - starting sharply and then gradually straightening out - the deadzone will suppress the lower roll values and only let stronger signals pass through.
Image: gain-sharpess-deadzone_troubleshooting.png
Info
Some of the quick tunes offer an On ground slider - it adjusts the gain for when the aircraft is on the ground. After take off, motion platform's behavior is controlled by the regular Gain slider.
4.2.2 Main motion platform quick tunes
Open a built-in profile's details. Before you begin tuning, click Default (1) to establish common baseline for tuning. Switch to Motion (2) tab and start adjusting quick tunes with a Gain (3) and Sharpness sliders (4). Change one tune a time and always use SIM to confirm how new value affects the motion platform operation. Untick a box next to a motion effect to disable it completely (5).
Following motion quick tunes are available to tweak the operation of a motion platform:
Overall [gain] - it is a global amplifier tune that affects all other tunes (except Weight Transfer Bias).
Body Roll is a relative constant angle related to track surface (e.g. hills) or angular velocity (roll rate) that represents intermittent vehicle body rotation. The latter is usually meaningful only in flight simulators. The first component is controlled by
Body Roll (Sustained) quick tune, the second by Body Roll (Intermittent) (available only for flight simulations) quick tune.
NOTE: not to be confused with centrifugal force or lateral G-force - these effects have separate sliders available for tuning.
Body Pitch is a relative constant angle related to track surface (e.g. hills) or angular velocity (pitch rate) that represents intermittent vehicle body rotation. The latter is usually meaningful only in flight simulators. The first component is controlled by
Body Pitch (Sustained) quick tune, the second by Body Pitch (Intermittent) (available only for flight simulations) quick tune.
NOTE: not to be confused with acceleration or longitudinal G-force - these effects have separate sliders available for tuning.
Turning Rate (only for platform capable of yaw movement) - it modifies the transformation of vehicle angular velocity (yaw rate) into top frame yaw. It is part of the washout filter algorithm.
NOTE: not to be confused with Side slip effect - that effect has separate slider available for tuning.
Vertical G-Force (Intermittent) - it modifies the transformation of vertical linear acceleration into top frame heave (for 2DoF motion platforms it modifies the pitch motion).
Simply, this effect simulates the feeling of sudden elevation change, while jumping, driving over a crest or after a sudden longitudinal control stick movement in an aircraft.
Longitudinal G-Force (Intermittent) (only for platform capable of surge movement) - it modifies the transformation of longitudinal linear acceleration into top frame surge.
Simply, this effect simulates a quick acceleration or deceleration action by rapidly moving the platform forward and backward.
Longitudinal G-Force (Sustained) - it modifies the transformation of longitudinal linear acceleration into top frame pitch. This is mainly for sustained accelerations.
Simply, the platform goes into pitch movement to replicate the continuous G-forces, but using user's body weight.
Lateral G-Force (Intermittent) (only in platform capable of sway movement) - it modifies the transformation of lateral linear acceleration into top frame sway. It is a part of the washout filter algorithm.
Lateral G-Force (Sustained) - it modifies the transformation of lateral linear acceleration into top frame roll. This is mainly for sustained accelerations and it is also known as Tilt Coordination.
Simply, the platform goes into roll movement to replicate the continuous G-forces, but using user's body weight.
Weight Transfer Bias - it allows to change proportion (bias) between intensity of acceleration and deceleration (braking) effects. It is purely subjective and depends on user's preferences, there is no science behind this setting.
Road Harshness - modifies the vertical low amplitude movements caused by the road harshness and bumps on the road (or landing strip for flight simulation) into heave and roll movement.
Extra rotation slider enables the road harshness effect to affect roll motion. It is introduced mainly for 2DoF setups. In 3DoF platforms and higher, road harshness works with a heave motion and additional roll movement may seem redundant.
NOTE: different games output different data on road harshness, some even include curbs and rumble strips. Road harshness intensity will also rely on the type of vehicle that is used (long and short-travel suspension).
Sideslip - increase or decrease platform's response to oversteer sideslip. If yaw is not available, it can be simulated by roll movement. Moving the pivot point (center of gravity) is available in Vehicle Parameters - CoG Bias.
NOTE: at first it may feel like Turning rate and Side slip effect are the same, but they are generated from different input data. The first responds to yaw rate (rotation of the vehicle/aircraft), and the second one responds to the loss of tire grip. The feedback relies strongly on the effect adjustment and subjective approach on which effect should be prioritized.
Motion tunes for flight simulations only:
Vertical G-Force (Sustained) - it modifies the transformation of vertical linear acceleration into top frame pitch.
Simply, the platform goes into pitch movement to replicate the continuous G-forces, but using user's body weight.
Gravity Correlation for Lateral Acceleration - removes gravity vector from lateral acceleration to make it more natural. This will influence other maneuvers.
Gravity Correlation for Longitudinal Acceleration - removes gravity vector from longitudinal acceleration to make it more natural. This will influence other maneuvers.
Flight/Ground Harshness - amplifies or reduces the low amplitude turbulence movement and uneven runway effects.
Info
Some of the quick tunes offer an On ground slider - it adjusts the gain for when the aircraft is on the ground. After take off and while in the air, motion platform's behavior is controlled by the regular Gain slider.
Info
Not all game/simulations will have all the motion tunes listed above. It depends on the input telemetry available.
4.2.3 Motion platform Special effects quick tunes
The SFX tab provides various sliders that allow for more extensive tuning of special effects (they mainly consist of vibration effects):
Threshold - defines the point at which the effect begins to take place.
Duration - typically measured in milliseconds (or seconds if otherwise specified in the quick tune description), defines the time span during which the effect remains active.
Frequency - determines the rate of vibration cycles, defining how rapid or closely spaced the vibrations are.
Intensity - determines the amplitude of the vibration, defining how strong or forceful the vibrations are.
Switch to SFX tab to start adjusting special effects (vibrations) of the motion platform:
Rev Limiter Intensity - modifies the intensity of rev limiter additional vibrations when vehicle engine reaches maximum revolutions. Go to Vehicle Parameters for more tuning options.
Rev Limiter Frequency Bias - modifies the frequency of rev limiter additional vibrations when vehicle engine reaches maximum revolutions. Go to Vehicle Parameters for more tuning options.
Gear Change Effect Time - modifies the time (duration in milliseconds) of additional gear change effect which overwrites the longitudinal acceleration signal of gear changes.
Gear Change Up Shift Intensity - modifies the intensity of up shifts for the additional gear change effect. It is artificially calculated from current vehicle speed. It also is able to partially suppress gear change effect from longitudinal acceleration (when set to 0).
Gear Change Down Shift Intensity - modifies the intensity of down shifts for the additional gear change effect. It is artificially calculated from current vehicle speed. It also is able to partially suppress gear change effect from longitudinal acceleration (when set to 0).
Wheel Forward Slip/Lock - modifies additional vibration when front or rear wheels slip forward because of traction loss or brake lock. More options on wheel slip are available at Vehicle Parameters.
Wheel Slip Angle - modifies additional vibration when wheels suffer from lateral slip. It activates when maximum allowed wheel slip angle is exceeded. More options on wheel slip are available at Vehicle Parameters.
Rumble Strip Frequency - modifies the frequency of rumble strips effect in relation to vehicle forward velocity.
Rumble Strips Intensity - modifies the intensity of rumble strips effect in relation to vehicle forward velocity. The software will automatically calculate the values for all speeds between 20 km/h and 300 km/h.
Violent Movement Threshold - modifies the threshold after which the suppression of violent movements occurs to prevent rapid and unpleasant motion of platform (during crashes, spinouts and big jumps).
Violent Movement Suppression Time - sets violent movement suppression time (in seconds).
Engine Vibration Frequency - sets a graph of the vibrations frequency at specific revolutions per minute.
Engine Vibration Intensity - sets a graph of the vibrations intensity at specific revolutions per minute.
Engine Vibration Location - moves the longitudinal center point of engine vibrations front or back.
ABS Active - modifies vibrations frequency and intensity when Anti-lock Brake System activates (if the vehicle exceeds the traction limit when braking).
Traction Control Active - modifies vibrations frequency and intensity when Traction Control activates (if the vehicle exceeds the grip limit when cornering or accelerating).
Special effects for flight simulations only:
Gear opening effect - increases or decreases a landing gear effect.
Artificial Tarmac Effect - artificially generated effect to substitute the vertical acceleration effect to amplify on-the-ground road harshness.
Positive G Warning - controls the frequency and intensity of vibration indicating exceeding the positive (plane is getting heavier) G-warning threshold. Connected with the settings in Aircraft parameters.
Negative G Warning - controls the frequency and intensity of vibration indicating exceeding the negative (plane is getting lighter) G-warning threshold. Connected with the settings in Aircraft parameters.
Effective Translation Lift - controls frequency and intensity of vibrations when a helicopter enters an ETL window.
Stall Shudders/Vortex Ring State - controls frequency and intensity of vibrations when a plane stalls or helicopter enters VRS state.
Tail Rotor Vibration Frequency - controls frequency of vibrations imitating tail rotor operating, divided into RPM ranges. Applies only to helicopters.
Tail Rotor Vibration Intensity - controls intensity of vibrations imitating tail rotor operating, divided into RPM ranges. Applies only to helicopters.
Tail Rotor Vibration Location - moves the center point locating the tail rotor vibrations placement. Applies only to helicopters.
Artificial Cannon Fire Intensity - artificially generated effect to substitute the longitudinal acceleration part of using a fire cannon. Controls the vibration intensity. Does not work in unlimited weapons mode.
Artificial Cannon Fire Frequency Bias - artificially generated effect to substitute the longitudinal acceleration part of using a fire cannon. Controls the vibration frequency bias. Does not work in unlimited weapons mode.
Artificial Cannon Fire Min Duration - artificially generated effect to substitute the longitudinal acceleration part of using a fire cannon. Controls the minimum duration (in milliseconds) to ensure smoothness.
Telemetry Cannon Fire Effect Suppressor - suppresses or increases the cannon fire effect from telemetry to distinguish it from from the artificially generated one. Move the duration slider maximum to the left to turn it off. It is recommended to use only one effect - the artificial or telemetry data one.
Seat Eject Effect - increase or decrease duration of the seat ejection effect. "Recenter after" defines the time after which the platform will go back to center position.
Missile Launch Effect - artificially generated effect to substitute the longitudinal and lateral acceleration part of missile launch effect. Controls the frequency, intensity and duration of the vibrations.
Flare/Chaff Dispense Effect - control the frequency, intensity and duration of vibration during flare or chaff launching.
Cockpit Shake - controls the vibration of the platform simulating the cockpit vibration in the roll and pitch axes. Make sure to set the threshold which specifies cut-off amplitude.
Info
Not all game/simulation have all the special effects listed available.
4.2.4 Post-processing quick tunes
Image: fs_postprocessing_QM.png
Switch to Post-processing to start adjusting roll, pitch, yaw, heave, sway and surge axes. Post-processing acts as filter for sim/game data output and reduces linearity on the processed data. The horizontal X axis represents input data and vertical axis Y represents output data. The red line represents the degree of signal change (new motion pattern between input and output).
Linearity is able to reduce long-travel movements leaving the minor movements intact.
Gain amplifies or reduces the overall signal - boosting or reducing linearity of input data.
Curvature Offset adjusts the size of the signal that will be modified - increasing the offset will result in boosting or decreasing medium travel movements, instead of small ones.
Zero Offset % parameter in the Post-Processing tab is primarily intended for the QS-H13 seat mover. It shifts a selected degree of freedom in the positive or negative direction to compensate for factors such as uneven mounting or a tilted seat. Although it can be applied to other motion platforms, its use is not recommended. The feature adjusts the baseline (zero point) of the chosen axis before motion feedback is generated, which inherently reduces the available actuator travel.
Info
List of quick tunes in Post-processing depends on type of game/simulation and amount degrees of freedom that the motion platform is able to produce.
Warning
Post-processing is not intended to serve as a range restriction for safe motion platform operations. This feature was added as a practical way to assist customization of motion platforms and suit personal preferences. This is NOT a safety feature. Even with very little linearity, if input signals have peaks, the top frame may still reach extreme positions. There must always be sufficient open space for the platform to move in full motion range.
4.2.5 Main QS-BT1 quick tunes
QS-BT1 is a belt-tensioning device designed to provide the user with feedback originating from the vehicle's or aircraft's telemetry. It is based on dual electric motors, similar to the QS-series motion platforms. However, it operates on a different principle — by applying pressure to the user's shoulders and chest, rather then applying motion into the platform. For this reason, the user is presented with a different set of sliders and an extended range of haptic support.
Info
Similar to motion platform quick tunes, QS-BT1's effects can be adjusted using Gain, Sharpness and Deadzone sliders. For details on their impact, go to 4.2.1.
NOTE: some of QS-BT1's gain sliders can be tuned to negative values to inverse the direction of force (e.g. left belt tensions instead of the right one).
Info
Why QS-BT1 does not include an "overall gain" slider? This device must be tuned through individual effects rather than global scaling. The feedback you feel depends not only on the motors but also on many mechanical and ergonomic factors — seat slot shape, insert friction, belt type, belt travel, user's body type, and overall fitment. Since every installation behaves differently, global gain would give inconsistent or misleading results. Adjusting each effect separately ensures proper balance and allows the QS-BT1 to deliver accurate, personalized feedback.
Following Main quick tunes are available to tweak the QS-BT1 operation:
Positive and Negative G - two separate quick tunes, available only for flight simulations. They adjust the tension that is present during high G events. Allows for setting the curve that defines the rising tension force by setting the individual G-force points.
Braking - provides belt-tensioning feedback based on deceleration data (braking, up-shifting).
Acceleration - provides belt-tensioning feedback based on forward acceleration data.
NOTE: it is disabled by default, since it is not intuitive to be pressed by the belts during acceleration, and could interfere with the braking effect, reducing the user's ability to distinguish between the two states.
Sideways Acceleration - using dual-motor capability this effect tensions one of the belts while cornering to simulate lateral G-forces.
Centrifugal Force - artificially calculated lateral G-force effect provided mainly to enhance the feedback for games that lack details in telemetry.
Info
What is the difference between Centrifugal Force and Sideways Acceleration? Sideways Acceleration represents lateral forces acting on the vehicle, such as collisions or hitting a wall, and is derived directly from game telemetry. Centrifugal Force occurs during cornering (lateral G-force) and is artificially calculated from forward speed and rotational velocity.
The separation exists to allow more personalized effects. Both effects can occur simultaneously (e.g. during a spin caused by a hit), but they do not multiply each other. In some games, only one effect may be present if the other is not provided.
Bounds - tensions the belts when no longitudinal acceleration is present. It is split into Neutral (belt tensioning) and Maximum sliders. The second one restricts all tensioning force above specified limit.
NOTE: bounds effect should not be used to tension the harness for the user to compensate for the loose belts setup. Refer to QS-BT1 user manual for correct belt and harness installation details.
Vertical G-Force - effect responsible for providing tension during elevation changes in a vehicle/aircraft.
Side Slip - Vibration effect that occurs when the vehicle looses lateral traction or oversteers. It can also be adjusted to cut all feedback tension, in order to simulate state of weightlessness during a slide.
Road Harshness - effect working on a similar principle as Vertical G-force, but on a low amplitude signal. Simulates uneven tarmac and grass excursion by tensioning the belts erratically.
NOTE: not to be confused with a vehicle's suspension operation - Road Harshness works on vertical acceleration data only.
Pre-Impact Protection - this effect works similarly to a real car: the belt tightens at the crash, to keep the user firmly in the seat.
NOTE: not to be confused with a Violent Movement Suppressor, which is used to weaken the tension (or motion) during fast acceleration events (like a collision or a crash).
4.2.6 QS-BT1 SFX
Following SFX (special effects) quick tunes are available to tweak the QS-BT1 operation (they mainly consist of vibration effects):
Engine Vibration Frequency & Intensity - two separate quick tunes, available both for vehicle and flight simulations. They adjust the tension that is present when increasing engine RPM (or thrust). Allows for setting the curve that defines the rising tension force by setting further engine speed increasing percentage points.
NOTE: Engine vibration is an effect that is constantly on and tends to overpower other effects - it is suggested to disable it if user feels a feedback overflow and when adjusting other effects.
Engine Vibration Extra - allows for modifying how the Engine vibration effect is used and how it interacts with other effects. Available sliders: Phase shift (making the effect irregular between the belts thus simulating less smoothly running engine, e.g. a V8), Alone (modifies the intensity of the effect when no other effect is present) and In-group (it modifies how the effect interacts with others; increasing it will force the engine vibration to be more pronounced while other effects are active).
NOTE: Phase shift effect creates the best immersion if it changes for different vehicles with different engine/drivetrain setups. Use Vehicle assignment option to bind a vehicle to a profile and enable profile auto-switching for seamless operation (details in section 4.3.8).
Canon Fire Effect - adjusts the vibration for firing the canon effect (available only for combat flight simulators).
Missile Launch Effect - adjusts the vibration for firing the missile effect (available only for combat flight simulators).
Flare/Chaff Dispense Effect - adjusts the vibration for the effect of dispensing the flare or chaff (available only for combat flight simulators).
Seat Eject Effect - adjusts the vibration for the effect of seat ejection (available only for combat flight simulators).
Positive & Negative G Warning - two separate effects adjusting the vibration which indicates triggering the G-force warning.
NOTE: not to be confused with Positive & Negative G-force vibration curve which is used to indicate the shift in G-forces by changing the vibration intensity and frequency.
Effective Translational Lift - adjusts the vibration effect for the helicopter in ETL hover angle.
Stall Shudders/Vortex Ring State - adjusts the vibration effect indicating stalling or VRS condition.
Turbulence - adjusts the vibration effect for turbulence experience caused by lateral wind speed (wind shear).
NOTE: not to be confused with in-the-air turbulence in vertical axis which is controlled by a separate quick tune (Flight/Ground Harshness).
4.2.7 General Vehicle Parameters
Switch to Vehicle Parameters tab to start adjusting additional parameters which influence the Motion and SFX tunes.
Rev Limiter - sets the operational range of the rev limiter effect. "Max Gear" specifies the highest gear in which the effect is applied. Gears above this value will not trigger the effect. "Offset" specifies the RPM range before the engine reaches its maximum RPM at which the effect starts to activate.
Wheel Forward Slip/Lock Threshold - defines a percentage threshold of a forward wheel grip loss before the effects will be generated with a distinction between front and rear wheels.
Wheel Slip Angle Threshold - defines a degree threshold of a lateral wheel grip loss before the effects will be generated with a distinction between front and rear wheels. "Escalation" sets the range of slip angle over which the effect ramps from minimum to maximum. To have the effect start at its maximum immediately, set "Escalation" to 0.
Wheel Base - sets the distance in meters between the center points between front and rear wheels. Affects multiple different effects.
Turning Circle - sets a vehicle turning circle for other effects to calculate correctly. Go to Tools and diagnostics → Wheels Effects Diagnostics to see the conversion from steering wheel input into front wheels angle.
CoG Bias (Center of Gravity Bias) - sets the center longitudinal point of the vehicle (1 - rear, 0 - front). Crucial for oversteer and understeer.
Info
Parameters listed above are included and will generate a graph in the "Tools and Diagnostics" → "Wheels Effects Diagnostics" or Profile → "Input diagnostics" tab.
4.2.8 Aircraft Parameters
Switch to Aircraft Parameters tab (in flight simulations profiles only) to start adjusting additional parameters which influence the Motion and SFX tunes.
ETL - thresholds - sets the Indicated Airspeed threshold (in knots) for the Effective Translational Lift effect to work. "Low" sets a threshold when the effect starts and "High" ends it.
VRS - thresholds - sets the thresholds for Vortex Ring State phenomenon specific for currently selected aircraft - Indicated Airspeed in knots and Vertical Velocity in meters per seconds.
Maximum AoA - sets the threshold for a maximum Angle of Attack degree after which the warning effect starts. "Warn before" defines how many degrees before maximum AoA the warning will start.
G Warnings - sets a threshold for positive and negative G-force exceeding for a warning effect to start.
Info
All parameters listed above are included and will generate a graph in the "Tools and Diagnostics" → "Aircraft Effects Diagnostics" tab.
4.2.9 General guidelines on profile tuning
The parameter tuning general guidelines are as follows:
Changes in profiles apply instantly. Switch windows with a ALT+TAB shortcut or use the game in windowed mode to tune the profiles during gameplay.
Disable all other effects to isolate and fine-tune a single effect without "noise" from the remaining effects. Then re-enable all effects and test the profile again.
Work in small steps - change one parameter at a time and test the result.
Make sure to adjust the effects moderately, especially for roll and lateral acceleration.
Use input and output graphs to visually compare input and output signals. Right-click on the graph and select "Stay on top" to see it during gameplay/simulation.
Keep in mind that there is no need to create separate profiles for separate vehicles/aircraft - input telemetry is different for all vehicles.
Info
If you are satisfied with your profile, consider sharing it with the community. Please include a brief explanation of the profile intention and how it differs from the default profile. Go to section Sharing a profile with the community section for details.
4.3 Profile management
In order to find a profile for a specific game simply scroll down the QubicManager window. They are sorted alphabetically. User may also use the search bar and type the prefix title - the game tiles will filter immediately.
Image: search_bar.png
4.3.1 Profile badges
Profiles in main QubicManager window are marked with badges in upper right corner of their image tile to distinguish different profile sources:
(1) Built-in - badge that marks a built-in default profile made by the Motion System R&D department
(2) #ID_number - badge that marks a profile imported from a Community profiles repository
(3) Attachment link - badge that marks a profile that is attached to a game installed on the PC
(4) No badge - custom profile cloned from a different one
4.3.2 Filtering the profiles
In order to adjust the GUI for your convenience, use filtering options in the top of the QubicManager window:
Image: only_users.png
All - shows all profiles
Favorites - shows only the profiles that have been marked as Favorites inside a profile window
Only installed - shows profiles only for games that are installed on the PC, including default and user created profiles
Only user's - shows only profiles created (cloned) by the user
For the same game - shows only the profile for the same game as the one currently activated
If you want to hide all game profiles besides your own, but using software configuration (not the filters), follow steps below.
Clone the built-in profile (1):
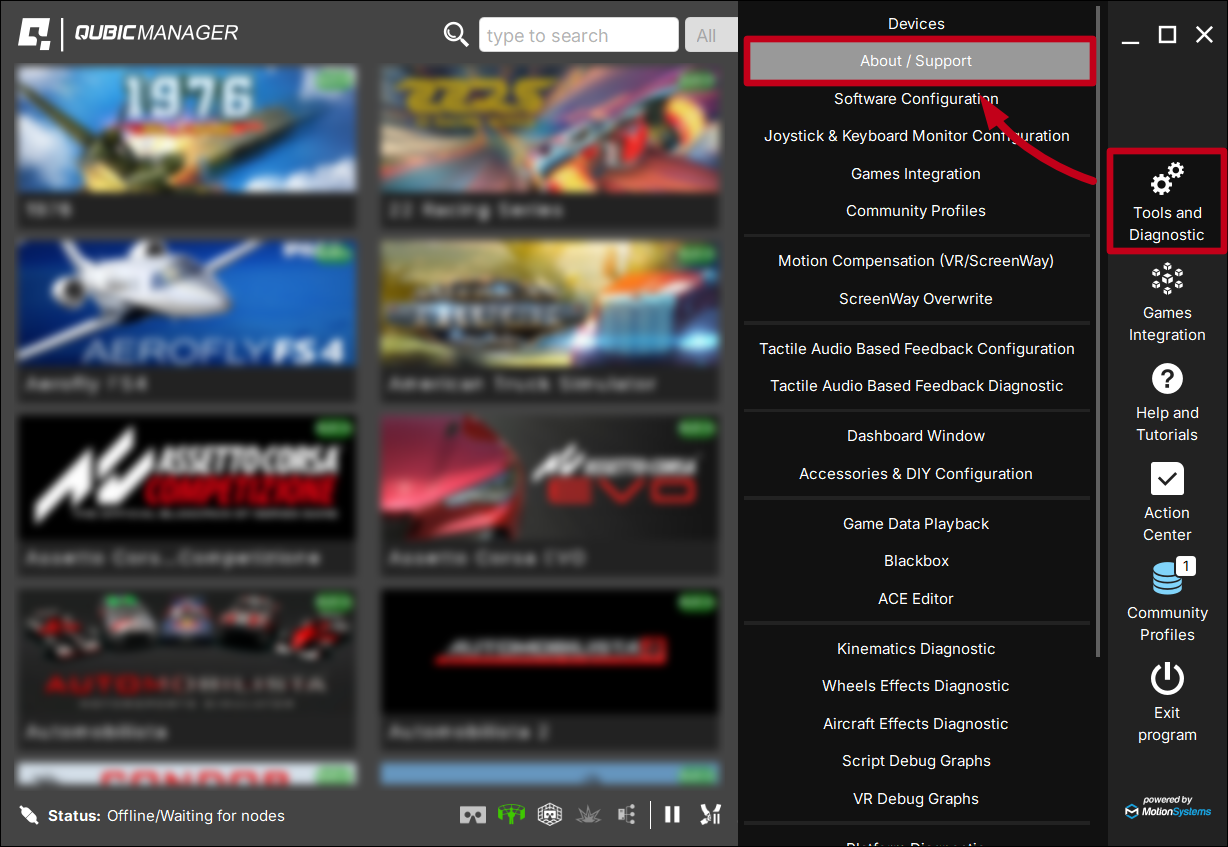
Go to Tools and Diagnostic (3) and open Software Configuration (4).
In Software Configuration you can find following parameters you might want to change:
(5) - uncheck to hide all default profiles and leave only your custom profiles.
(6) - uncheck to disable the option to control motion platform with a joystick.
(7) - uncheck to make sure that the SIM won't change the active profile.
After QubicManager restarts, there will only be user's cloned profiles on the list:
Image: fs_users_profile_only_QM.png
4.3.3 Cloning the profile
Cloning a default profile is suggested when beginning the tuning of the motion procedure. It enables easy switch between a default and a modified one and keeps a copy of default settings to serve as a guidance.
A shallow copy (1):
retains a reference to the original built-in profile (it will get updated with a software update, if some changes have been made to the profile's backend)
uses the motion scripts and all other configuration from the original profile
has unique values only for quick-tune settings, ACE configuration remains
reflects ACE changes made to the original profile automatically
Info
When using a shallow copy, the new profile is automatically updated when QubicManager is updated. If you do not intend to modify the motion script (ACE), we strongly recommend using shallow copy profiles.
4.3.4 Copying/sharing profile adjustments
There are two ways of copying profile adjustments or sharing them with friends.
1st method - exporting a full profile to a file. In the profile window go to Sharing (1) → Export to file (2). Save the file on you PC and send it in order to share.
To import that profile from a file, scroll the main QubicManager window to the bottom → click Import Profile (3) → on pop-up dialog window click Local (Online will redirect to Community Profiles) → select the file → enter a new profile name → click OK. The profile will sort aphabetically within the game group.
2nd method - copying and pasting the quick tune HEX code. In the profile window click Sharing (1) → open the drop down menu (2) → select one of 6 available configurations:
Motion/SFX/Post-processing - all effects adjustments for motion platforms (including customs cockpits with QS-210/220 vertical actuators).
Tactile Audio Based Feedback (ICE + Gearbox) - adjustments for custom tactile haptics for engine and gearbox
Tactile Audio Based Feedback (Other) - adjustments for custom tactile haptics for wheel and suspension effects
Wheel Base - adjustments for QS-DD-20 direct drive (no longer available for sale)
Seat Belt Tensioner - adjustments for QS-BT1
Vehicle Parameters - configuration of the effects parameters
It is possible to share the HEX code in two ways:
→ copy to clipboard (3) - copy and paste HEX code to share
→ Save to file (4) - save on your PC and share the file with the HEX code
To apply the adjustments:
→ Paste the HEX code into the bottom text frame (5)→ click Apply (6)
→ Load the shared file (7) → click Apply (6)
4.3.5 Sharing a profile with the community
Sharing a profile should be considered only when the profile has been tuned and tested. The user must verify themselves using their Discord login, and the profile will be published under their Discord alias.
The profile is customized by the user to their personal preferences. When submitting a profile, it is recommended to provide a brief description of the profile's purpose and to explain which aspects of the feedback have been emphasized.
To submit your profile to the database, follow these steps:
Open the profile you want to share
Select Sharing tab on the right (1)
Click Upload to database (2)
Click Login to proceed with verification (3). Follow required steps in the browser. If you have trouble verifying the Discord account, see troubleshooting guidance section, article faq-discord
After the verification, select the device for which the profile has been created and enter a brief description (5).
Click Upload (6).
4.3.6 Importing user-made profiles
Beside the built-in default profiles, created by the Motion System R&D department, there are also user-made profiles uploaded to the Community profile repository and available for download.
Info
Most profiles are created by users with the quick tune sliders and then uploaded to the Community Profiles repository. During the upload, the user's adjustments are applied to the code underneath, while the sliders themselves are reset to their default (middle) positions. This makes the imported profile a new baseline starting point for further tuning and refinement.
On the right-side panel of QubicManager , click Community profiles.
Community profiles window:
(1) - Login - re-authorization with a Discord account
(2) - Game tile - click to see all the profiles uploaded for that game title
(3) - NEW - a badge that marks profiles that have been uploaded recently, not yet seen by you
(4) - Type game name - search bar for filtering the profiles by game titles
(5) - Type device name - search bar for filtering the profile by device name
(6) - Back - click to go back to main Community profile window
(7) - Refresh - click to refresh the profiles list
(8) - Mark as seen - click to remove NEW label from the profiles (also removes the counter badge notification of Community profiles icon from the main profile window)
Inside the game title:
(1) - Import - click to import the profile to your main profile list (click Import → enter the name → click OK → profile will sort aphabetically within the game group)
(2) - Vote - upvote the profile if you like it
(3) - Mark as seen - click to remove NEW label from the profile
(4) - Type profile author, id or part of description - search bar for filtering the profiles by an author, id or description
(5) - Type device name - filter the profiles by device name
(6) - Sort - sort the profile by date, author (alphabetically) or the amount of upvotes
After importing the profile and naming it, that profile will sort aphabetically within the game group. It will be marked with a #ID_number badge (8).
4.3.7 How to integrate game/SIM with a profile
If a game/SIM is associated with a profile, profile icon displays a green link symbol (1) and the profile is filtered by "Only Installed" drop down menu filter (2).
Not all profiles have associated games. There are following reasons:
Game is not installed in your system.
Game is installed but it has not created any registry entries or other files so QubicManager could not find it - go to Games Integration (1) → type in game title (2) → click Locate (3) → specify game installation location (once inside the game folder, click 'OK') → vertical status bar will switch from black to green (4).
Game has been installed after QubicManager has already been started - go to Action center and check for game configuration.
Info
Some games (e.g. Grid, Grid 2, F1, Dirt, Dirt 2, Dirt 3) must be launched at least once before they can be configured. QubicManager can locate the game executable and assign it to a profile, but platform movements may not be active on the first run. This will be fixed automatically at the next system start or can be done manually.
The game creates a user profile on first launch, which QubicManager must modify to enable telemetry data via UDP. The correct procedure is as follows:
Install the game.
Start the game.
Create user profile in the game and exit.
Go to QubicManager Action Center and click Check configuration.
4.3.8 Automatic profile switching
Automatic profile switching means, that the profile will switch in the background automatically after the user:
launched a different game or changed the vehicle in the game (1)
launched a different game (2)
Pick Never to disable automatic profile switching.
Info
Assigning a vehicle to a profile can be useful if you have prepared separate profiles for different cars and you want these profiles to switch automatically when you select a different vehicle in the game, without having to open QubicManager and switching them manually.
This functionality can also be used to apply different Screenway settings for different vehicles (e.g. for car mods with different telemetry that may disrupt the motion platform or Screenway settings).
To activate profile auto-switching, go to Tools and diagnostics (1) → Software configuration (2) → general settings (3) → scroll down → Profile auto-select drop-down menu (4) → When game or vehicle change (5). The software will restart.
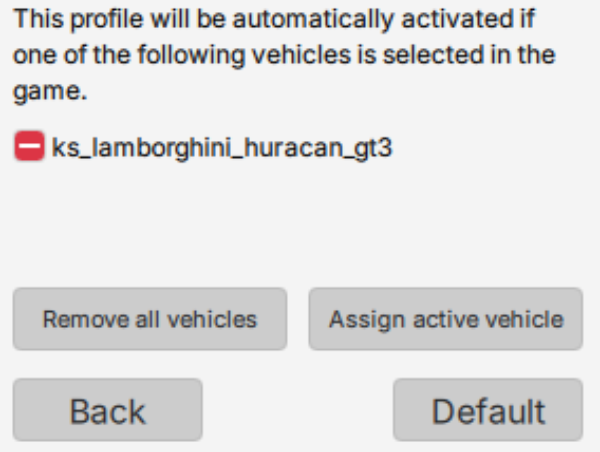
Assigning a vehicle to a profile:
1st method: Click the Assign active vehicle button (6) in the profile window while a game session is running in the background. The car will assign and show on the list (7).
2nd method: Activate a profile → launch the game → select a vehicle inside the game → enter a game session.
Vehicle is now assigned to this profile (sometimes you have to leave the pits before the assignment functionality activates). You can see that it has been assigned in the profile window.
3rd method: While in a game session and driving a specific vehicle that you want to assign to a different profile than the current one - switch between game and QubicManager window and activate the target profile. The vehicle will be assigned to the profile that is currently activated.
To remove a vehicle from a given profile, either assign it to a different profile or click the minus button (8) next to it in the profile window.
5 Motion compensation
When a real vehicle enters a turn, the resulting lateral forces push the driver's body outward from the seat. To simulate this behavior, the motion platform must tilt its upper frame. These movements are interpreted by VR systems as head motion, which is inaccurate.
In the case of static displays - with bigger travel actuators the user is being moved out of alignment from the screen, creating a constant need to follow the screen with head and eye movements. QubicManager has a solution implemented for both Virtual Reality headset users and static display users.
Motion platform movement alters the position of the entire cockpit, including the driver. VR systems interpret this as actual head movement and apply it to the tracking data. Without compensation, the driver could experience disorientation, discomfort or even nausea (VR sickness). QubicManager uses advanced mathematical formulas to calculate necessary compensation and applies it to the VR headset at its run time. It eliminates platform movements from the VR tracking system making your experiences to be more immersive and authentic. Compensation module is transparent for end users, it can be used with almost all our platforms and level of correction can be adjusted to user individual preferences with a few simple sliders.
5.1.1 VR HeadWay activation
In order to activate VR HeadWay, go to Tools and Diagnostic (1) → Motion Compensation (VR/ScreenWay) (2) → System Integration (3) → select Enable the motion compensation subsystem for VR (4).
Make sure that all required drivers are installed:
Image: vr_headway_enable2.png
Check if all required integration methods are enabled (they are activated by default):
Image: vr_headway_enable3.png
Warning
If the VR HeadWay does not work, despite completing all the steps, there might be a conflicting 3rd party software. TrackIR, OpenTrack and other similar tracking software may cause conflicts with VR HeadWay. They need to be uninstalled or disabled for correct motion QubicManager motion compensation systems to work.
5.1.2 VR HeadWay procedure for mapping the coordinate system
Mapping procedure must take place at first game start at VR mode. Usually once found settings are still correct even after PC cold restart, but in some cases remapping might be needed after power shutdown. You can redo the VR coordinate system mapping at any time.
Info
For VR headsets that do not use external reference sensors and are unable to restore the coordinate system after powering off and on, it is required to run the mapping procedure each time the VR system is powered back on.
Activate profile for a selected game, click Run the game, and on startup window select VR mode. If the game went directly to game session - pause it.
Image: vr_headway_enable4.png
Take a seat and put the VR headset on your head.
Use keyboard (Win + Shift + O) or gamepad hotkey to begin VR coordinate system mapping procedure. You can configure binding in Software Configuration window. Or click the mapping button at the bottom of the window.
It will take a while - platform will perform series of movements and the lector will talk you through it. Make sure that you are not moving your head during mapping process (rest it against the headrest).
You can redo the mapping at any time during the gameplay.
5.1.3 In-game VR camera zero position
This step should be performed whenever the in-game camera orientation is not correct. Usually, when the game starts, the current position of the VR headset is taken as the zero position. The motion platform usually activates only when the game session starts. As a result, the VR camera in the game is at least shifted vertically. The correction procedure is to lock the motion platform in the center position and reset the in-game camera.
Use keyboard, gamepad hotkey or QubicManager 's bottom icon (1) to lock the motion platform in centered position (or configure the bindings in Software Configuration window).
Look forward and center VR camera in the game. Check game's user manual for details.
Use keyboard, gamepad hotkey or an icon (1) to unlock the motion platform from centered position.
5.2 ScreenWay - stationary display compensation
The ScreenWay compensation principle is similar to VR HeadWay. It adjusts the in-game camera position to compensate for the motion of the motion platform. That way, if the television or monitor remains stationary, it is possible to align the screen view with the user's body or head position.
Image: screenway_title.png
Keep in mind that:
ScreenWay is not required and becomes redundant if your display is physically attached to the rig.
ScreenWay will function only with a game that provides an API that allows the software to manipulate the camera position. The list of games tested with the ScreenWay function is provided at the end of this section.
ScreenWay and VR HeadWay do not operate simultaneously.
Some games apply camera-movement smoothing, which makes it impossible to compensate for short, rapid movements of the motion platform.
For most games, ScreenWay will operate ONLY with the cockpit camera (the camera including the steering wheel, not the one fixed to the dashboard).
Info
ScreenWay operates ONLY along the axis of the motion platform. The QubicManager software and a functional motion platform are required for the compensation mechanism to work. This includes active effects in the QubicManager profile options — if an effect is deactivated, it does not produce movement and, therefore, does not generate compensation for the stationary display. The same rule applies when the motion platform is stopped using the Motion Lock button.
5.2.1 Screenway activation and configuration
In order to activate the ScreenWay compensation, navigate to "Tools and Diagnostic" (1) → "Motion Compensation (VR/ScreenWay)" (2) → "System Integration" (3) → check "Enable the motion compensation subsystem for stationary displays (ScreenWay)" (4).
Upon activation, the ScreenWay option will appear in the "Other" tab of the profile window (5). It is initially configured with default values (6). Activate a profile (7), launch a game (8), enter a game session, and ensure that your motion platform is operational. The screen should now move in synchrony with the motion platform. Please note that ScreenWay compensates only for the degrees of freedom supported by your platform. For example, yaw and surge compensation are available only on devices capable of generating these degrees of freedom.
Tip
It is recommended to compensate primarily for sway and yaw. Roll, pitch, and heave adjustments are optional and depend on user preference.
Use the smoothness slider to reduce abrupt or rough camera movements.
ScreenWay operates more effectively at higher frame rates.
Position the rig as close to the display as possible for optimal immersion and improved compensation perception.
Consider setting the "Roll Compensation" value to a negative number; for some users, this may provide a more intuitive response.
5.2.2 ScreenWay game integration
If you would like to verify whether the ScreenWay system is supported by a given game title, open that game's default profile and check if the ScreenWay tab is available (after ScreenWay has been activated). If it is not visible, ScreenWay will not function with that game.
ScreenWay compensation can be diagnosed using overwrite operation: navigate to "Tools and Diagnostic" → "ScreenWay Overwrite" (9). During an active game session, select "Roll" (10), and after the countdown (11), the in-game camera will briefly display full roll compensation.
List of tested games - ScreenWay works:
Assetto Corsa
Assetto Corsa Competizione
Dirt 2.0
EA Sports WRC (only with additional software; go to "Help and Tutorials" → "How to configure ScreenWay for EA Sports WRC" for details)
iRacing
Automobilista 2
RaceRoom
F1 2024
rFactor 2
BeamNG (early access)
Le Mans Ultimate (early access)
Flight Simulator 2020
Flight Simulator 2024
List of tested games - ScreenWay does not work:
Richard Burns Rally
Assetto Corsa Evo (early access)
Euro Truck Simulator
American Truck Simulator
Forza Horizon 4
Forza Horizon 5
Forza Motorsport
Info
Go to the Help and Tutorials articles on ScreenWay, since they contain ways of activating the system on EA Sports WRC and WRC Generations. These titles need additional software and different configuration for the ScreenWay to work correctly.
Image: screenway_help_article.png
In some cases, for the ScreenWay to function correctly, you must enable a specific method of using a given API. Go to Tools and Diagnostic → Motion Compensation (VR/ScreenWay) → ScreenWay, to check what Dedicated APIs there are to work with certain game titles.
Image: screenway_enable2.png
To enable these APIs, go to Tools and Diagnostic → Motion Compensation (VR/ScreenWay) → System Integration and scroll down. Select one of the listed Methods to enable the API.
Image: screenway_enable3.png
Warning
If the ScreenWay (and the overwrite operation) does not work, despite completing all the steps, there might be a conflicting 3rd party software. TrackIR, OpenTrack and other similar tracking software may cause conflicts with ScreenWay. They need to be uninstalled or disabled for correct motion QubicManager motion compensation systems to work.
6 Diagnostics
Checking data/telemetry diagnostics can be useful to verify problem with a platform, with an effect or to adjust main motion or special effects tune.
6.1 Input data diagnostics
Input data diagnostics shows you all the input data that comes from the game (or simulation) to the software, to be then calculated into "top frame position" (individual actuator acceleration and position calculations).
This can be useful for troubleshooting effects missing from the motion platform. Different games transmit different telemetry data, and in some cases the signal may be either sparse or rich in effects. The Input Diagnostics tool allows you to verify the presence (or absence) of incoming data, enabling you to distinguish between an issue with the motion platform itself or a problem in the software generating the motion feedback.
Info
Keep in mind: all Qubic System devices respond directly to the in-game telemetry, not to pedal, steering wheel or flight stick inputs. Software calculates the top frame position (or haptic special effects, belt tensioning force, etc.) from input data.
In order to use the diagnostics - go to Profile window → click Input diag. → right click on any graph and select "Stay on top" → start the game → start generating input date - enter driving/flying session → use the graphs to verify that the telemetry is consistent with vehicle's/aircraft's movement.
6.2 Output data diagnostic
Result of the motion cueing algorithm operation can be checked in following places - Script Debug Graphs (1) or in Platform Diagnostic (2).
In Script Debug Graphs you can check output to the motion platform (1). The output to the motion platform does NOT indicate if the requested motion combination is within the work envelope - this can be checked only in Platform Diagnostic.
6.3 Platform diagnostics
The Platform Diagnostic is able to perform different tests on the motion platform to determinate if the motion platform is operating correctly, but from the motion-cueing algorithm point of view the most important components are IK Roll, IK Pitch, IK Yaw, IK Heave, IK Sway and IK Surge from Actuators Position tab. These graphs display how requested position (orientation and translation) of the top table changes over time (1).
Once the ACE generates required top table position, then the kinematics processor calculates required actuators extensions (sometimes also referred to as actuator position or arm angle).
If the specified combination of motions is outside the top table's work envelope, the motion is downscaled to the work envelope boundaries. The Platform Diagnostic indicates the occurrence of this event by displaying the IK graphs in ORANGE (2) and showing the "Out of range" status (3).
Each graph contains two plots: the first is the required IK position, and the second is the downscaled achievable IK position that will be used.
Info
It is perfectly acceptable for an out-of-work-envelope condition to occur occasionally in extreme cases (e.g. when a vehicle hits a wall). However, if this starts to happen too frequently, the motion-cueing algorithm parameters may require adjustment.
Use the sliders (4) to position the platform (actuators). Sliders for unavailable degrees of freedom will be greyed out. At maximum speed, platform motion is abrupt—reduce Max Speed (5) to 20% for smoother movement.
Warning
Keep in mind that the Platform Diagnostic window has exclusive control over the platform. Close this window before starting the game.
6.4 Seat Belt Tensioner Diagnostic
Seat Belt Tensioner diagnostic manipulates the QS-BT1 directly for testing purposes. It also contains diagnostic input and output data in a form of graphs.
Use the sliders for left, right or both (1) belts to test the tensioning force and its smoothness.
Info
The tension command cuts off after a few seconds - it is a normal occurrence (2).
(3) Road left and right - road harshness input signal graphs.
(4) Vertical - vertical G-force input graph.
(5) Acc./Deceleration - acceleration and braking (deceleration) input graph.
(6) Required Force [%] - graph that plots (as a percentage of the maximum force) the actual applied force. This tool is the primary method for verifying that the QS-BT1 can process the signal without delay.
(7) Actual Current [mA] - real-time current consumption graph in milliamperes (mA).
(8) VDC [V] - DC voltage graph.
(9) Rear light - back led bar tester. Check the box to test whether the LED assigned to specific effects is functioning properly.
Tip
Double click on a graph to enlarge it to a separate window. Right-click the graph for more options.
6.5 Game Data Playback
Gama Data Playback allows to record input telemetry data generated during gameplay, save it to .csv file and play it back. The motion platform works with the recorded data exactly as it was captured, accurately reproducing the original motion from a gameplay.
This tool records clean input telemetry data. It is calculated and converted into motion cues during playback. You may change the profile, activate or deactivate effects, connect a new device (including adding the QS-BT1) - the recording will be fully compatible and correctly applied for a current setup.
You can use the same recording.csv and play it on another QS-device, using QubicManager . The motion will vary depending on the motion platform setup and profile used.
Tip
Game Data Playback is a helpful diagnostic tool. It can be used to find faults in the cockpit (source of noise or loose connections) or to tune a profile in real time by adjusting the quick tune sliders and immediately experiencing how the motion platform adapts to the updated motion pattern.
Game Data Playback window:
(1) Record (Single) - records the input telemetry for a maximum of 5 minutes. After it stops automatically the recording cannot be saved, only played back, unless it is stopped by user first
(2) Record (Loop) - continuously records the last 44 seconds of input telemetry. Click Stop to save that 44 second recording to a .csv file
(3) Play - opens a Windows file explorer to load a .csv recording file. NOTICE: After selecting a recording it immediately starts the data playback and the platform begins the move
(4) Stop - stops the recording and allows to save it to a .csv file
(5) Auto repeat - select it to make the recording play on repeat
(6) Steering, Gas, Brake - shows the control devices inputs
(7) Graphs for Roll, Pitch, Yaw, Heave, Sway, Surge - graphs plotting real-time data of all 6 degrees of freedom
(8) Graphs for motors 1 to 6 - graphs plotting motor data
(9) Graphs for QS-BT1 - graphs plotting QS-BT1 diagnostic data for tensioning force, current and voltage.
(10) Eye button - click to make the window stay always on top
6.6 QubicManager device statuses
Image: status_not_connected.png
- no device is detected. If status appears while devices are connected - indicates that firmware update failed (requires firmware recovery) or M10 controller or USB connection is at fault. Check USB connection for loose connections, try different USB ports, bypass any USB hubs, swap USB cable for a different one.
Image: status_offline.png
- Power Cabinets are disconnected or not powered. If this status appears during operation - check power cords, power switches, CFG DIP switches configuration and M-BUS connection cables.
Image: status_running.png
- the device is in simulation/receives input signal.
Image: status_paused.png
- the device is paused (Pause button at the bottom of the QubicManager window).
Image: status_motion_lock.png
- Motion Lock system has been triggered. Unpress the Motion lock button, check the Motion Lock button cable/connection. In a setup with no Motion Lock button - check the Motion Lock jumper.
Image: status_cycle_motion_lock.png
- the device is waiting for a cold start procedure (more details in device user manual).
Image: status_pending_ref_run.png
- the device is performing calibration/reference run. DO NOT change the payload.
Image: status_parking.png
- the device is parking (the game/simulation was paused or no telemetry input is available).
Image: status_parked.png
- the device achieved parking position and is in stand-by mode. It is powered, connected and ready to be operational.
Image: status_connected_with_issues.png
- there is an issue with the connection or power - check the working status in Tools and diagnostic → Devices.
Info
ALL diagnostics and cable connection inspections MUST be performed with the device powered OFF.
If any of error statuses persist after performing the troubleshooting steps - please contact technical support.
7 Support
7.1 Help & Tutorials and Context help
Context help is integrated directly into QubicManager and is available on demand. It includes a wide range of topics not covered in this document, as well as tutorials that assist with common configuration tasks.
When context help is available for the current window, a help icon is displayed in the title bar.
If there is a help chapter available for a specific topic or section, there is a link displayed.
The same content can be reached by opening directly from application main window (Help and Tutorials).
Use a search bar (1) to find a topic or browse the list on the left (2).
7.2 Frequently asked questions
Find the issue relevant to your situation, and then locate the solution with the matching number in the following section.
Questions:
Why do I have no motion when I started the game?
Why some of the motion effects/motion cues are missing during gameplay?
Why motion platform works in one game, but doesn't work in a different?
Why I don't get a proper feedback when stepping off the gas/brake pedal?
Why I have to cycle the Motion lock every time I turn on the platform?
How to correctly turn off the platform? Is there a procedure in QubicManager?
Why my profile feels different after I updated QubicManager?
Does QubicManager works together with SimHub/different motion cueing software?
My monitors are static and not a part of motion platform, is there a compensation system?
Why some of my special effects are not working?
Can I run QS-BT1/other QS device from Simhub?
Can I run QubicManager on Linux?
Is QubicManager compatible with PlayStation/Xbox?
I'm having trouble mapping/calibrating the VR headset with VR HeadWay.
Why motion compensation ScreenWay does not work, despite completing all the configuration steps?
Can I run QS-BT1/other QS-device with a game not listed on Supported Games list (https://qubicsystem.com/supported-games/)?
Why I can't log into Profiles base via Discord link?
There's a new game coming out, will you support it?
Can I tune my profile using my button box/Streamdeck?
Why QubicManager software crashes on launch (OpenGL error)?
Why my profiles are not switching when I change the vehicle?
Why I get an error after/during a firmware update?
How do I roll back the software update/firmware update?
I want to implement an uncommon functionality/add support for a functionality using ForceSeatMI. Is it possible?
QubicManager has thrown an error code I've never seen before, what does it mean?
Why my antivirus software shows potential danger from QubicManager software?
Why my profiles are not switching when I change the vehicle?
I'm skeptical, do I NEED to perform an update?
How do I roll back the QubicManager version?
Why after update I encounter an error when trying to use QubicManager ?
Solutions:
Why do I have no motion when I started the game?
Check if your device it powered.
Check if your device is plugged in via the USB/M10 controller.
Check if the correct profile is activated. If there is no game profile - check the Game integration tab. If it is not there, it is not supported.
Check if the game generates input signal (section 6.1).
Check Device status at the bottom left corner - refer to section QubicManager device statuses for explanation of statuses meaning. If it states "Running" or "Parked/centered" - go to Platform Diagnostic and use the sliders to confirm the motion.
Refer to troubleshooting section of your device's user manual.
Why some of the motion effects/motion cues are missing during gameplay?
Check if you have a correct profile activated
Check if these effects are not disabled or turned down in the profile menu (Motion and SFX tab)
Verify that they are available as a input telemetry - go to profile window → Input diag. → right click on a ny graph and select "Stay on top" → begin gameplay → look for graph oscillation (section 6.1)
Check Vehicle/Aircraft parameters tab in profile window - they specify engagement threshold for some of the effects
Make sure you have updated your QubicManager to a latest version
Why motion platform works in one game, but doesn't work in a different?
Check if you have a correct profile activated
Check if all effects are not disabled or turned down in the profile menu (Motion and SFX tab)
Check Action center for any pending issues
Go to Game integration → search for the game → Locate it if needed (point to a specific game folder) → reestablish game integration (by clicking Clear → Locate).
Verify if there's any input telemetry - go to profile window → Input diag. → right click on a ny graph and select "Stay on top" → begin gameplay → look for graph oscillation
Check Vehicle/Aircraft parameters tab in profile window - they specify engagement threshold for some of the effects
Make sure you have updated your QubicManager to a latest version
Why I don't get a proper feedback when stepping off the gas/brake pedal? PS- and QS-devices respond to vehicle physics - the braking force is represented as negative forward acceleration that comes from the vehicle telemetry, not a brake pedal input. This is the reason why the platform can perform pitch motion even without braking, but when starting to slow down by downshifting (engine braking).
Why I have to cycle the Motion lock every time I turn on the platform? For safety reasons, and in strict compliance with the requirements of ISO 14118:2017 (E) concerning the prevention of unexpected start-up, the QS-210, QS-220, QS-V20, QS-CH2, QS-S25 and QS-S35 motion systems require one complete cycle of the Motion Lock switch whenever power is restored after being cut off.
How to correctly turn off the QubicSystem platform? Is there a procedure in QubicManager? There is no shut-down procedure. All QS devices can be just powered off. Use a built-in power switch, custom one, a smart plug or an extension cord with a power switch (all rated for 10A minimum). Or simply plug it off (from the wall socket first, NEVER the DC side of Power Control Unit).
Warning
PS-series platforms have a strict shut-down procedure. Refer to machine's user manual for details.
Why my QS-BT1 seatbelt tensioner/QS-H13 seat mover keeps cutting out, shows disconnected status? Most likely it is a USB connection related issue. Refer to a troubleshooting section in device's user manual. In short: use a shortest possible USB cable and a powered hub/active extender with an integrated cable.
Why my profile feels different after I updated QubicManager? Our R&D department constantly improves default profiles to make them more reliable, comfortable and realistic. Also, support for new devices are being implemented.
You can create a non-shallow copy of a profile which will not be updated. Keep in mind that it could create issues with compatibility in the future.
Does QubicManager works together with SimHub/different motion cueing software? Refer to a compatibility table - Software compatibility. Some games need UDP port forwarding. For details refer to QubicManager → Help and Tutorials → type in 'UDP' for a specific game's tutorials.
My monitors are static and not a part of motion platform, is there a compensation system? ScreenWay is motion compensation system. It moves the image on the monitor referring to motion platform's available degrees of freedom and offers an adjustable rate of compensation. For details go to section 5.2.
Why some of my special effects are not working?
Check if their settings specify an engagement threshold.
Check Vehicle/Aircraft parameters tab in profile menu - they specify special effect's thresholds as well.
Can I run QS-BT1/other QS device from other software (e.g. Simhub)? No. Both PS- and QS-series devices are run by the QubicManager exclusively.
Can I run QubicManager on Linux? QubicManager are compatible with Windows only - for details go to section System requirements.
Is QubicManager compatible with PlayStation/Xbox? QubicManager is able to create motion cues for console games only if 1/ they transmit motion cueing telemetry data and 2/ there is a PC for our software to run on and serve as a telemetry relay. For details go to QubicManager → Help and Tutorials → type in 'Gran turismo 7' (the procedure is explained on GT7's example).
I'm having trouble mapping/calibrating the VR headset with VR HeadWay. Make sure you are following the procedure:
Seat down in your seat wearing the VR headset
Activate profile for a selected game, and the game must be started in VR mode
Start the mapping procedure (Win + Shift + O or the button at the bottom)
Image: vr_mapping_button.png
Platform will move, do not move your head during calibration
Often, even after the calibration, the in-game VR camera must be centered. Find the keyboard shortcut for that, keep your head straight in a comfortable position and reset the zero camera position.
Why motion compensation ScreenWay does not work, despite completing all the configuration steps? If the ScreenWay overwrite/VR HeadWay does not work, despite completing all the steps, there might be a conflicting 3rd party software. TrackIR, OpenTrack and other similar tracking software may cause conflicts with VR HeadWay and ScreenWay. They need to be uninstalled or disabled for correct motion QubicManager motion compensation systems to work.
Can I run QS-BT1/other QS-device with a game not listed on Supported Games list QubicSystem.com/supported-games? It is possible to map an input device (controller, joystick) to operate both the in-game vehicle/aircraft controls and simultaneously create user specified motion cues for a given degrees of freedom and special effects. For details go to QubicManager → Help and Tutorials → type in 'joystick' and follow the instructions.
Why I can't log into Profiles base via Discord link? In order to see (and contribute to) Community Profiles, QubicManager software needs to authorize the access via Discord account. When you enter Community Profiles, it should automatically open a tab in your browser asking you to authorize access. This is a normal and safe procedure.
If the authorization does not work for you:
try logging in using incognito mode in your browser
try to log out and then log back in - click the small profile icon in the upper right corner
check if there's no conflict on port 1337 - that port is used by Discord for the authorization, but other software on your PC could be using it as well, creating a port conflict
check if your antivirus software is not blocking the connection there is a limited time to authorize the connection - after it has elapsed, try point 1
you can also log out all together by going to QubicManager → Tools and Diagnostics → About/support → Repair → Account „Logout". Then restart the software.
There's a new game coming out, will you support it? If it provides vehicle physics telemetry, probably yes. It is up to game developers how soon will that happen (early access, beta version, official release). Go to our Discord for more details (Discord channel) - we usually inform users on progress status.
Can I tune my profile using my button box/Streamdeck? Yes, you can. For details go to QubicManager → Help and Tutorials → type in 'button box' or 'stream deck' and follow the instructions.
Why QubicManager software crashes on launch (Open GL error)? It is usually caused by a crashing graphics driver.
Solution short-term: To open the app, click OK on all the operating system errors. Restart the QubicManager software and you will be presented with a window:
Image: opengl_error_3.png
Click "YES" if you want run the application in Safe Mode (it will run a little slower).
Solution long-term #1: In order to overwrite the OpenGL rendering backend permanently, type in troubleshooting in Windows search bar. Select Qubic System Troubleshooting Assistant.
Image: opengl_error_1.png
In the prompt window, type 6 on your keyboard and click Enter. Restart the QubicManager application.
These solutions will not work in every instance. In some cases - proceed to long-term solution #2.
Image: opengl_error_2.png
Solution long-term #2: This issue is caused by graphics drivers. Try to downgrade to a previous version of graphics drivers or check for updates.
Why my profiles are not switching when I change the vehicle?
First, check if the auto-switching option is enabled. Go to QubicManager → Tool and Diagnostic → Software Configuration → scroll down and check 'Profile auto-switch' drop-down menu.
Go to you profile and make sure that the car is listed, which means it got attached to that profile (switching to a car that is listed will switch that profile).
Image: vehicle_assign.png
Check if that vehicle even provides a vehicle ID. Go to your profile menu → Input Diag. → check if at the bottom left corner it specifies any vehicle during gameplay. Some vehicle (mods do that often) do not have an ID attached to them. That means you are not able to attach that vehicle to a profile. ID may also be removed or changed during game update.
Why do I get an error after/during a firmware update? Usually it is correlated with an USB connection. Try different PC USB ports, bypass USB hub, try a different, use a shortest possible USB cable and a powered hub/active extender with an integrated cable.
How do I roll back the firmware update? It is not recommended and cannot be done without a specific installer/procedure. Please contact technical support at qubicsystem.com/technical-support and describe your problem.
I want to implement an uncommon functionality/add support for a functionality using ForceSeatMI. Is it possible? For personalized approach, please contact technical support at qubicsystem.com/technical-support
Why my antivirus software shows potential danger from QubicManager software? Our software is signed with a recognized code-sign certificate assigned to MotionSystems and is safe to install and use. Danger notification must be a false positive from the antivirus software.
I'm skeptical, do I NEED to perform a software update? It is strongly recommended for safety, compatibility and reliable operation of the QubicManager . Remaining at an old software version will cause motion platform and other devices operational problems in the future and it could lead to unpredictable motion in the future.
How do I roll back the QubicManager version? It is not recommended. If there is a good reason behind it, please contact technical support at qubicsystem.com/technical-support and describe your case.
The procedure when given an older QubicManager build: uninstall the current version → reboot the PC → install the older build. DO NOT install/downgrade firmware package.
Why after the update I encounter an error when trying to use QubicManager ? Completely uninstall QubicManager , all versions → use a program that removes old software libraries and wipe them clean → restart your PC → install QubicManager again.
7.3 Technical support request
If you encounter any issues with your device, please keep in mind that most problems are common and already have known solutions. Therefore, always first check:
Device status - refer to section 6.6 for more information
Troubleshooting procedures in your device's User Manual
If your issue is not covered in any of these sections, submit a technical support request at QubicSystem.com/technical-support.
To ensure clear and efficient communication, include:
A precise description of the issue and its context.
Photos and videos - if your issue relates to the connection setup or device operation.
Snapshot file created while the device is powered on (unless the issue concerns the power supply) - see section 7.4. The snapshot contains logs with all the necessary information required by technical support.
7.4 Creating a snapshot
A snapshot is the easiest and fastest way to diagnose a problem. If you send in the zip file generated in the snapshot menu along with a description of the problem, technical support receives all the necessary information about the product and its configuration. It can be then analyzed to provide the best solution.
Info
The QubicManager and all interconnected Power Cabinets MUST BE be powered up when creating the snapshot.
Open the main window of the QubicManager application.
Select data that will be included in the snapshot.
Scroll down, consent to the technical support terms and conditions and select Create & Show:
Image: Screenshot_QS_snapshot2.jpg
The snapshot has been created, click the OK button - the folder with the snapshot ZIP file will open.
Image: snapshot_2.png
Attach the snapshot ZIP file to your support request.
Alternatively, click Snapshot icon in the top-right corner of the Action Center:
Image: creating_snapshot.png
7.5 Discord channel
We strongly recommend joining our discord channel, where our growing community is sharing amazing tips and ideas of how to set up, use and tune the Qubic System products. You can also send questions for our staff or get answers directly from the community.
Join our discord channel by following the invitation link:
ForceSeatMI is an easy to use yet powerful interface that allows to add a motion platforms support to any application or game. In most applications there is no need to control the hardware directly from the SIM. Because of that ForceSeatMI is used only to send telemetry or positioning request to QubicManager . This approach delegates responsibility of transforming telemetry data to an actual platform motion from the SIM to QubicManager . It also simplifies error handling that the SIM has to implement.
Image: fsmi_diagram.png
8.2 ForceSeatDI
ForceSeatDI (Direct Interface) is a lower level interface than ForceSeatMI. It controls hardware directly and ForceSeatPM is not required at all. All error handling and status checking have to be performed by the application. This interface allows to control more than one motion platform from the same PC and allows to create complex but fully synchronized movements of multiple motion platforms.
Image: fsdi_diagram.png
8.3 ForceSeatMI vs ForceSeatDI
ForceSeatMI (Motion Interface) is a programming interface that allows to add a motion platform support to any application or a game. The ForceSeatMI does not control hardware directly - it sends all data to ForceSeatPM. This approach delegates the responsibility of transforming telemetry data to a real motion from the application to ForceSeatPM. It means that application developers do not have to worry about things like platform disconnections, transmission errors, thermal protection warnings or signal filtering.
Direct Interface is less complex than ForceSeatMI. It manages hardware directly, thus ForceSeatPM is not essential. Checking errors or status is a duty of the application. It allows to control multiple platforms from the same computer. It is possible to build complex and fully synchronized movements of multiple motion platforms at once.
Warning
ForceSeatDI should be used only in very specific applications. For all other applications,
ForceSeatMI is recommended.
http://qubicsystem.com/uqsace ACE Documentation - an advanced user manual, with a comprehensive description of the ACE vehicle physics simulation application, including detailed explanations, practical tips, and examples, as well as in-depth coverage of motion cueing algorithms and their tuning capabilities.


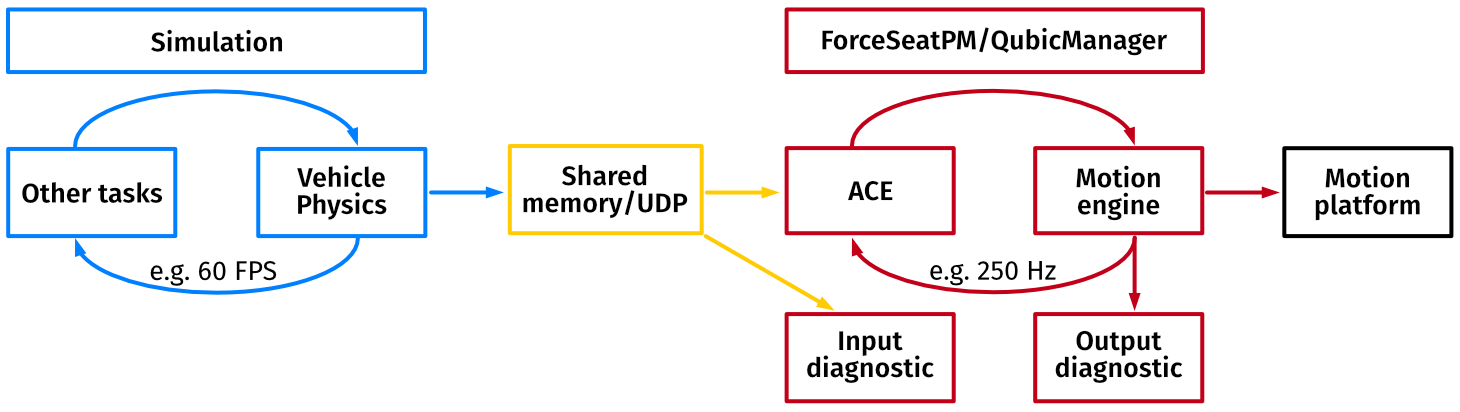 Motion diagnostics
The role of Platform managers (ForceSeatPM and QubicManager are very similar - more details in section 3.1) is to provide the user with a graphical interface and tuning controls, allowing adjustment of motion intensity and strength. While ACE calculates and filters incoming data, QubicManager can also selectively disable or modify feedback generated by specific effects.
Additionally, the software collects and presents diagnostic information via graphical charts for input, output and top frame data, enabling detailed system and motion cueing process analysis.
Motion diagnostics
The role of Platform managers (ForceSeatPM and QubicManager are very similar - more details in section 3.1) is to provide the user with a graphical interface and tuning controls, allowing adjustment of motion intensity and strength. While ACE calculates and filters incoming data, QubicManager can also selectively disable or modify feedback generated by specific effects.
Additionally, the software collects and presents diagnostic information via graphical charts for input, output and top frame data, enabling detailed system and motion cueing process analysis.
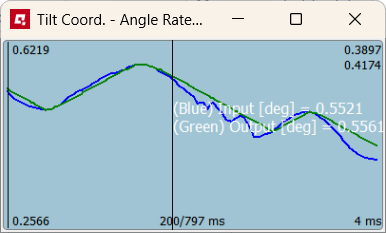 Full adjustability or seamless operation out of the box
Although the underlying processes are complex, the key point is that the user retains full control over profile parameters and platform behavior when desired. And by creating and refining the built-in default game profiles in-house for users who prefer a simplified experience, the platform manager software ensures smooth motion and reliable feedback without any manual adjustments.
Baseline (built-in) default profiles are a good starting points for further adjustment. For details and tips on tuning sliders adjustment, go to section 4.2. If you want advanced motion tuning and intend to create entirely new profiles from scratch, proceed to the Vehicle Physics Simulation Application manual.
Platform manager software operation in examples
Full adjustability or seamless operation out of the box
Although the underlying processes are complex, the key point is that the user retains full control over profile parameters and platform behavior when desired. And by creating and refining the built-in default game profiles in-house for users who prefer a simplified experience, the platform manager software ensures smooth motion and reliable feedback without any manual adjustments.
Baseline (built-in) default profiles are a good starting points for further adjustment. For details and tips on tuning sliders adjustment, go to section 4.2. If you want advanced motion tuning and intend to create entirely new profiles from scratch, proceed to the Vehicle Physics Simulation Application manual.
Platform manager software operation in examples
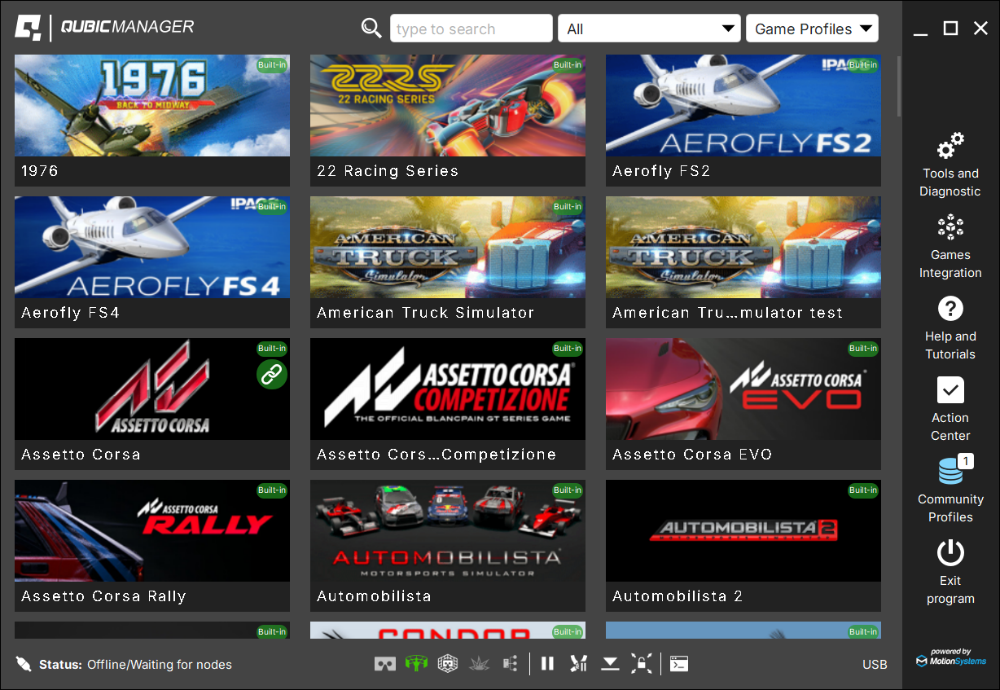
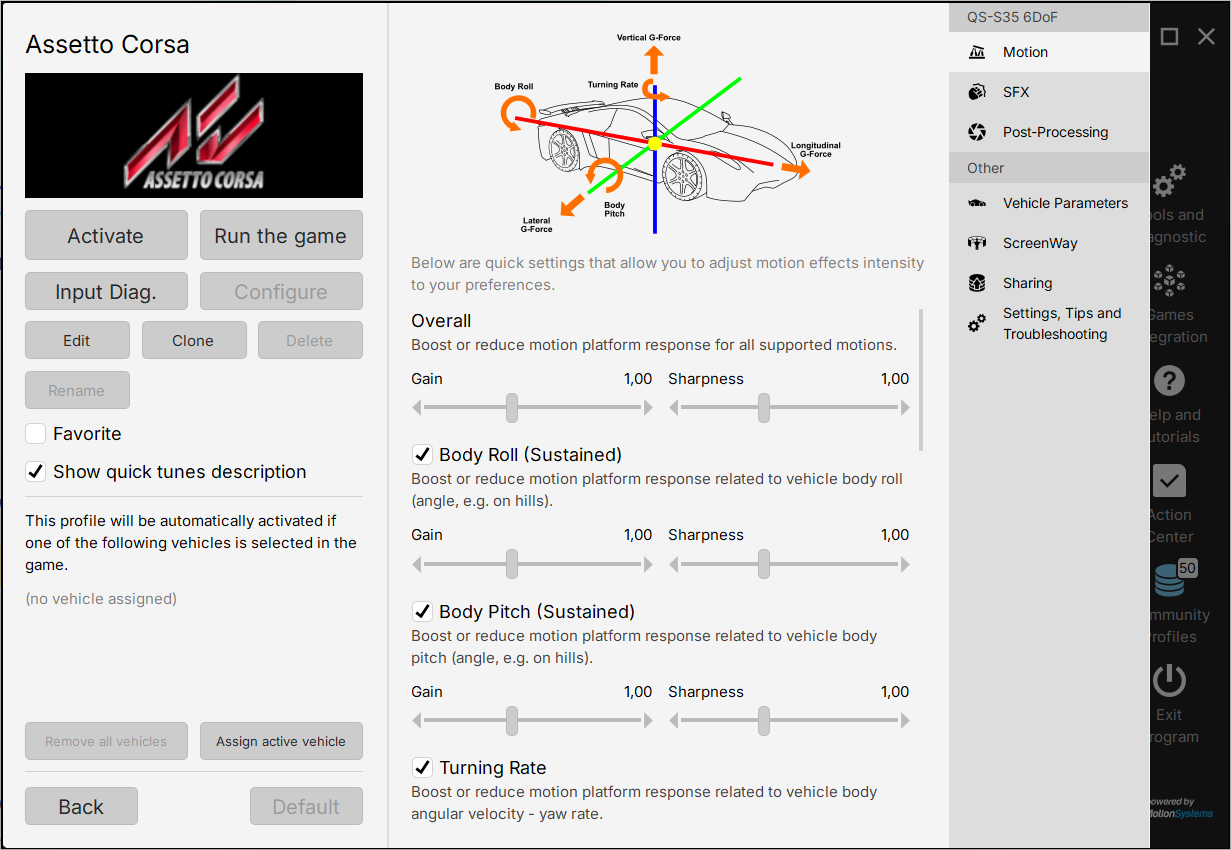
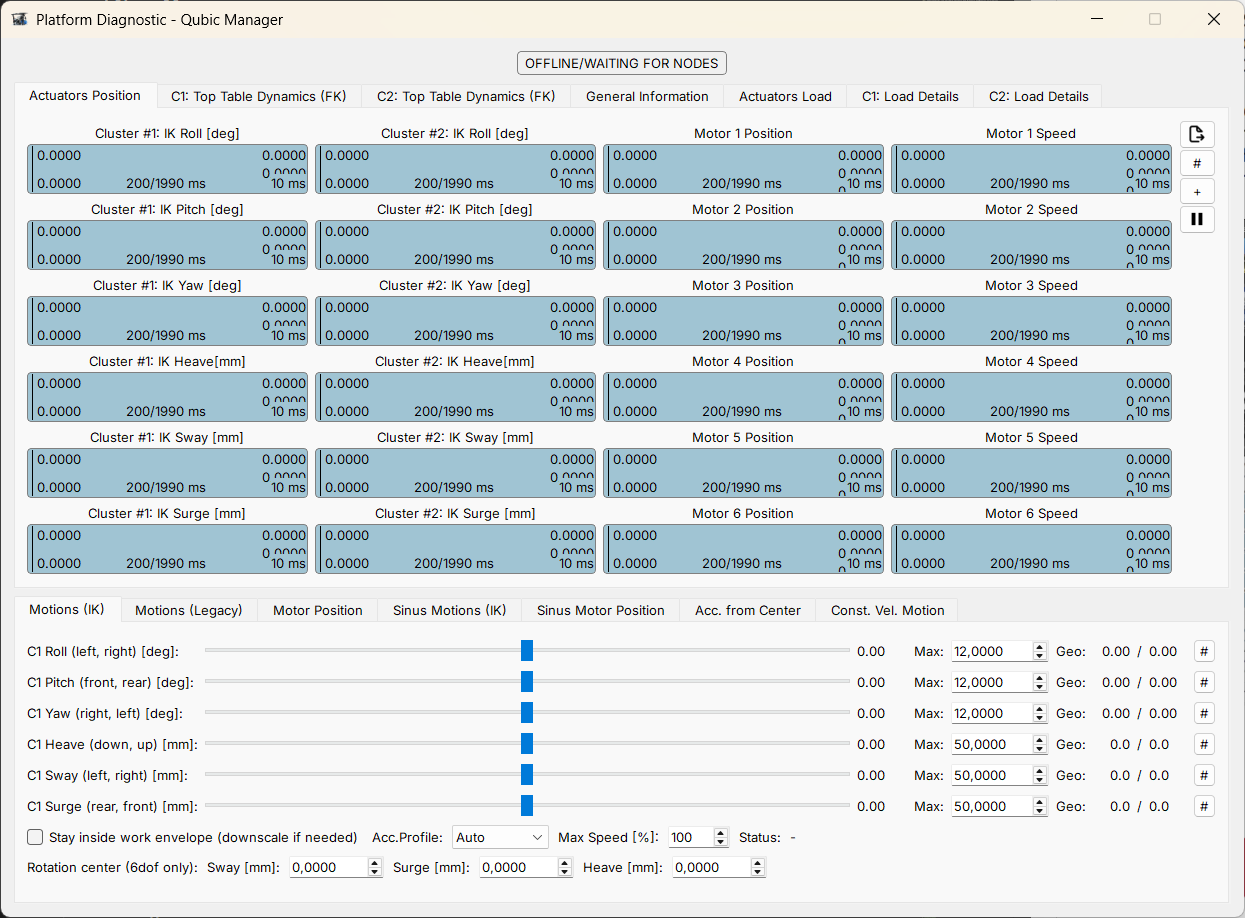
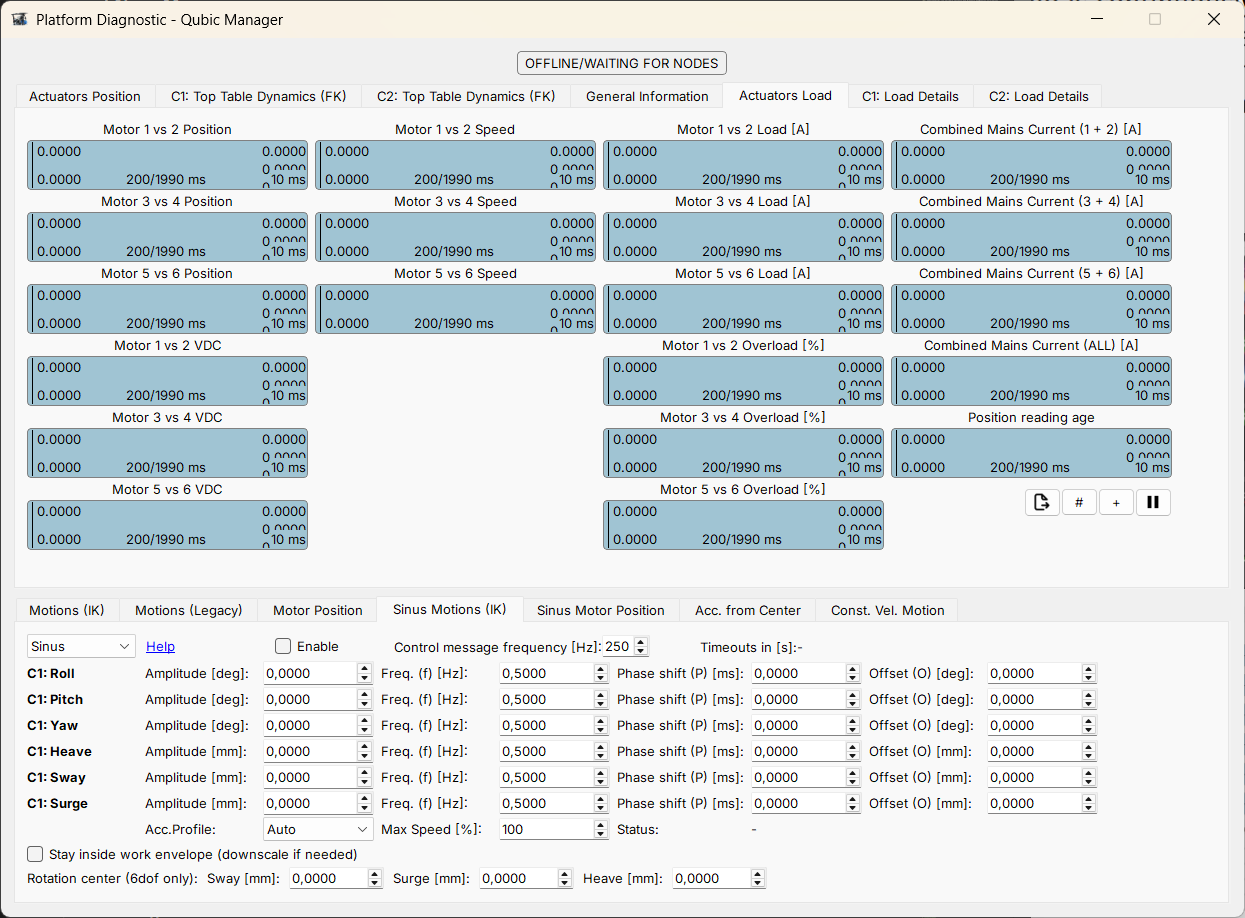


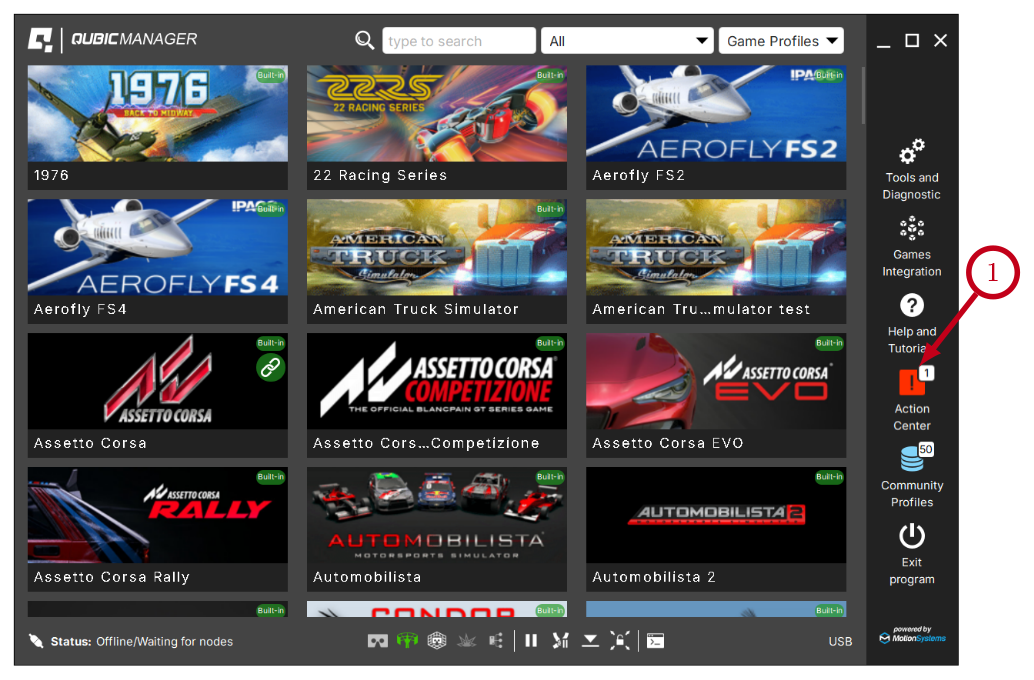 It is possible to solve them one by one or by pressing the Resolve All button. Firmware update may require additional confirmation in the dialogue box.
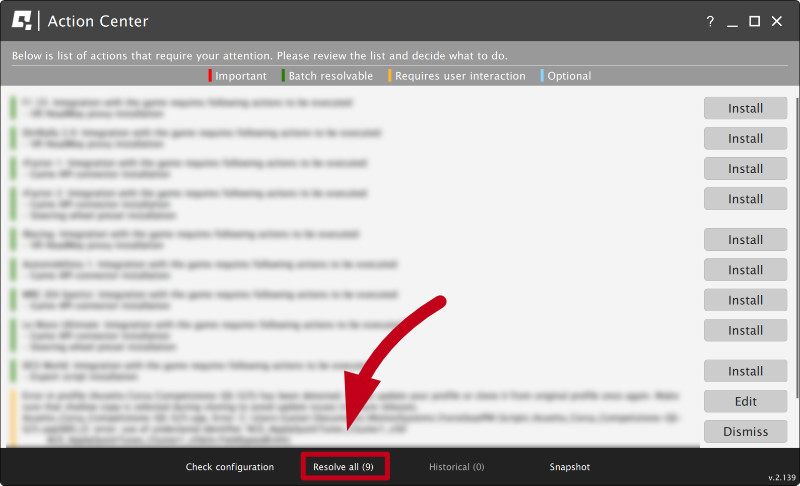
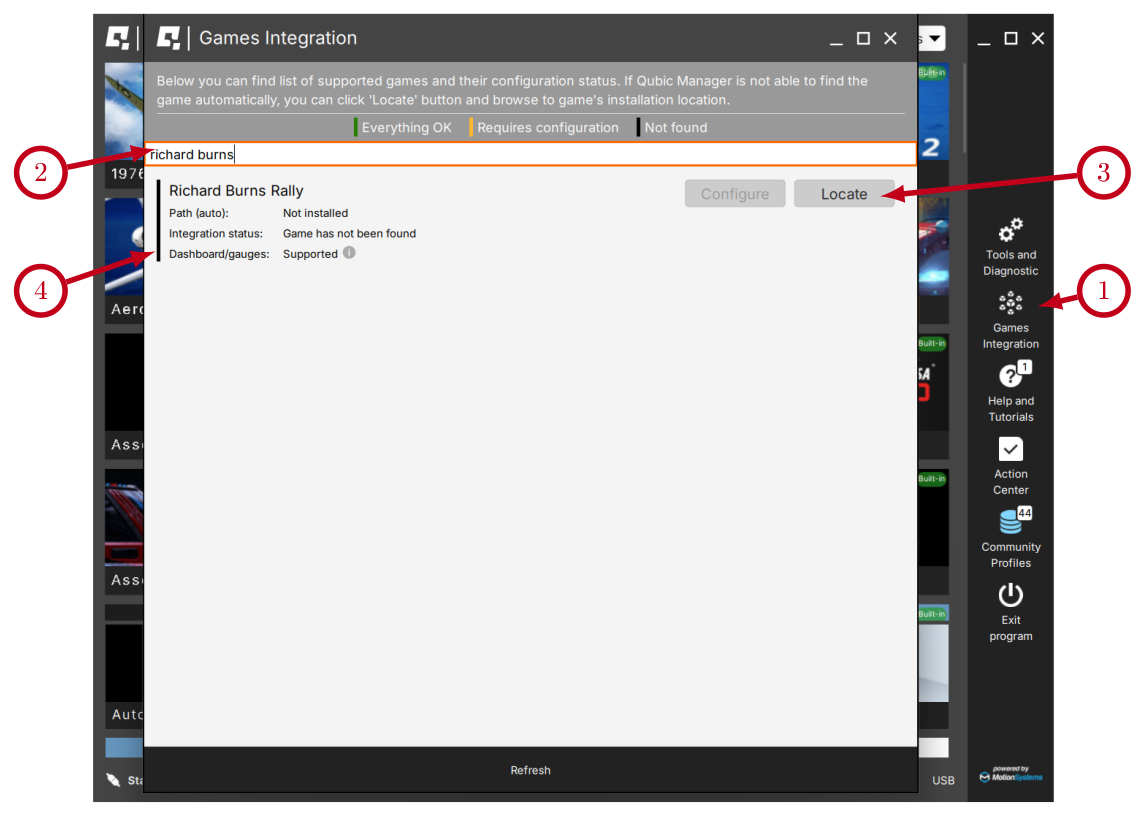 If a Configure button is active, it automatically creates a game configuration.
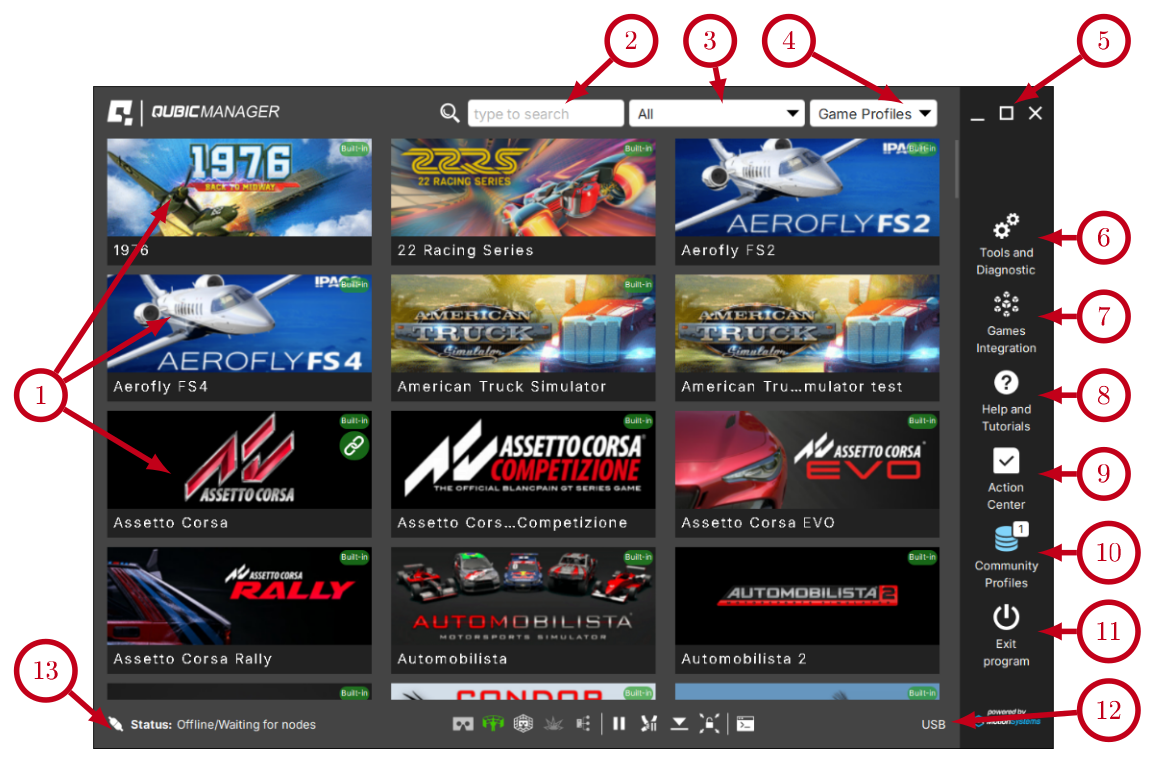
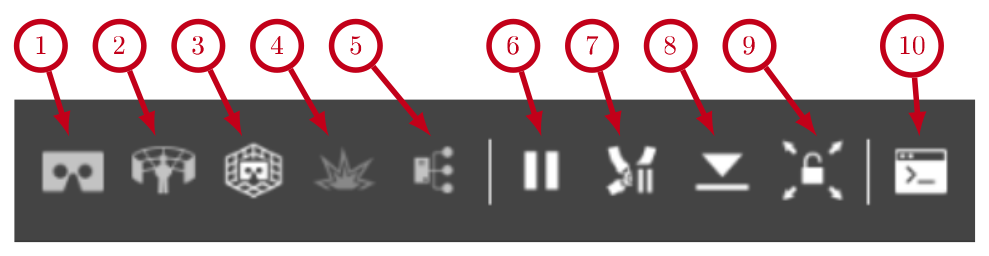 To manage a profile, select the desired game from the main window and click on its corresponding tile (1) to view profile details.
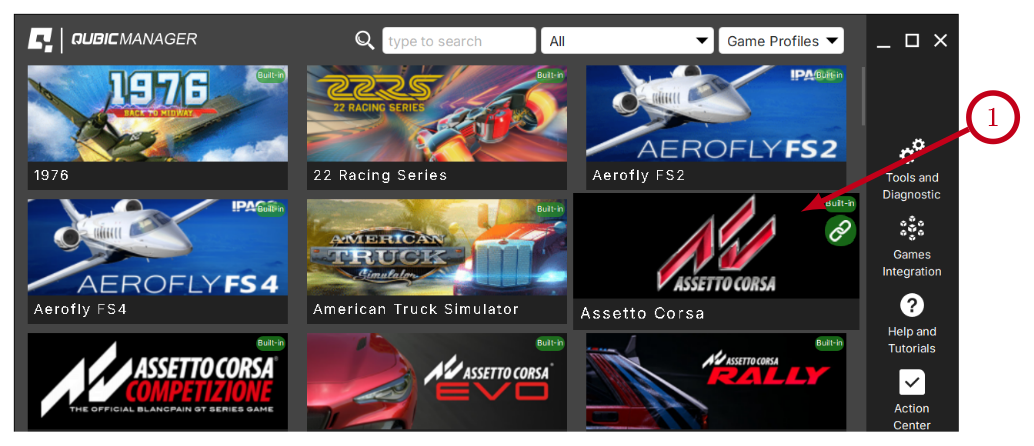
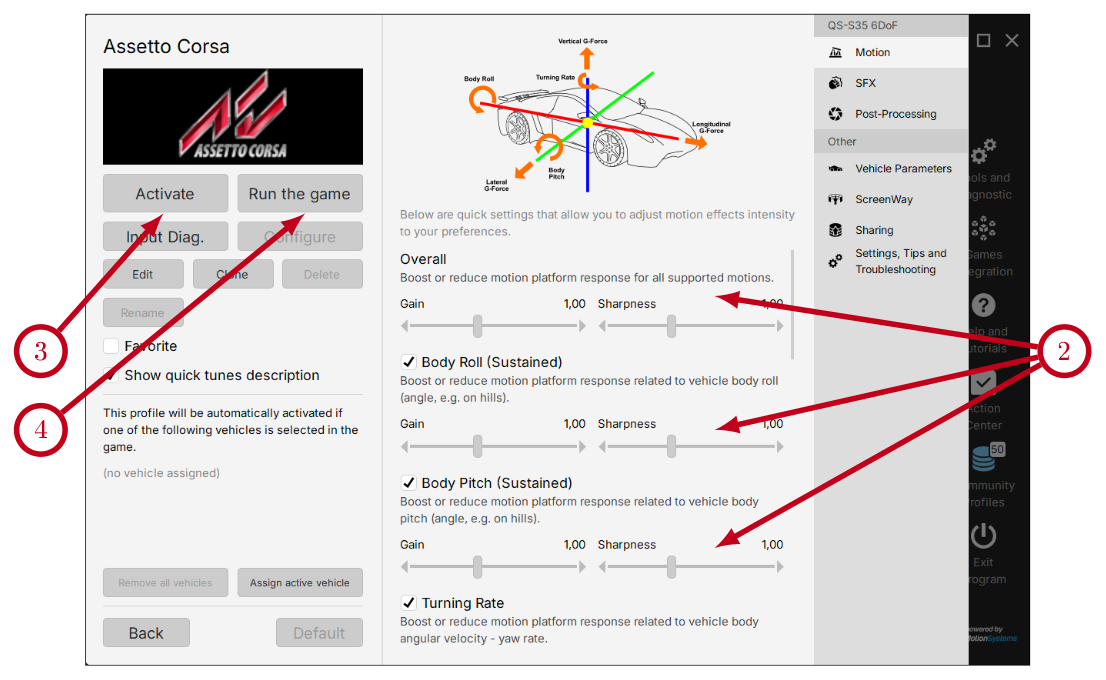
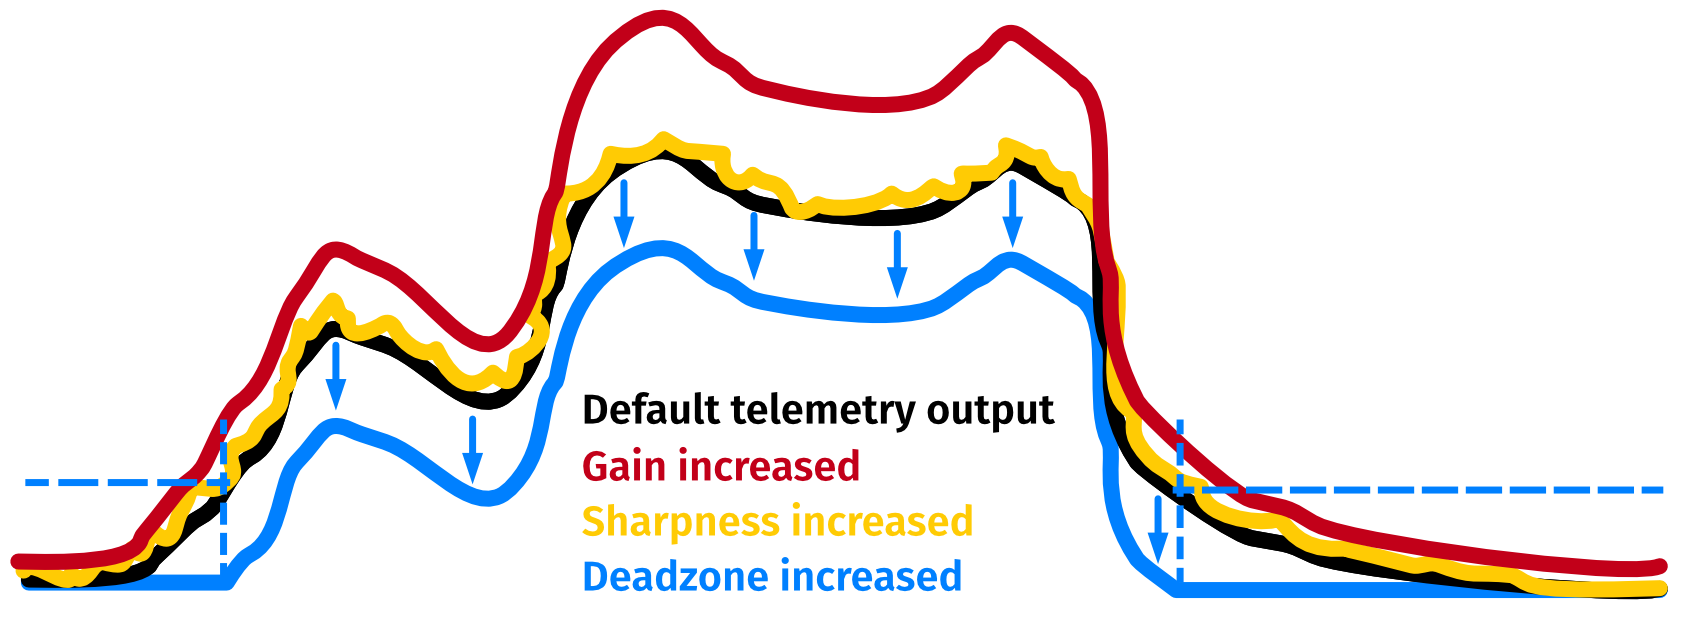
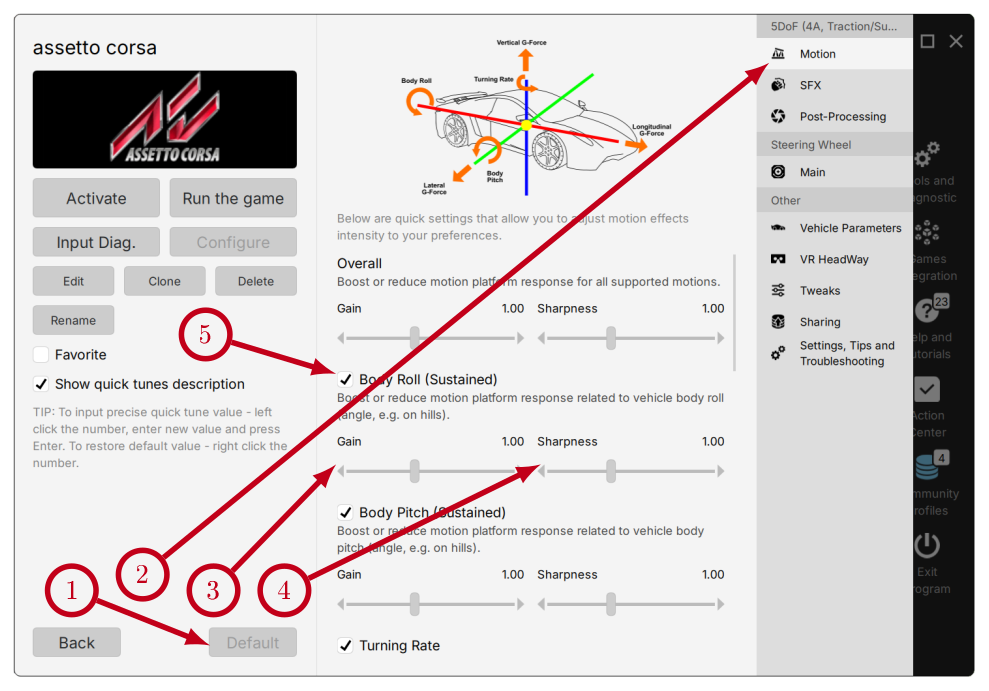 Following motion quick tunes are available to tweak the operation of a motion platform:
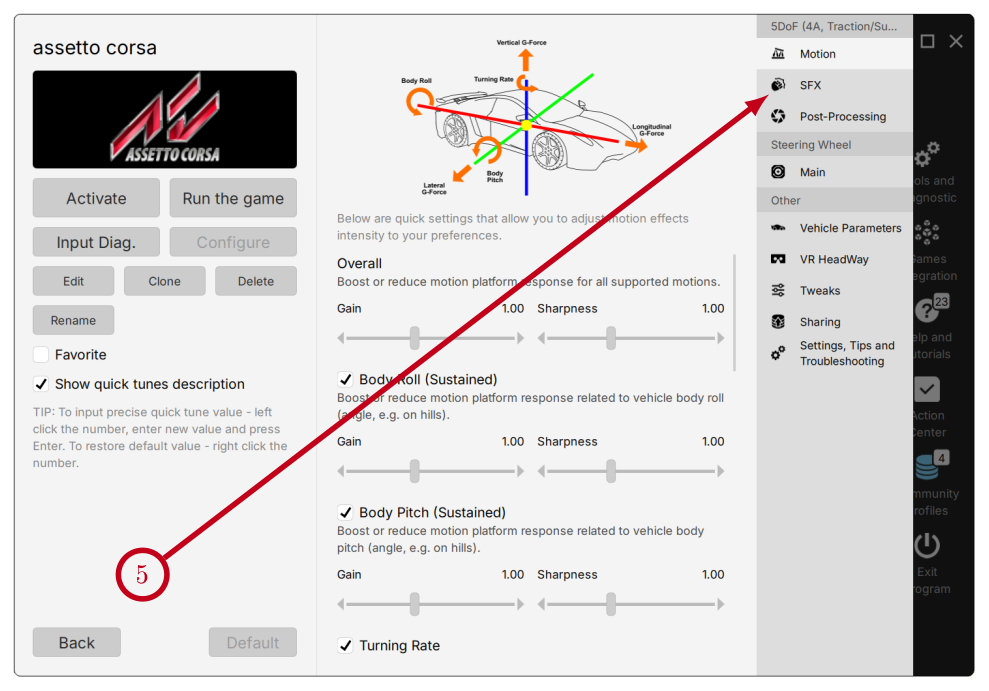 Switch to SFX tab to start adjusting special effects (vibrations) of the motion platform:
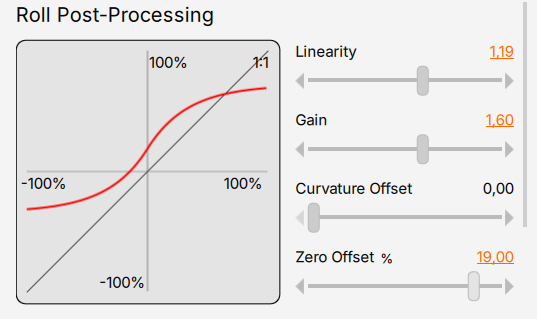 Switch to Post-processing to start adjusting roll, pitch, yaw, heave, sway and surge axes. Post-processing acts as filter for sim/game data output and reduces linearity on the processed data. The horizontal X axis represents input data and vertical axis Y represents output data. The red line represents the degree of signal change (new motion pattern between input and output).
NOTE: some of QS-BT1's gain sliders can be tuned to negative values to inverse the direction of force (e.g. left belt tensions instead of the right one).
Following Main quick tunes are available to tweak the QS-BT1 operation:
Switch to Post-processing to start adjusting roll, pitch, yaw, heave, sway and surge axes. Post-processing acts as filter for sim/game data output and reduces linearity on the processed data. The horizontal X axis represents input data and vertical axis Y represents output data. The red line represents the degree of signal change (new motion pattern between input and output).
NOTE: some of QS-BT1's gain sliders can be tuned to negative values to inverse the direction of force (e.g. left belt tensions instead of the right one).
Following Main quick tunes are available to tweak the QS-BT1 operation:
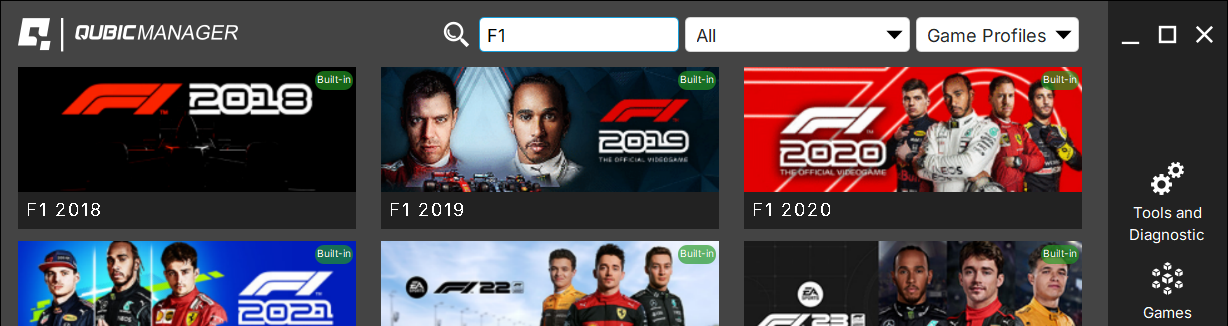

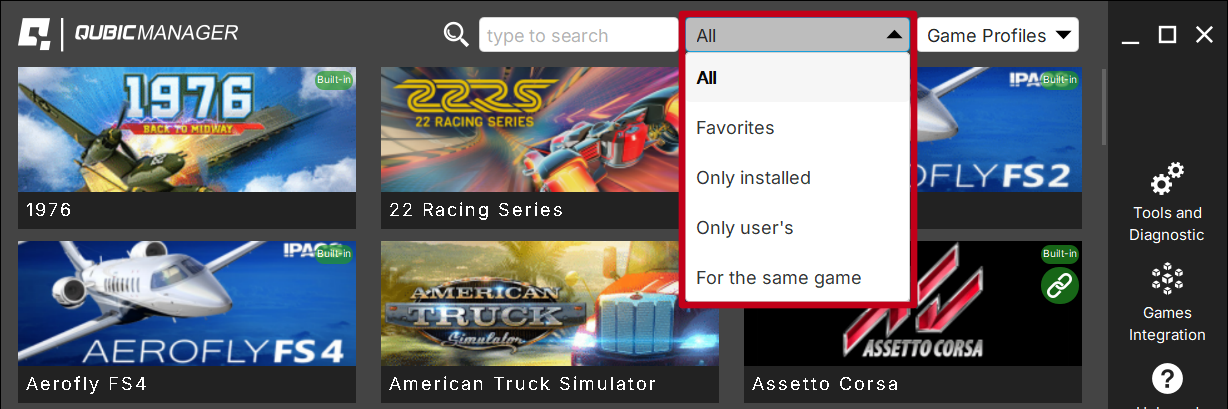
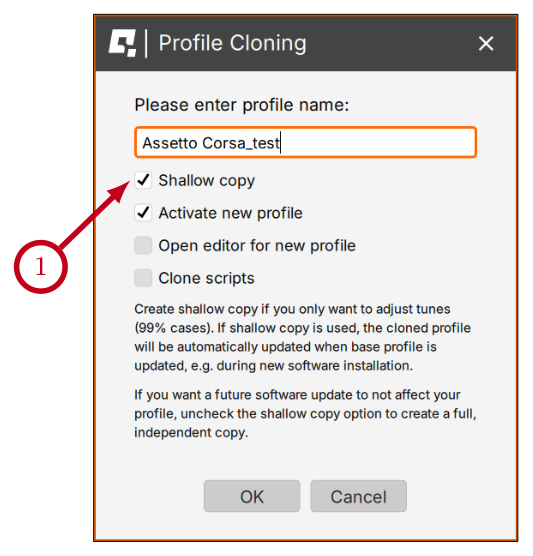
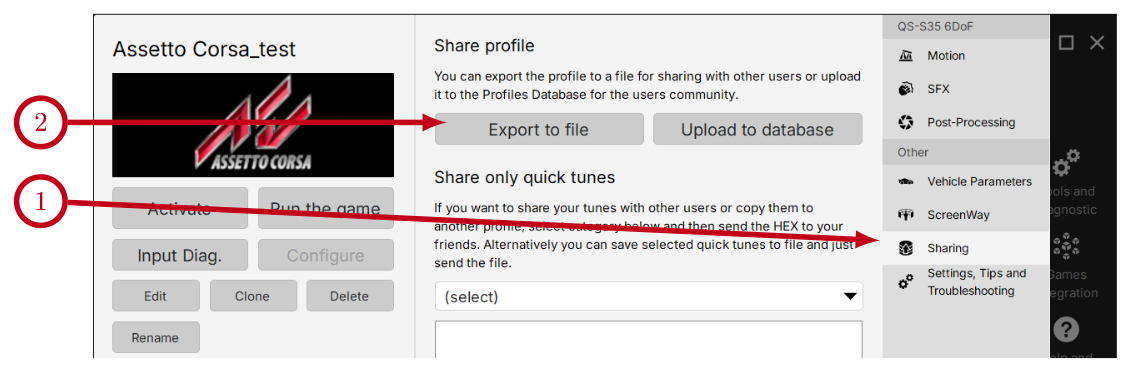 To import that profile from a file, scroll the main QubicManager window to the bottom → click Import Profile (3) → on pop-up dialog window click Local (Online will redirect to Community Profiles) → select the file → enter a new profile name → click OK. The profile will sort aphabetically within the game group.
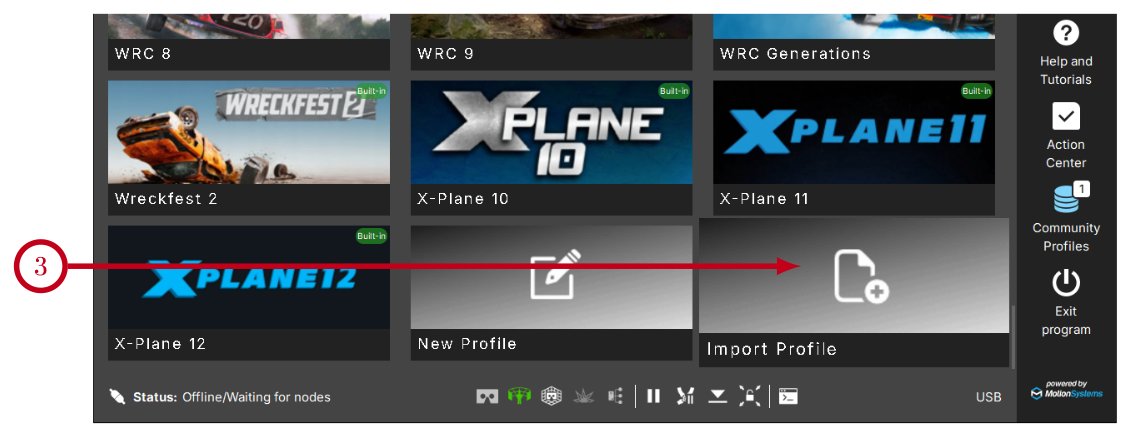
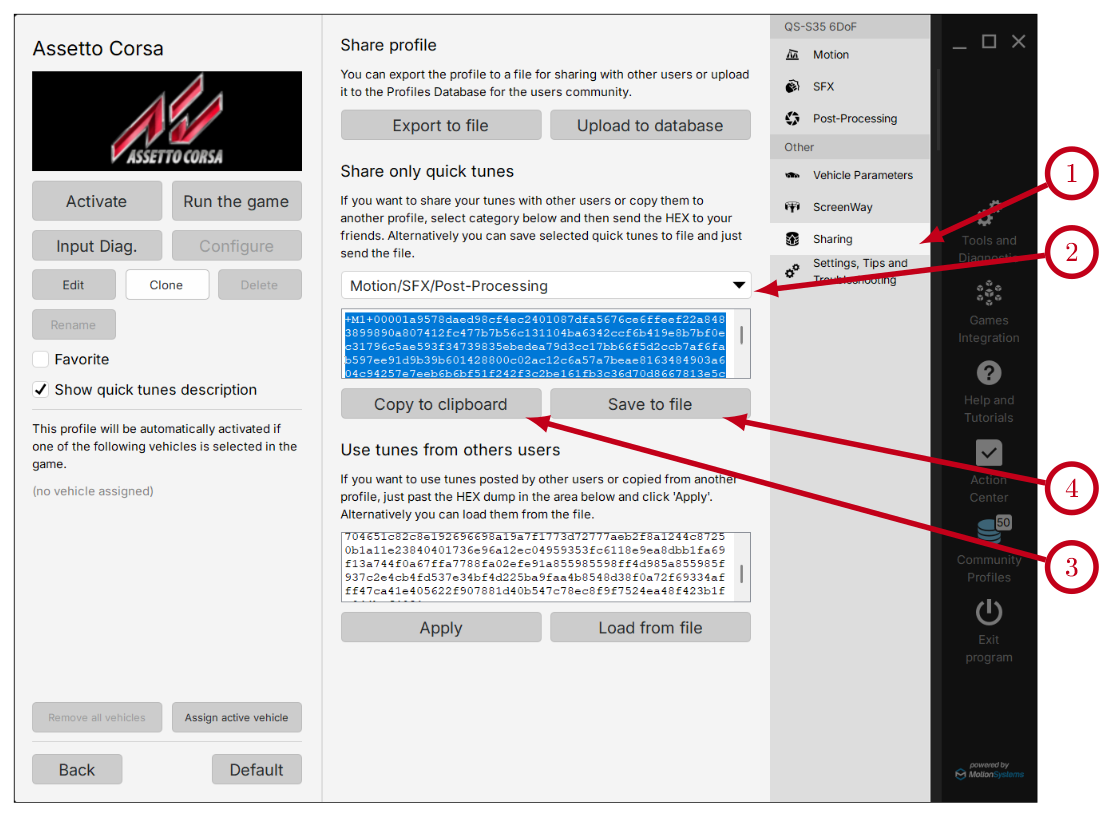 To apply the adjustments:
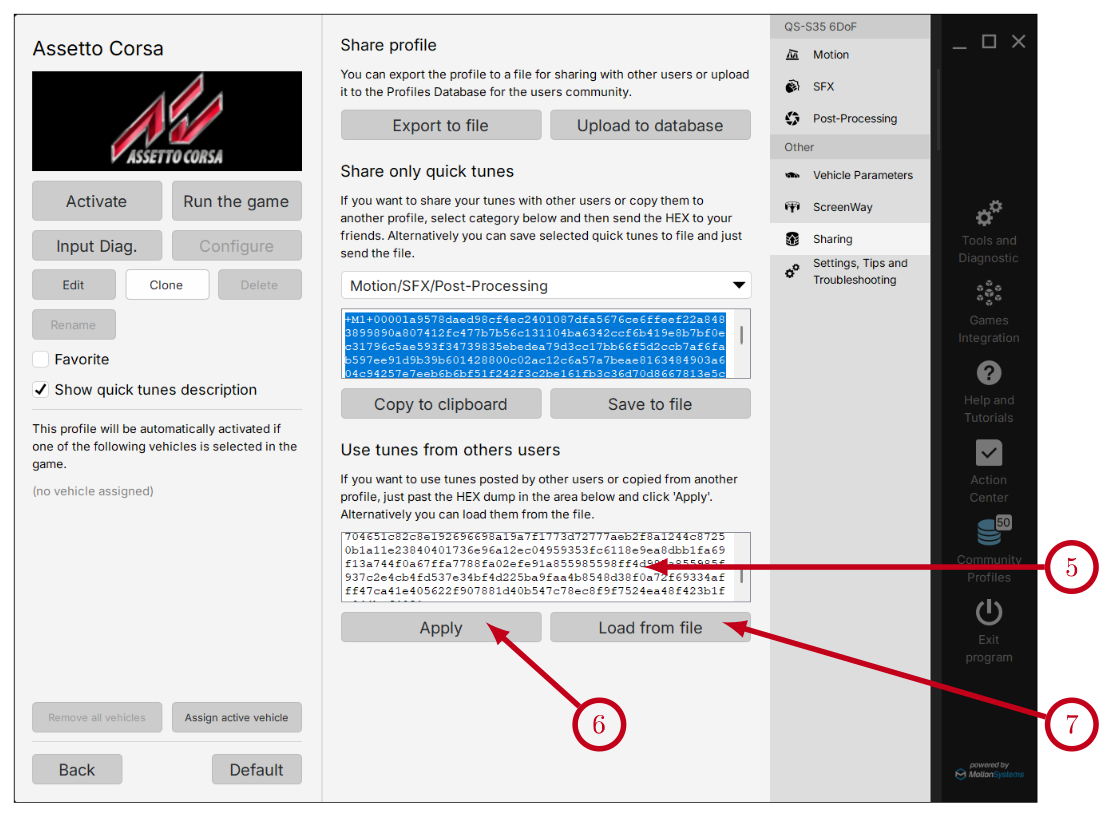 On the right-side panel of QubicManager , click Community profiles.
Community profiles window:
On the right-side panel of QubicManager , click Community profiles.
Community profiles window:
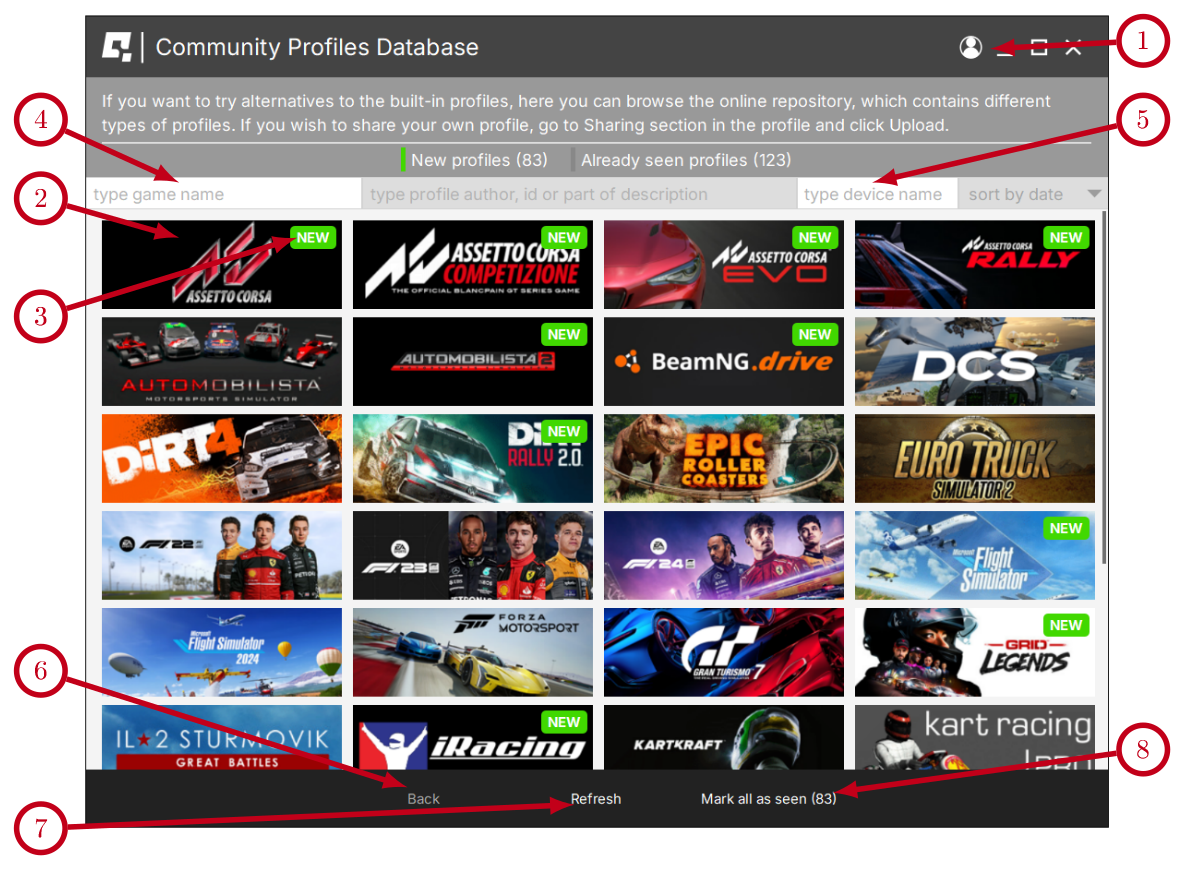 Inside the game title:
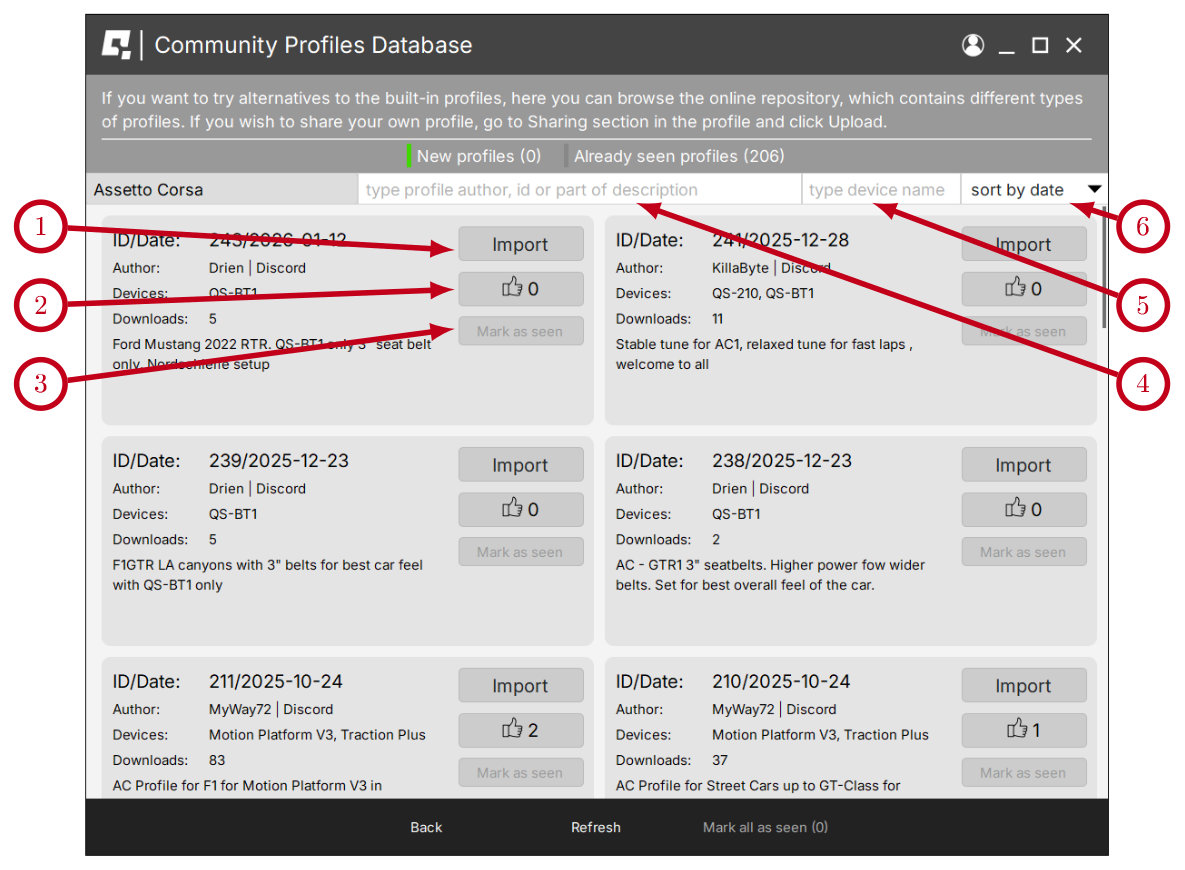 After importing the profile and naming it, that profile will sort aphabetically within the game group. It will be marked with a #ID_number badge (8).
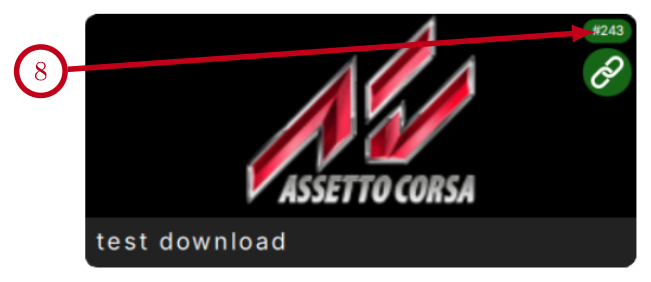
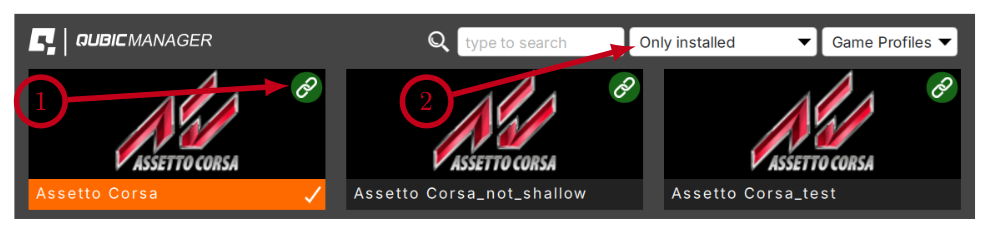 Not all profiles have associated games. There are following reasons:
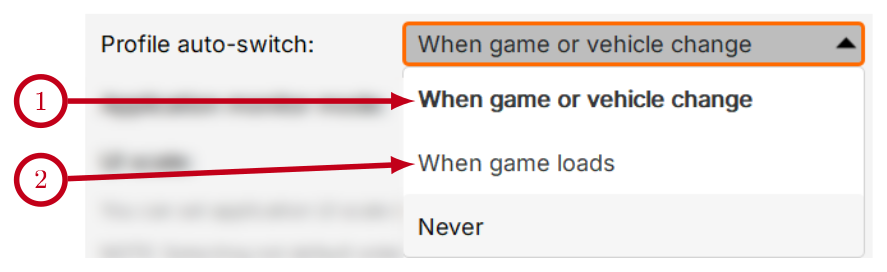
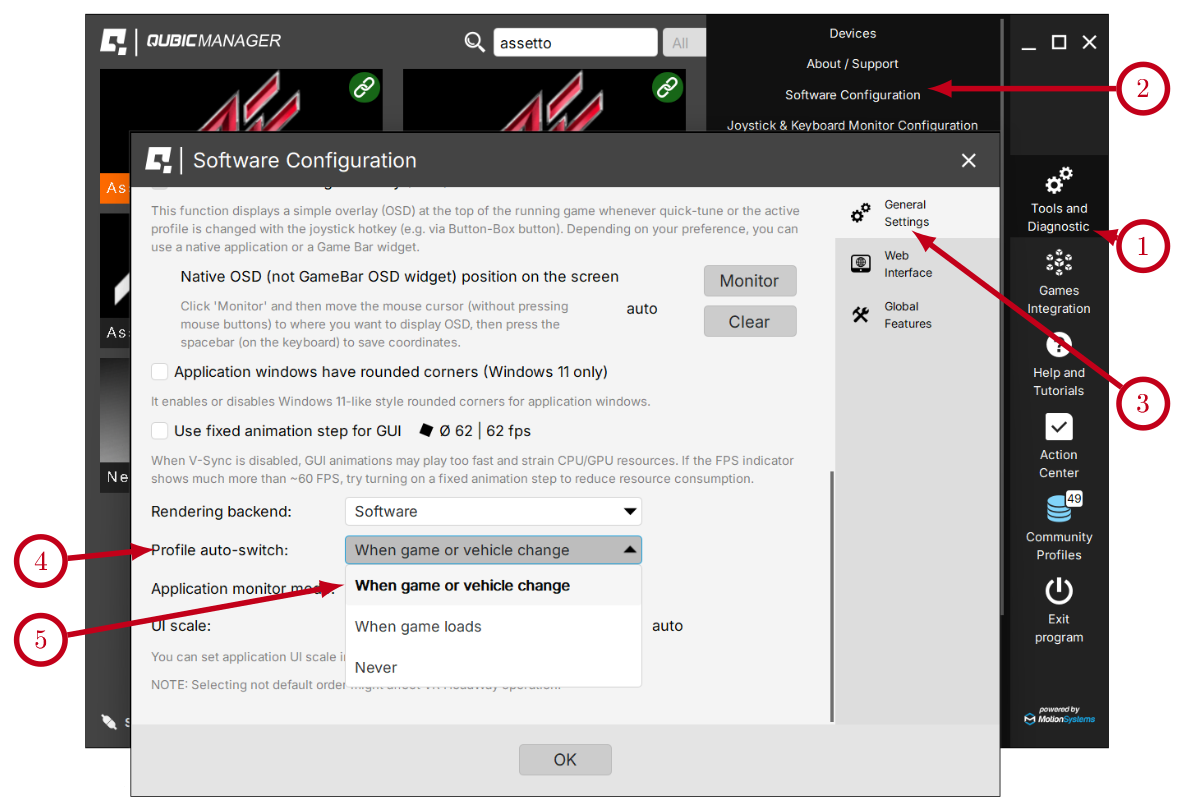
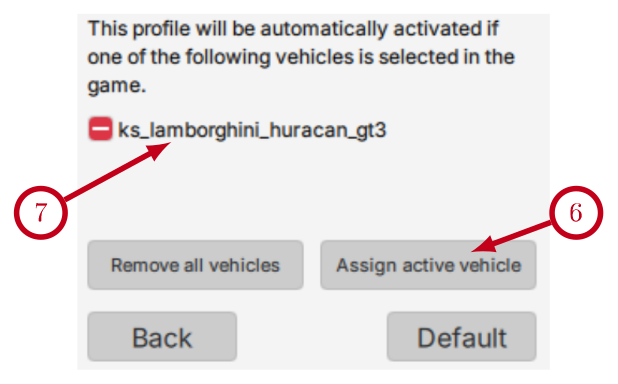
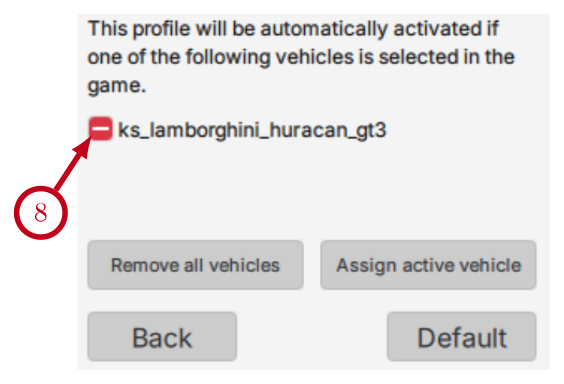
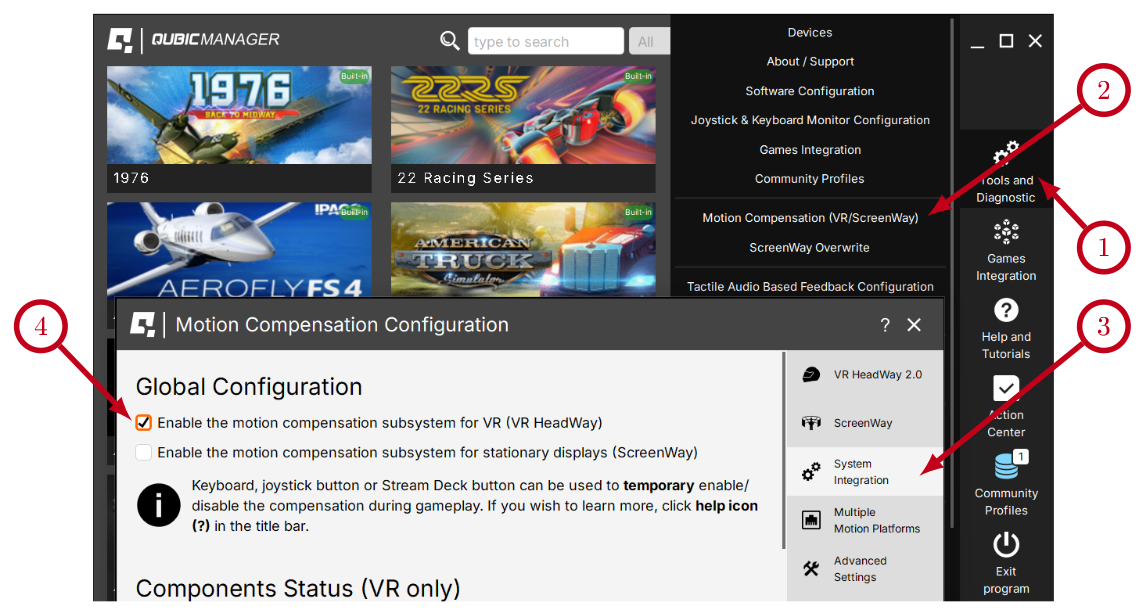 Make sure that all required drivers are installed:
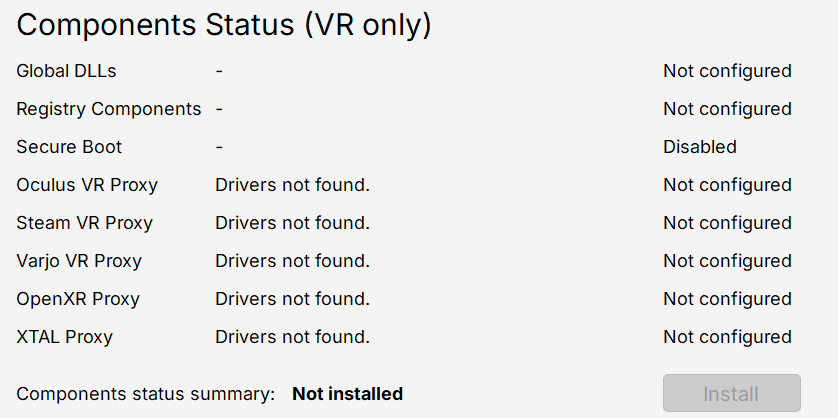 Check if all required integration methods are enabled (they are activated by default):
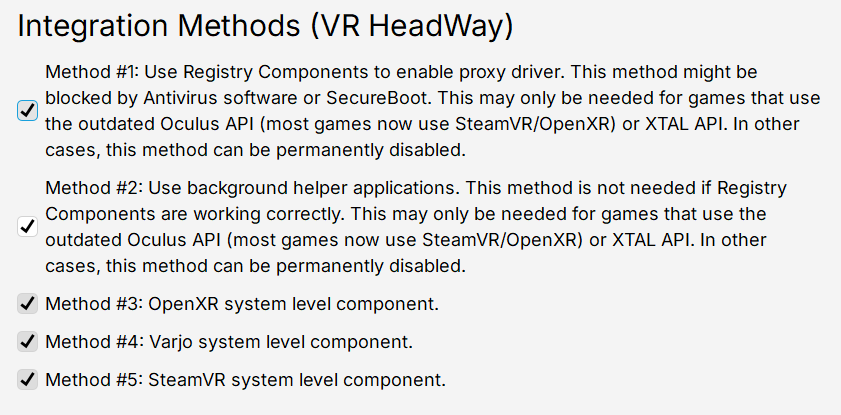
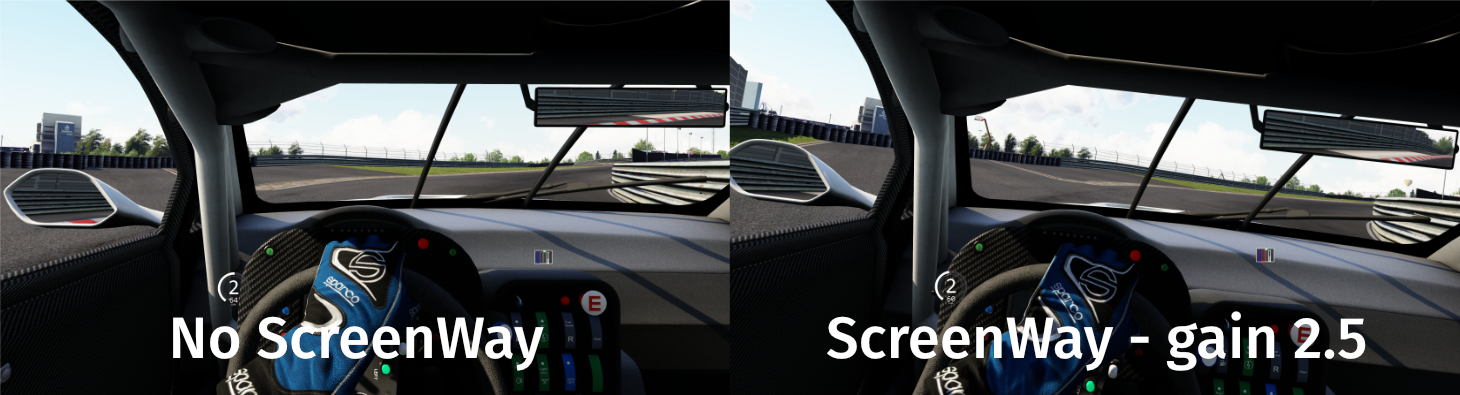 Keep in mind that:
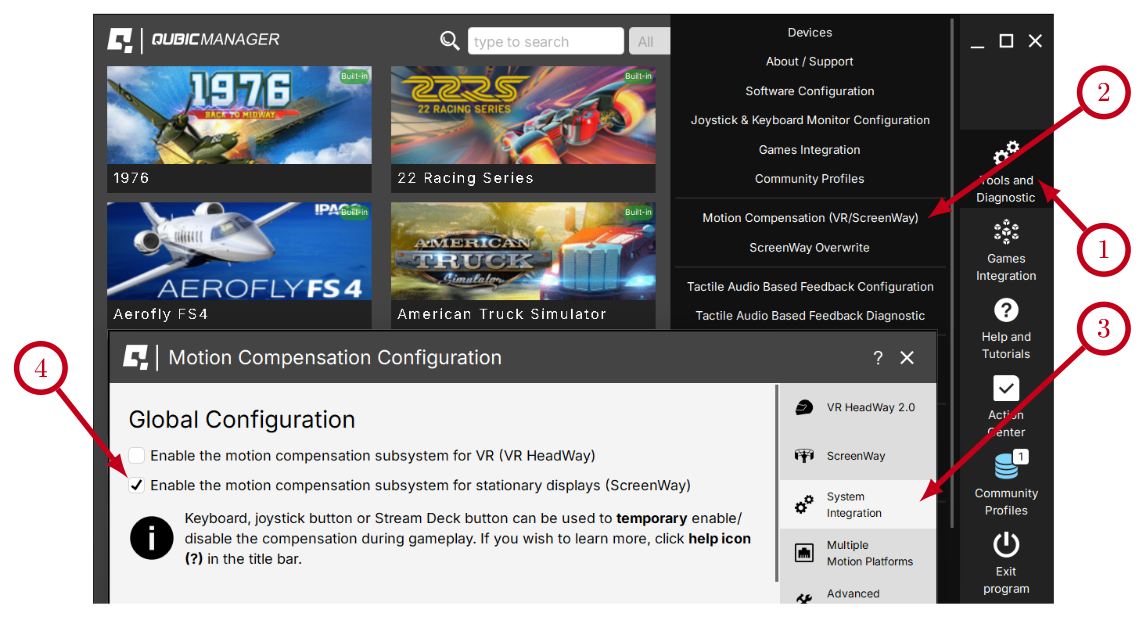 Upon activation, the ScreenWay option will appear in the "Other" tab of the profile window (5). It is initially configured with default values (6). Activate a profile (7), launch a game (8), enter a game session, and ensure that your motion platform is operational. The screen should now move in synchrony with the motion platform. Please note that ScreenWay compensates only for the degrees of freedom supported by your platform. For example, yaw and surge compensation are available only on devices capable of generating these degrees of freedom.
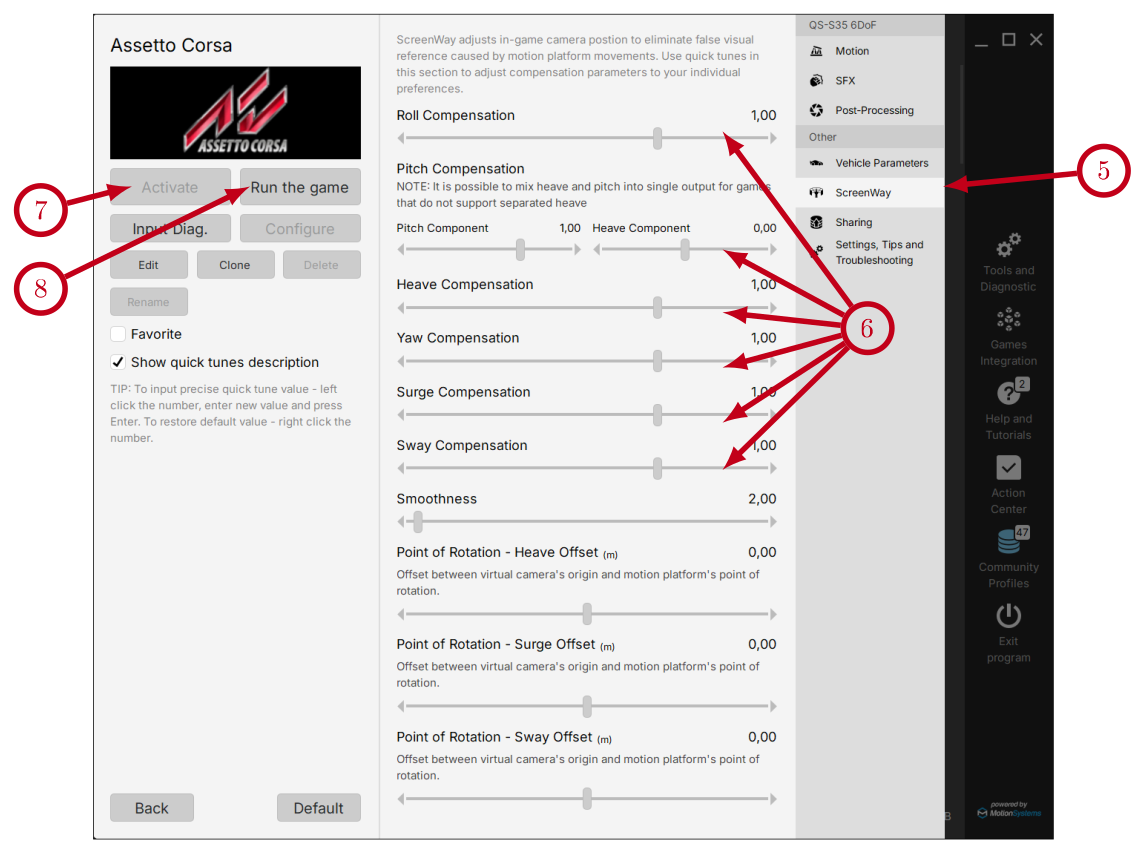
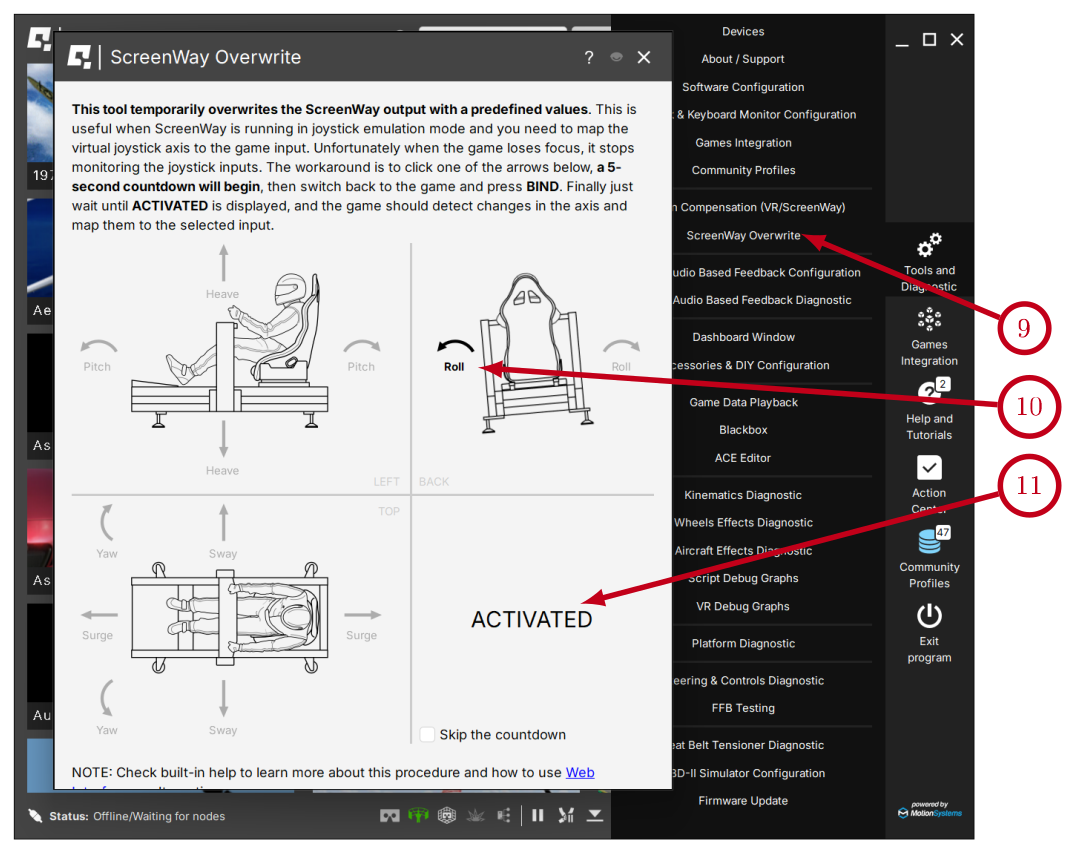
 To enable these APIs, go to Tools and Diagnostic → Motion Compensation (VR/ScreenWay) → System Integration and scroll down. Select one of the listed Methods to enable the API.
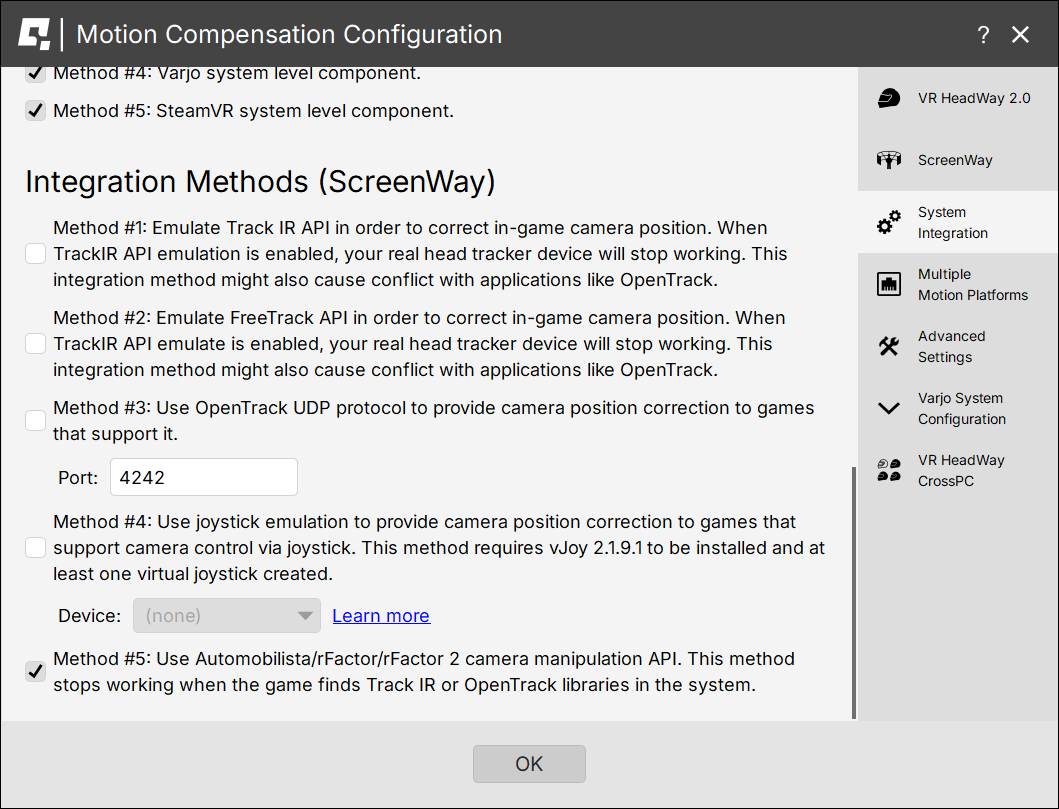 In order to use the diagnostics - go to Profile window → click Input diag. → right click on any graph and select "Stay on top" → start the game → start generating input date - enter driving/flying session → use the graphs to verify that the telemetry is consistent with vehicle's/aircraft's movement.
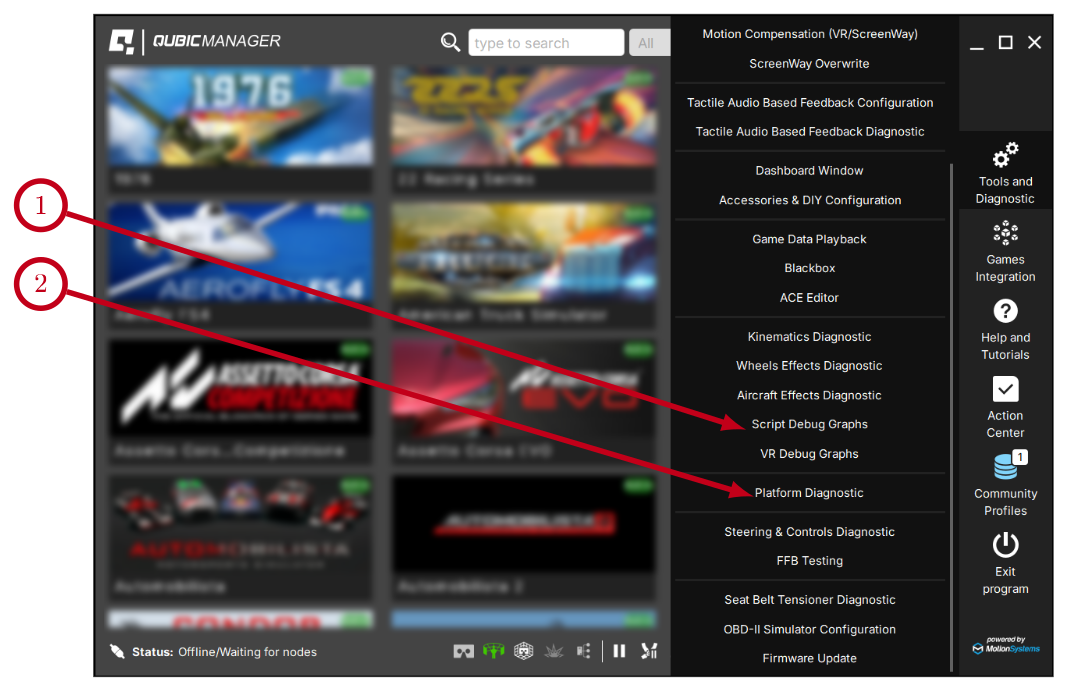 In Script Debug Graphs you can check output to the motion platform (1). The output to the motion platform does NOT indicate if the requested motion combination is within the work envelope - this can be checked only in Platform Diagnostic.
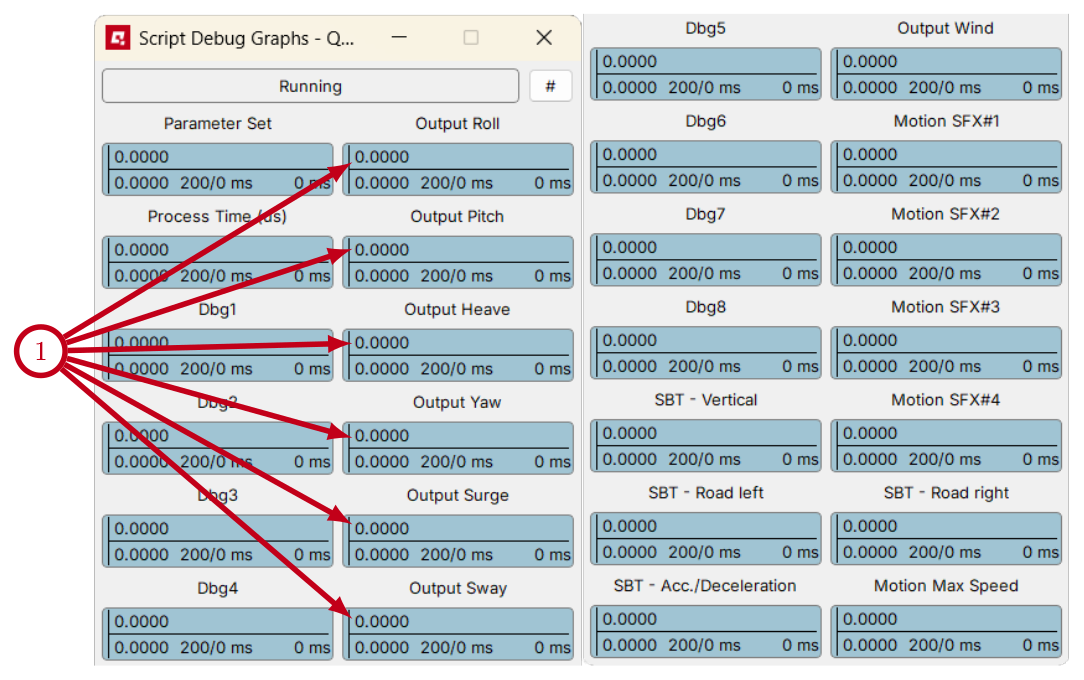
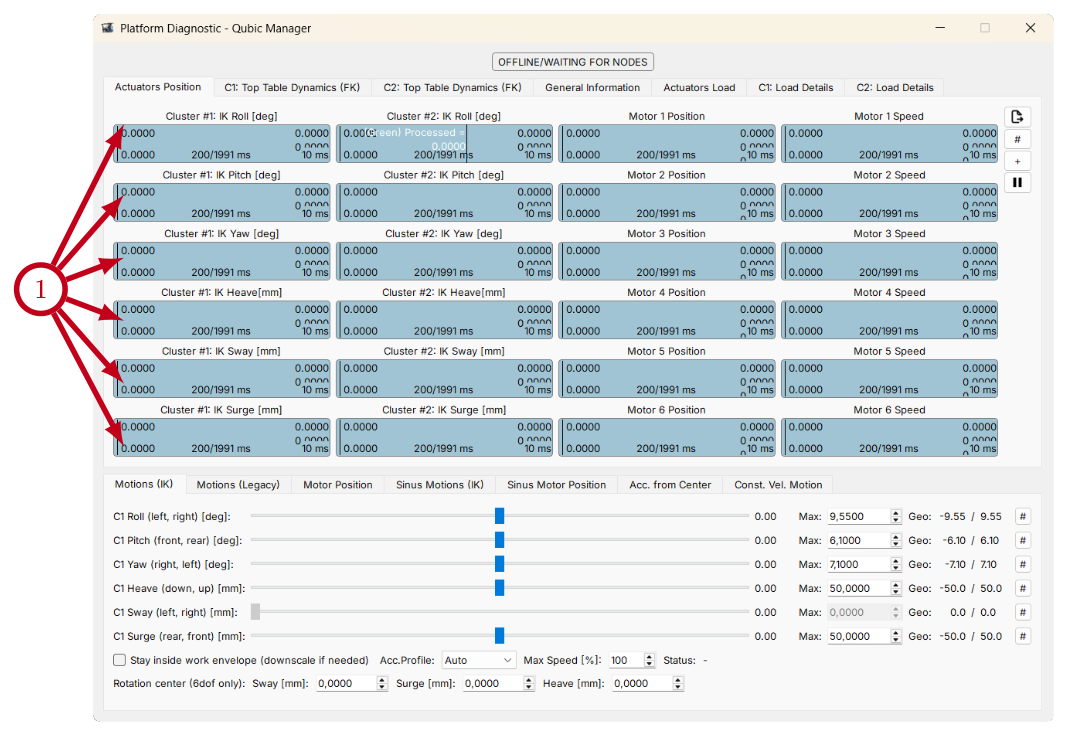 Once the ACE generates required top table position, then the kinematics processor calculates required actuators extensions (sometimes also referred to as actuator position or arm angle).
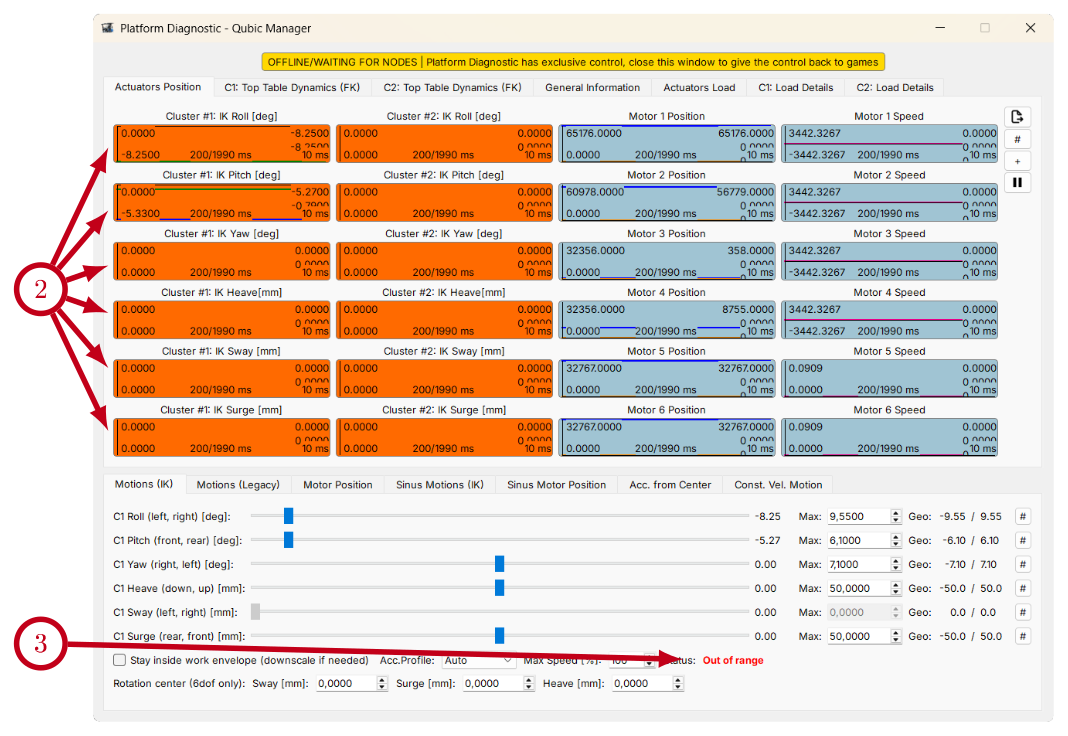 If the specified combination of motions is outside the top table's work envelope, the motion is downscaled to the work envelope boundaries. The Platform Diagnostic indicates the occurrence of this event by displaying the IK graphs in ORANGE (2) and showing the "Out of range" status (3).
Each graph contains two plots: the first is the required IK position, and the second is the downscaled achievable IK position that will be used.
If the specified combination of motions is outside the top table's work envelope, the motion is downscaled to the work envelope boundaries. The Platform Diagnostic indicates the occurrence of this event by displaying the IK graphs in ORANGE (2) and showing the "Out of range" status (3).
Each graph contains two plots: the first is the required IK position, and the second is the downscaled achievable IK position that will be used.
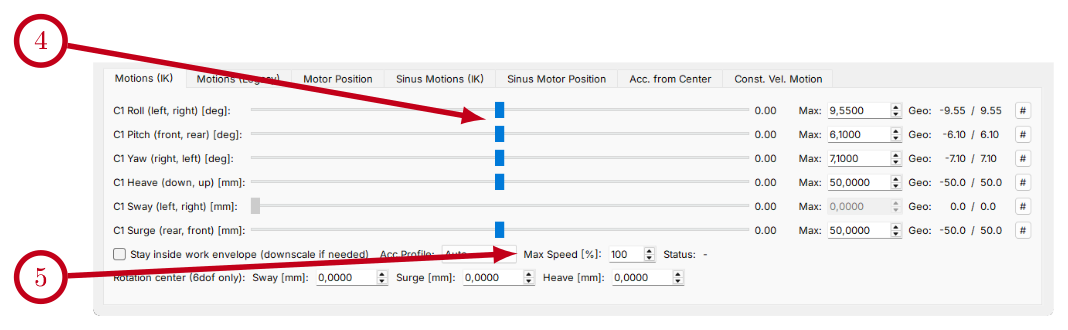 Use the sliders (4) to position the platform (actuators). Sliders for unavailable degrees of freedom will be greyed out. At maximum speed, platform motion is abrupt—reduce Max Speed (5) to 20% for smoother movement.
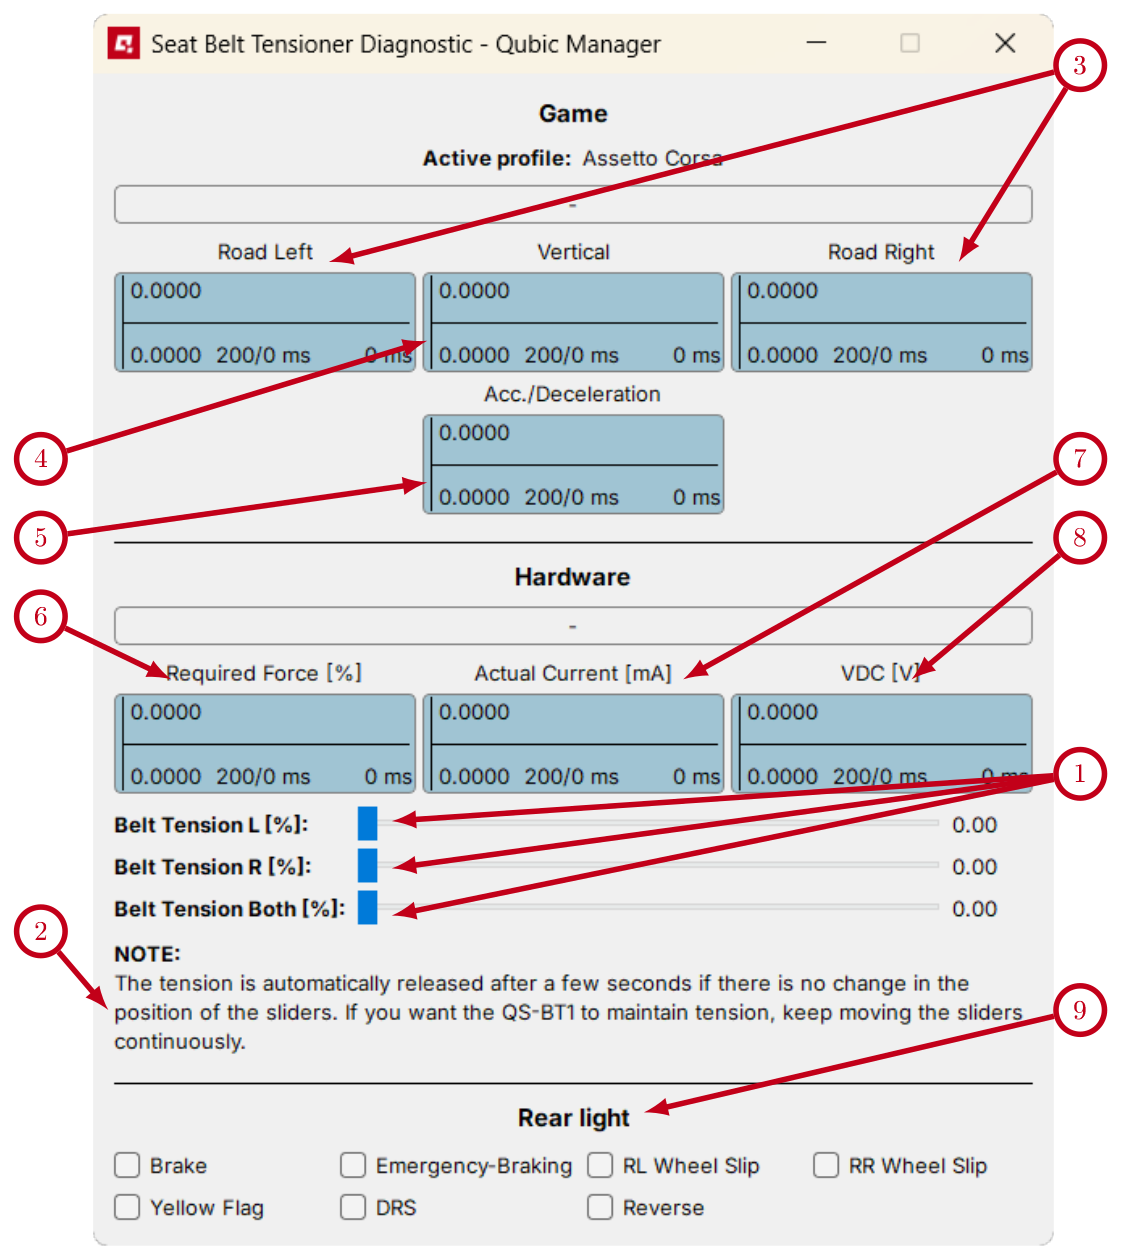 Game Data Playback window:
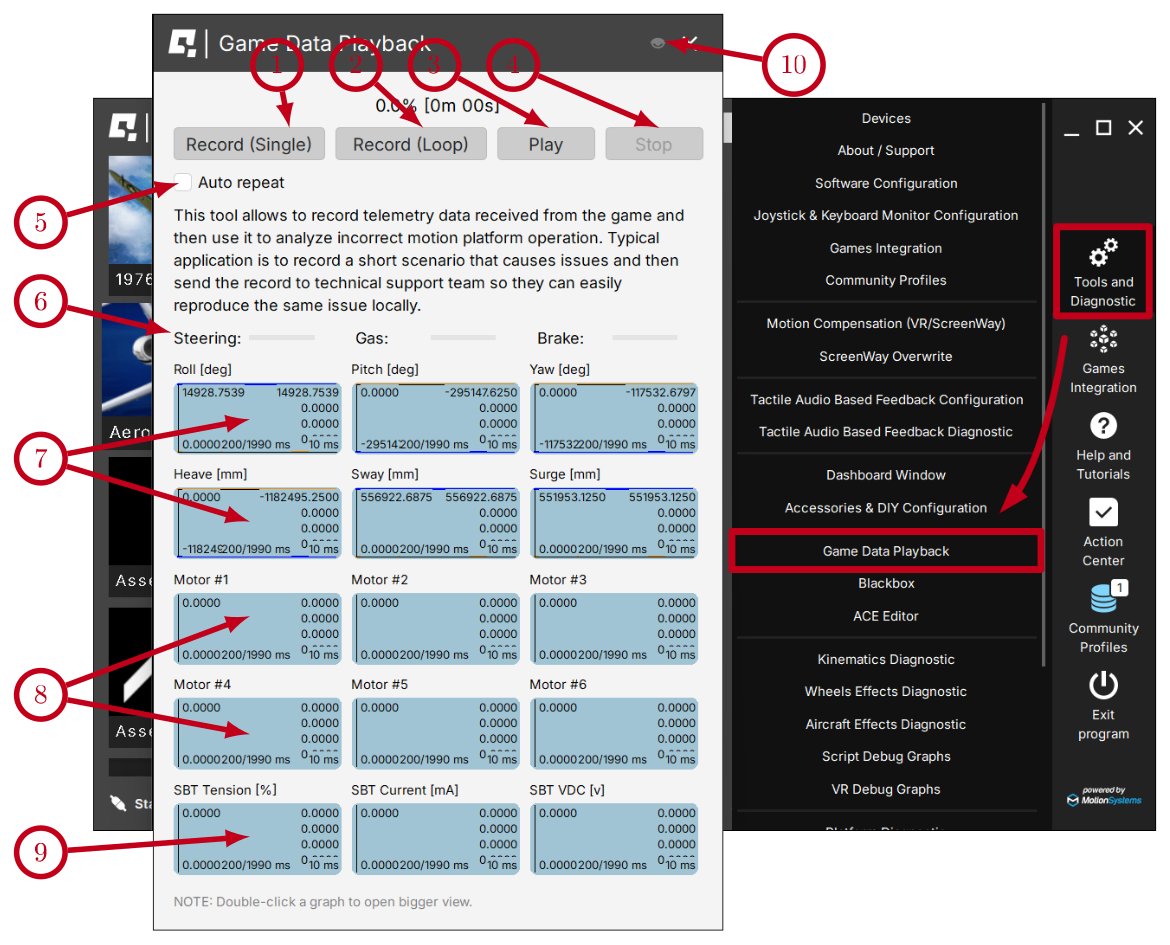
 - no device is detected. If status appears while devices are connected - indicates that firmware update failed (requires firmware recovery) or M10 controller or USB connection is at fault. Check USB connection for loose connections, try different USB ports, bypass any USB hubs, swap USB cable for a different one.
 - Power Cabinets are disconnected or not powered. If this status appears during operation - check power cords, power switches, CFG DIP switches configuration and M-BUS connection cables.
 - the device is in simulation/receives input signal.
 - the device is paused (Pause button at the bottom of the QubicManager window).
 - Motion Lock system has been triggered. Unpress the Motion lock button, check the Motion Lock button cable/connection. In a setup with no Motion Lock button - check the Motion Lock jumper.
 - the device is waiting for a cold start procedure (more details in device user manual).
 - the device is performing calibration/reference run. DO NOT change the payload.
 - the device is parking (the game/simulation was paused or no telemetry input is available).
 - the device achieved parking position and is in stand-by mode. It is powered, connected and ready to be operational.
 - there is an issue with the connection or power - check the working status in Tools and diagnostic → Devices.
 If there is a help chapter available for a specific topic or section, there is a link displayed.
 The same content can be reached by opening directly from application main window (Help and Tutorials).
 Use a search bar (1) to find a topic or browse the list on the left (2).
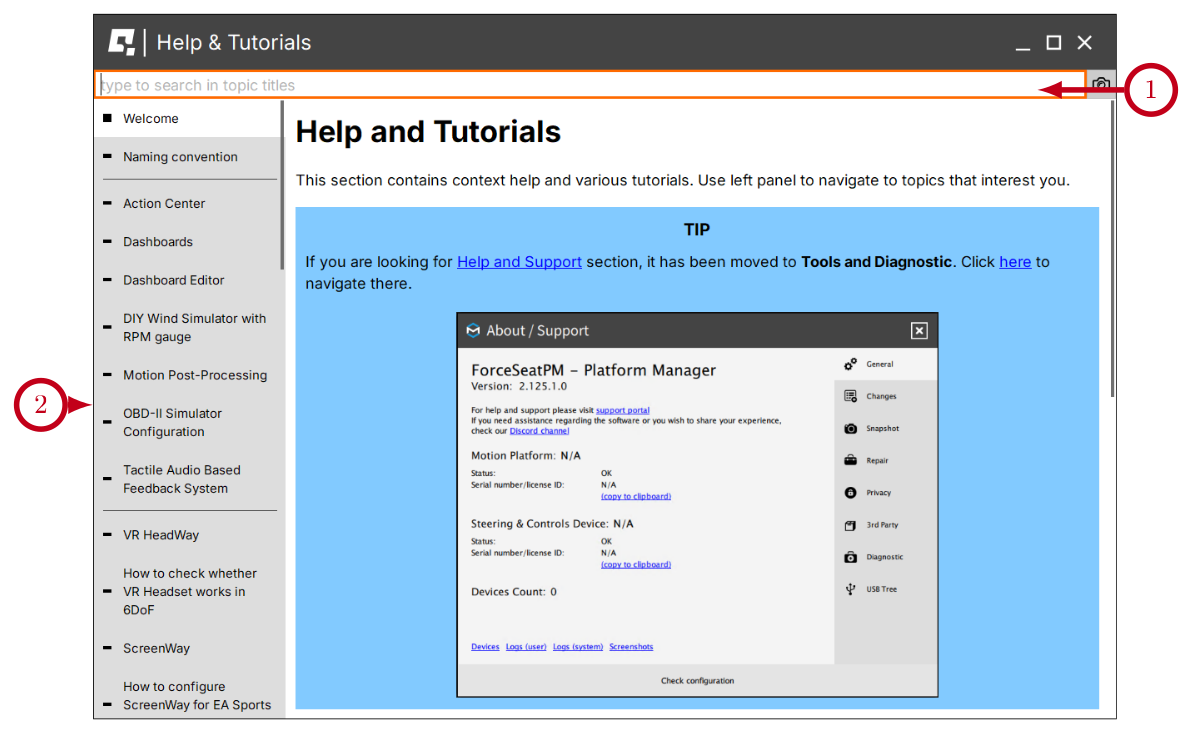
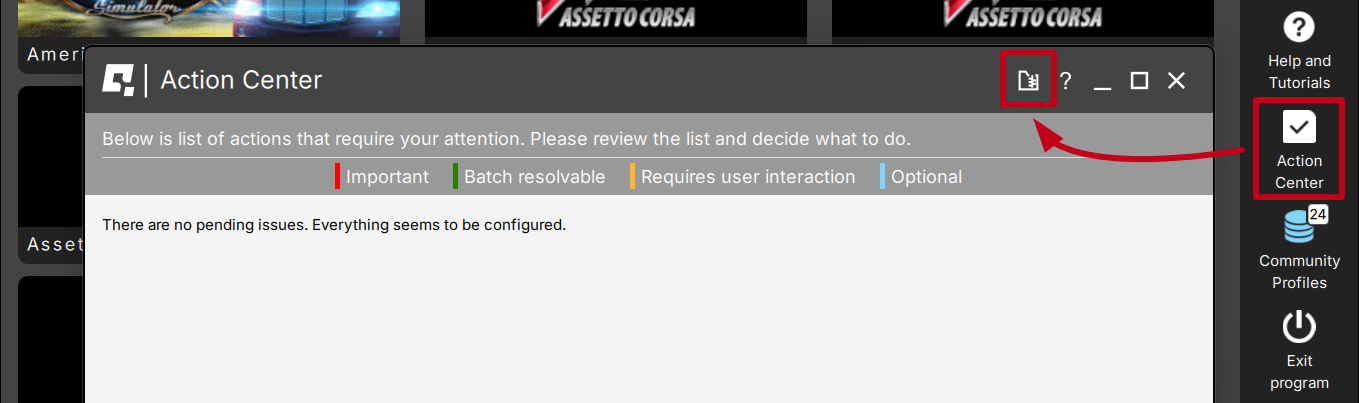

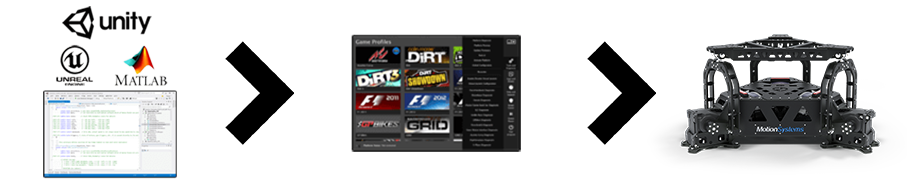
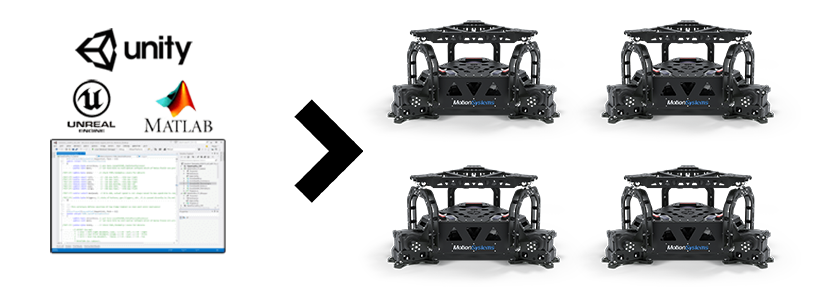
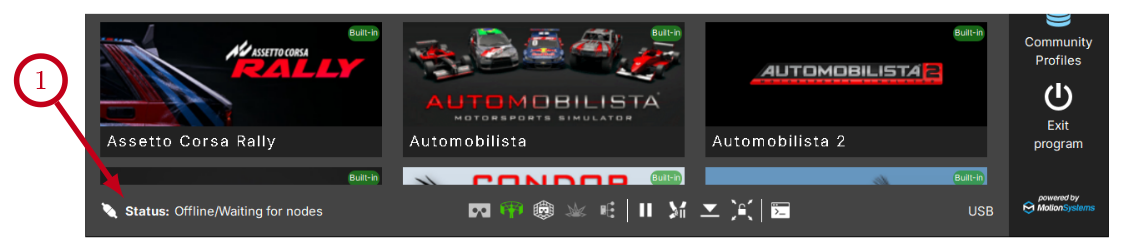

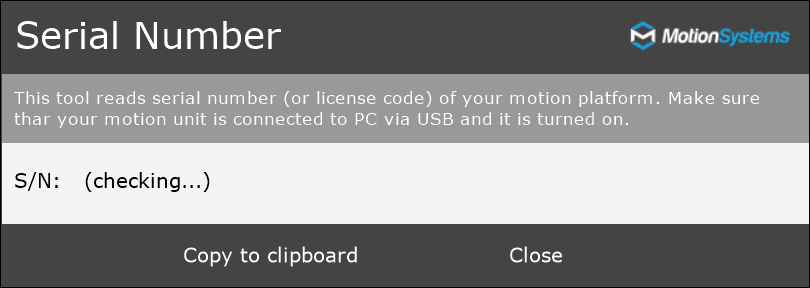
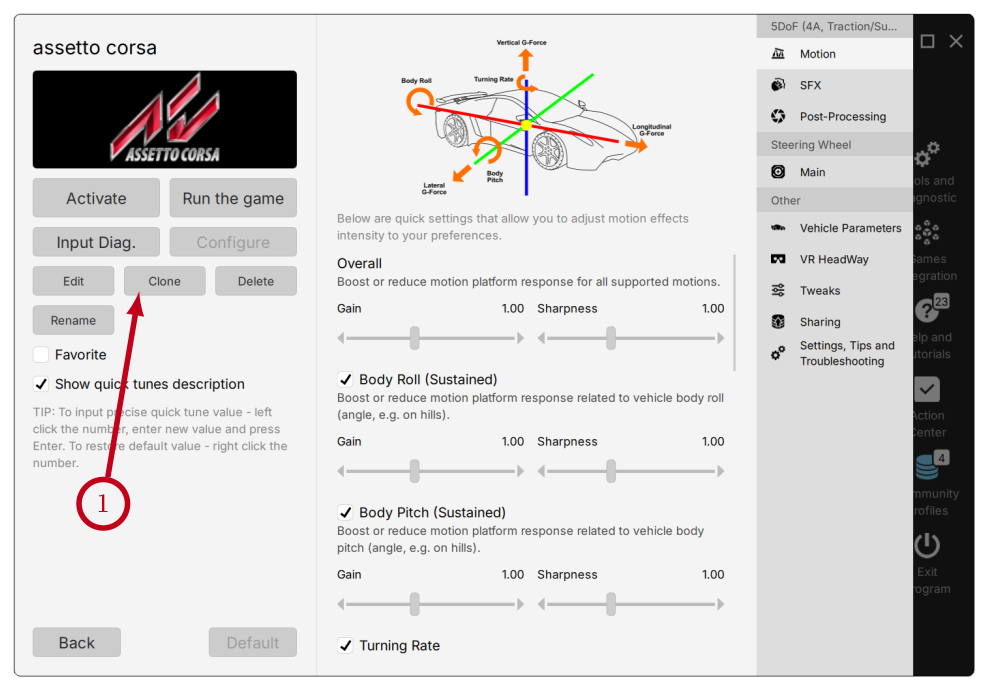
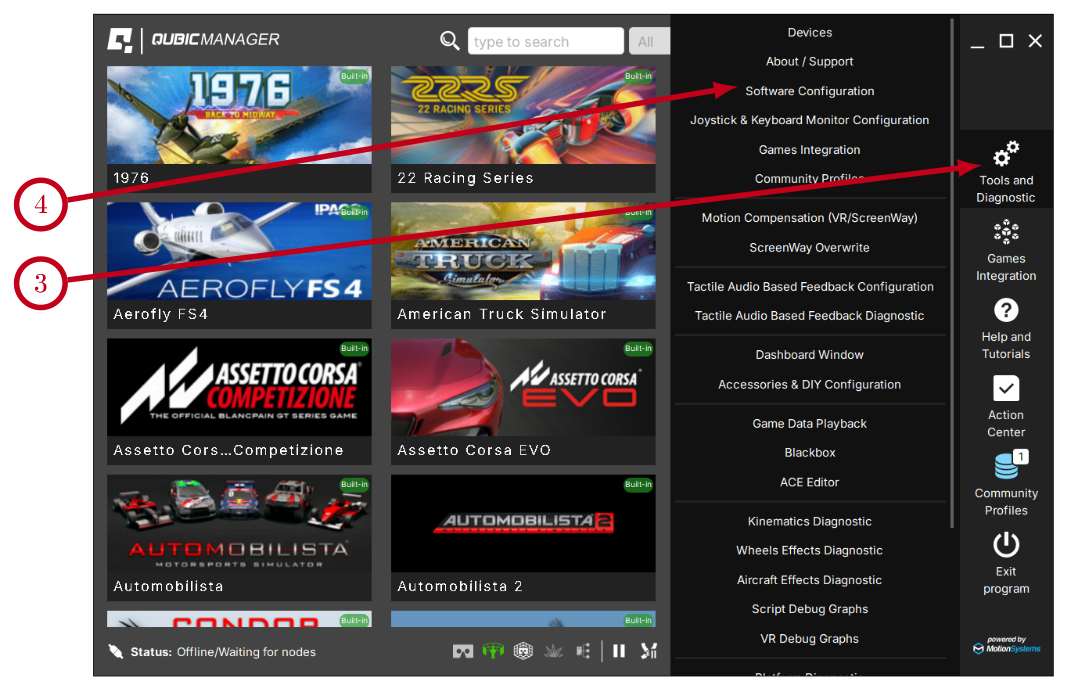

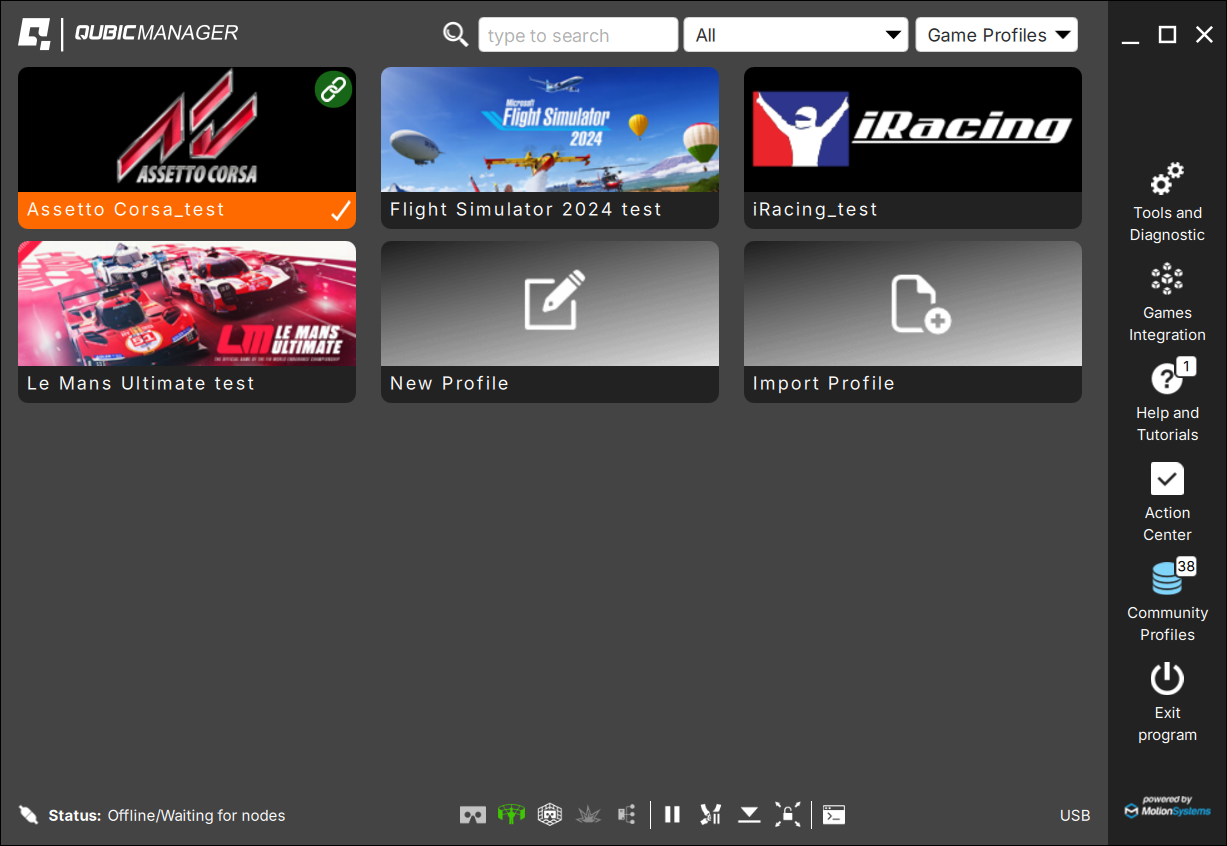
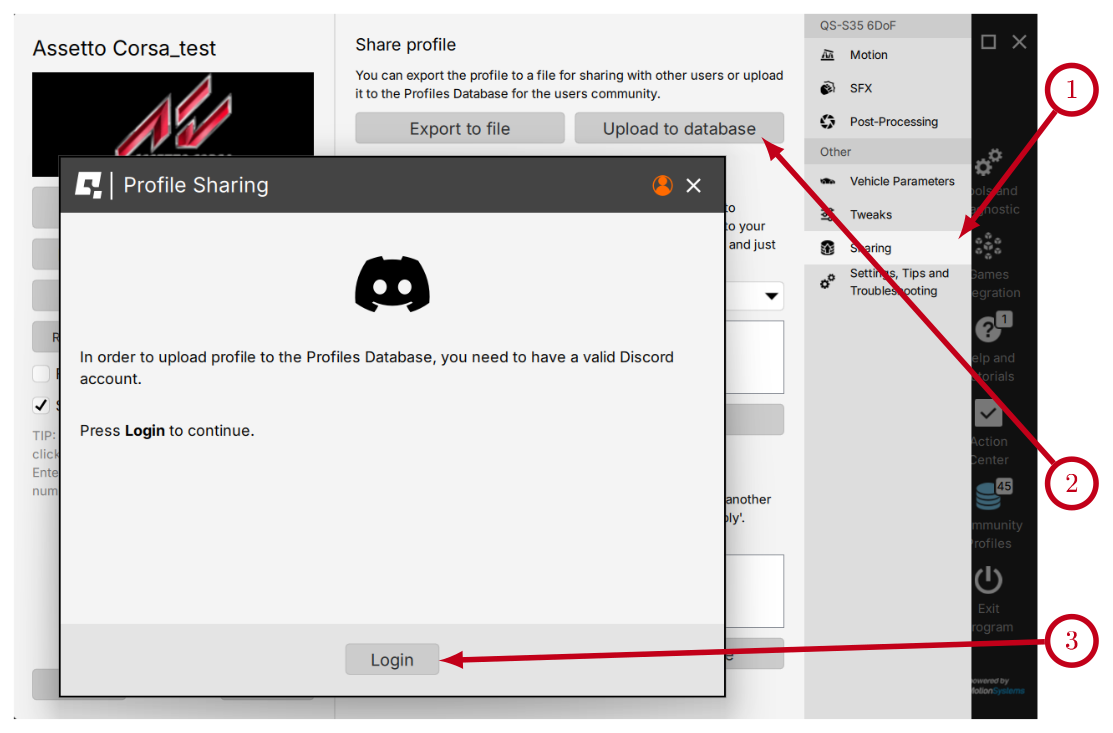
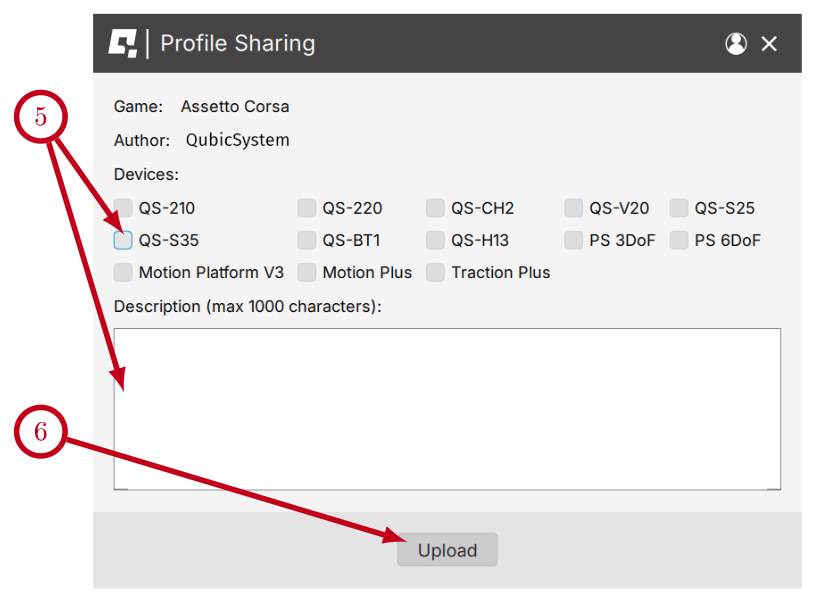


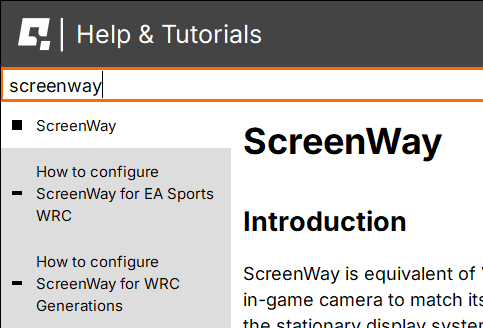

 Solution long-term #2: This issue is caused by graphics drivers. Try to downgrade to a previous version of graphics drivers or check for updates.